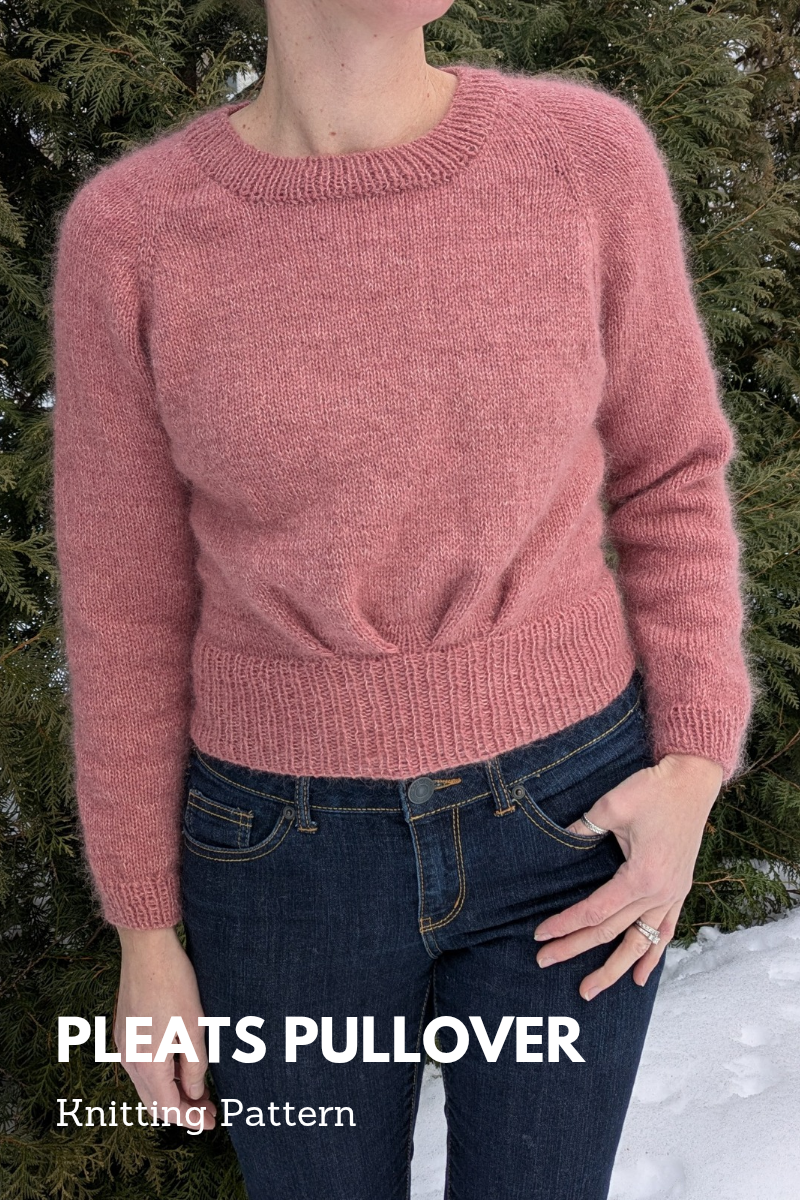
Posted on

Knitting Pattern: Streamline Cardigan

A classic cardigan with a smooth i-cord edge

Skill Level: Advanced Beginner


Find a printer-friendly, PDF version of the Streamline Cardigan below!

Sizing

The pattern is designed to have 2-3 inches of positive ease. Select a size based on your actual bust width plus the 2-3 inches of positive ease, totaling the bust width in (A).

(A) Bust Width:

32 (36.5, 40, 44, 48) (52, 56.5, 60.5, 64.5) inches or  81 (93, 102, 112, 122) (132, 144, 154, 164) cm

(B) Sleeve Length:

19.5 (19.5, 20.5, 20.5, 21) (21, 21, 21, 22) inches or 50 (50, 52, 52, 53) (53, 53, 53, 56) cm

(C) Total Length:

21 (21, 21, 21, 21) (21, 21, 21, 21) inches or 53 (53, 53, 53, 53) (53, 53, 53, 53) cm

(D) Yoke Length:

8.5 (9, 9.5, 10, 10.5) (11, 11.5, 12, 12.5) inches or 22 (23, 24, 25, 27) (28, 29, 30, 32) cm

(E) Waist Length:

12.5 (12, 11.5, 11, 10.5) (10, 9.5, 9, 8.5) inches or 32 (30, 29, 28, 27) (25, 24, 23, 22) cm

(F) Upper Sleeve Width:

12.5 (13.5, 14, 15, 16.5) (18.5, 20, 21.5, 22.5) inches or 32 (34, 36, 38, 42) (47, 51, 55, 57) cm

GAUGE

18 sts x 24 rows = 4” (10 cm) in stockinette stitch on larger needles with three listed yarns held together

NOTIONS

Stitch markers

Scrap yarn

7, ½ inch (1.27 cm) buttons

SUGGESTED NEEDLES

Size 5 (US), 3.75 mm circular needles

Size 5 (US), 3.75 mm double pointed needles or small circular needles

Size 3 (US), 3.25 mm circular needles

Size 3 (US), 3.25 mm double pointed needles or small circular needles

SUGGESTED YARN

4 (5, 5, 5, 5) (6, 6, 7, 7) skeins Hobbii Alpaca Silk in Pearl Beach, or 658 (734, 803, 874, 966) (1061, 1150, 1234, 1331) yards or 602 (671, 734, 799, 883) (970, 1052, 1128, 1217) meters of fingering weight yarn

2 (2, 2, 2, 3) (3, 3, 3, 4) skeins Hobbii Soft Alpaca Lace in Beach Pebbles, or 658 (734, 803, 874, 966) (1061, 1150, 1234, 1331) yards or 602 (671, 734, 799, 883) (970, 1052, 1128, 1217) meters of lace weight yarn

2 (2, 2, 2, 3) (3, 3, 3, 4) skeins Hobbii Soft Alpaca Lace in Ecru Natural, or 658 (734, 803, 874, 966) (1061, 1150, 1234, 1331) yards or 602 (671, 734, 799, 883) (970, 1052, 1128, 1217) meters of lace weight yarn

If you would like to use one strand of yarn, instead of three strands held together, select a sport or DK weight yarn that achieves gauge and uses the same yardage as the Hobbii Alpaca Silk yarn listed above.

STITCH ABBREVIATIONS

BO – bind off

BOR – beginning of round

CO – cast on

K – knit

KFB – knit into the front and the back of the next stitch (increase)

K2tog – knit two stitches together (decrease)

M1L – pick up the bar between the stitch you knit and the one you’re about to knit, bringing the needle from front to back, and knit into the back of the stitch (increase)

M1R – pick up the bar between the last stitch you knit and the one you’re about to knit, bringing the needle from the back to the front, and knit into the front of the stitch (increase)

P – purl

PFB – purl into the front and the back of the next stitch (increase)

PM – place marker

R(d) – row (round)

RS – right side

Sl – slip the next stitch purlwise with the yarn held in the front

SM – slip marker

SSK – slip unworked stitch from left needle to right needle knitwise. Slip a second unworked stitch from the left needle to the right needle knitwise. Slip those two unworked stitches separately back to the left needle purlwise. Knit those two stitches together in the back of the stitches (decrease).

St(s) – stitch(es)

WS – wrong side

Pattern Notes

This raglan sweater is worked flat with the three listed yarns held together throughout, and from the top down. You first work an i-cord cast on edge, casting on two separate sections, each equal to half of the collar stitches and worked individually for the cast on. The first collar section is worked as a RS-facing panel with K sts, and the second collar section is worked as a WS-facing panel with P sts. The two panels are joined together in the first row after the cast on, being sure to have the WS of both panels facing for the first row after the cast on. This ensures you have a rolled i-cord edge on either side of the collar and the CO sts for both panels are touching at the nape of the neck.

You work the yoke, which includes a front and a back body panel and the beginning of two sleeve panels. When your yoke is long enough to reach your armpits, you separate the sleeve panels from the body panels, holding the sleeve stitches on scrap yarn and joining the body panels to finish the body of the sweater down to the waist. You work buttonholes into the body after the sleeve separation. The entire length of the cardigan edge is worked with an i-cord edge for a flush look.

When you finish the body, you work each sleeve individually. You finish by picking up stitches along the length of the collar and body panels to work a button band, including buttonhole placement.

Stitch counts and round counts are indicated for each size based on the following size order: XS (S, M, L, XL) (2XL, 3XL, 4XL, 5XL). It is recommended that you highlight the stitch and round counts for your size before beginning to knit.

Stitches that appear between * and * should be worked until the end, unless otherwise indicated.

It is recommended you check your gauge on both the circular needles and double pointed needles (or small circular needles) to ensure your tension is the same. Adjust your needle size as necessary to obtain gauge.

INSTRUCTIONS

Collar Cast On:

Using the i-cord cast on and the larger needles, CO 36 (35, 37, 41, 43) (48, 48, 50, 51) sts. You can follow this tutorial from VeryPink Knits, or the following instructions to work an i-cord cast on. CO 3 sts, slip your working stitches from the right needle to the left needle. Making sure the working yarn is coming from the left most stitch on the left needle, KFB, K2, *slip the first 3 sts on your right needle to the left needle, KFB, K2.* Repeat from * to * until you have 36 (35, 37, 41, 43) (48, 48, 50, 51) sts. Cut yarn and hold these sts aside.

Using the i-cord cast on, CO 35 (35, 36, 41, 42) (48, 48, 50, 50) sts using the following instructions: CO 3 sts, slip your working stitches from the right needle to the left needle, making sure the working yarn is coming from the left most stitch on the left needle, PFB, P2, *slip the first 3 sts on your right needle to the left needle, PFB, P2.* Repeat from * to * until you have 35 (35, 36, 41, 42) (48, 48, 50, 50) sts. Cut yarn.

Turn your work so the RS is facing on both cast on edges, with the edges of each panel where you CO 3 sts to start are touching each other. The panels should be positioned on your needles so you begin to work the second panel then continue to work across and join the first panel.

(Set up Row 1): K5 (5, 5, 5, 5) (5, 5, 5, 5), PM, 14 (12, 12, 12, 12) (20, 20, 20, 20), PM, 33 (36, 39, 48, 51) (46, 46, 50, 51), PM, 14 (12, 12, 12, 12) (20, 20, 20, 20), PM, K5 (5, 5, 5, 5) (5, 5, 5, 5).

(Set up Row 2): Sl 2, P across to last 2 sts, sl 2.

Yoke Increases:

For Sizes 2XL (3XL, 4XL, 5XL) ONLY:

R1: K2, M1L, K to 2 sts before marker, M1R, K1, M1R, K1, SM, K1, M1L, K to 1 st before marker, M1R, K1, SM, K1, M1L, K1, M1L, K to 2 sts before marker, M1R, K1, M1R, K1, SM, K1, M1L, K to 1 st before marker, M1R, K1, SM, K1, M1L, K1, M1L until last 2 sts, M1R, K2. (14 sts increased).

R2: Sl 2, P across to last 2 sts, sl 2.

Repeat R1-2 an additional – (-, -, -, -) (4, 5, 5, 6) times for a total of – (-, -, -, -) (5, 6, 6, 7) repeats. You will now have – (-, -, -, -,) (166, 180, 184, 199) sts distributed as follows:

Right Front Panel: – (-, -, -, -,) (20, 23, 23, 26) sts

Sleeve A: – (-, -, -, -,) (30, 32, 32, 34) sts

Back Panel: – (-, -, -, -,) (66, 70, 74, 79) sts

Sleeve B: – (-, -, -, -,) (30, 32, 32, 34) sts

Left Front Panel: – (-, -, -, -,) (20, 23, 23, 26) sts

For Sizes ALL SIZES:

R3: K2, M1L, K to 1 st before marker, M1R, K1, SM, *K1, M1L, K to 1 st before marker, M1R, K1, SM* until last marker, K1, M1L, until last 2 sts, M1R, K2. (10 sts increased).

R4: Sl 2, P across to last 2 sts, sl 2.

Repeat R3-4 an additional 8 (10, 12, 13, 14) (9, 10, 11, 11) times for a total of 9 (11, 13, 14, 15) (10, 11, 12, 12) repeats. You will now have 161 (180, 203, 222, 235) (266, 290, 304, 319) sts distributed as follows:

Right Front Panel: 23 (27, 31, 33, 35) (40, 45, 47, 50) sts

Sleeve A: 32 (34, 38, 40, 42) (50, 54, 56, 58) sts

Back Panel: 51 (58, 65, 76, 81) (86, 92, 98, 103) sts

Sleeve B: 32 (34, 38, 40, 42) (50, 54, 56, 58) sts

Left Front Panel: 23 (27, 31, 33, 35) (40, 45, 47, 50) sts

R5: K to 1 st before marker, M1R, K1, SM, *K1, M1L, K to 1 st before marker, M1R, K1, SM* until last marker, K1, M1L, K until end. (8 sts increased).

R6: Sl 2, P across to last 2 sts, sl 2.

Repeat R5-6 an additional 10 (10, 10, 11, 13) (14, 15, 17, 18) times for a total of 11 (11, 11, 12, 14) (15, 16, 18, 19) repeats. You will now have 249 (268, 291, 318, 347) (386, 418, 448, 471) sts distributed as follows:

Right Front Panel: 34 (38, 42, 45, 49) (55, 61, 65, 69) sts

Sleeve A: 54 (56, 60, 64, 70) (80, 86, 92, 96) sts

Back Panel: 73 (80, 87, 100, 109) (116, 124, 134, 141) sts

Sleeve B: 54 (56, 60, 64, 70) (80, 86, 92, 96) sts

Left Front Panel: 34 (38, 42, 45, 49) (55, 61, 65, 69) sts

R7: K across

R8: Sl 2, P across to last 2 sts, sl 2.

Repeat R7-8 an additional 4 (4, 3, 3) (2, 2, 0, 0) times, or until you reach your desired body length before the sleeve separation.

Try on your piece. The length should fall just below your armpits, where you can comfortably pinch together either side of a sleeve panel under your arms. If it is too short, work Rows 7-8 until you reach your desired length.

Separate Sleeve and Body Sections:

R12: K across 34 (38, 42, 45, 49) (55, 61, 65, 69) sts, remove marker, place 54 (56, 60, 64, 70) (80, 86, 92, 96) sts onto scrap yarn, remove marker, CO 2 (4, 4, 4, 4) (4, 4, 4, 6) sts, K across 73 (80, 87, 100, 109) (116, 124, 134, 141) sts, remove marker, place 54 (56, 60, 64, 70) (80, 86, 92, 96) sts onto scrap yarn, remove marker, CO 2 (4, 4, 4, 4) (4, 4, 4, 6) sts, K across 34 (38, 42, 45, 49) (55, 61, 65, 69) sts. You will now have 145 (164, 179, 198, 215) (234, 254, 272, 291) sts on your needles, not counting the sleeve sts on the scrap yarn.

Body:

R13: Sl 2, P across to last 2 sts, sl 2.

R14: K across

R15: Sl 2, P across to last 2 sts, sl 2.

If you would like to add length to the cardigan from the suggested measurements, continue working R14-15 until you added the desired additional length.

Buttonhole Rows:

R16: K until last 5 sts, BO 1, K to end.

R17: Sl 2, P2, CO 1, P to last 2 sts, sl 2.

Repeat R14-15 a total of 4 (4, 4, 4, 3) (3, 3, 3, 2) times, then work R16-17. Repeat this section until you have worked 7 buttonholes.

In R18, you will need to work 3 (2, 1, 0, 1) (0, 0, 2, 1) decrease(s) using K2tog to get a stitch count that is divisible by 4 plus 2 sts. Switch to the smaller needles.

R18: *K2, P2* until last 2 sts, K2.

R19: *P2, K2* until last 2 sts, P2.

Repeat R18-19 an additional 2 times. Bind off using the tubular bind off.

Sleeves:

(Set up Round): Remove 54 (56, 60, 64, 70) (80, 86, 92, 96) sts from scrap yarn and distribute evenly along double pointed needles or small circular needles. Find the bottom of the armpit (where you cast on sts at the sleeve separation), and pick up 2 (4, 4, 4, 4) (4, 4, 4, 6) sts. PM in the middle of the picked up sts at the bottom of the armpit to mark the BOR.

Rds 1-7 (6, 5, 4, 4) (3, 3, 2, 2): K across

Rd 8 (7, 6, 5, 5) (4, 4, 3, 3): K1, K2tog, K until 3 sts before end, SSK, K1

Repeat Rds 1-8 (7, 6, 5, 5) (4, 4, 3, 3) an additional 11 (13, 15, 17, 19) (24, 27, 29, 32) times. You will now have 32 (32, 32, 32, 34) (34, 34, 36, 36) sts.

Repeat Rd1 for 9 (7, 14, 20, 15) (15, 3, 25, 21) repeats, or until you reach your desired length. Use the i-cord bind off method to bind off.

Repeat for second sleeve.

Weave in ends using a tapestry needle. Sew the CO sts of the collar at the nape of the neck together. Attach buttons on the left side of the button band, opposite the BO holes made. Block your garment.

THANK YOU!

Posted on

Knitting Pattern: Classic Striped Pullover

A top down raglan sweater with colorful contrasting stripes

Skill Level: Advanced Beginner


Find a printer-friendly, PDF version of the Classic Striped Pullover below!

SIZING

The pattern is designed to have 2-3 inches of positive ease. Select a size based on your actual bust width plus the 2-3 inches of positive ease, totaling the bust width in (A).

(A) Bust Width:

33 (36, 40.5, 44.5, 49) (52, 56.5, 60.5, 64) inches or 84 (91, 103, 113, 124) (132, 144, 154, 163) cm

(B) Sleeve Length:

19 (20, 20, 20, 20) (21, 21, 21, 21) inches or 48 (51, 51, 51, 51) (53, 53, 53, 53) cm

(C) Total Length:

25 (25, 24.5, 25, 24.5) (24.5, 24.5, 24.5, 24.5) inches or 64 (64, 62, 64, 62) (62, 62, 62, 62) cm

(D) Yoke Length:

8.5 (9, 8.5, 10, 11) (10.5, 12, 12.5, 13) inches or 22 (23, 22, 25, 28) (27, 30, 32, 33) cm

(E) Waist Length:

16.5 (16, 16, 15, 13.5) (14, 12.5, 12, 11.5) inches or 42 (41, 41, 38, 34) (36, 32, 30, 29) cm

(F) Upper Sleeve Width:

12.5 (13, 14, 15, 16.5) (18, 20, 21.5, 22.5) inches or 32 (33, 36, 38, 42) (46, 51, 55, 57) cm

GAUGE

19 sts x 16 rows = 4 inches (10 cm) in stockinette stitch

SUGGESTED NEEDLES

Size 4 (US), 3.5 mm circular needles

Size 4 (US), 3.5 mm double pointed needles or small circular needles

NOTIONS

Stitch markers

Scrap yarn

Tapestry needle

SUGGESTED YARN

1 skein Knit Picks Upcycle Alpaca Blend Sport in Sandalwood (A1)

1 skein Knit Picks Upcycle Alpaca Blend Sport in Seashell (A2)

1 skein Knit Picks Upcycle Alpaca Blend Sport in Hazelnut (A3)

1 skein Knit Picks Upcycle Alpaca Blend Sport in Salmon (A4)

1 skein Knit Picks Upcycle Alpaca Blend Sport in Squirrel (B1)

1 skein Knit Picks Upcycle Alpaca Blend Sport in Currant (B2)

1 skein Knit Picks Upcycle Alpaca Blend Sport in Space (B3)

Yarn Substitution: substitute with your favorite sport weight yarn, or similar weight that gets you gauge, so long as each color has at least 109 (123, 135, 150, 162) (178, 191, 205, 218) yards or 100 (112, 123, 137, 148) (163, 175, 187, 199) meters.

STITCH ABBREVIATIONS

BO – bind off

BOR – beginning of round

CC – contrast color

CO – cast on

K – knit

K2tog – knit two stitches together (decrease)

KFB – knit into the front and the back of the next stitch (increase)

M1L – pick up the bar between the stitch you knit and the one you’re about to knit, bringing the needle from front to back, and knit into the back of the stitch (increase)

M1R – pick up the bar between the last stitch you knit and the one you’re about to knit, bringing the needle from the back to the front, and knit into the front of the stitch (increase)

MC – main color

P – purl

PM – place marker

Rd(s) – round(s)

RS – right side

SM – slip marker

SSK – slip unworked stitch from left needle to right needle knitwise. Slip a second unworked stitch from the left needle to the right needle knitwise. Slip those two unworked stitches separately back to the left needle purlwise. Knit those two stitches together in the back of the stitches (decrease)

St(s) – stitch(es)

WS – wrong side

PATTERN NOTES

This raglan yoke sweater is knit from the top down and flat for the beginning of the yoke, then joined and knit in the round. You first work the yoke, which includes a front and a back body panel and the beginning of two sleeve panels. When your yoke is long enough to reach your armpits, you separate the sleeve panels from the body panels, holding the sleeve stitches on scrap yarn and joining the body panels to finish the body of the sweater down to the waist. Then, you pick up stitches along the cast on edge to knit the collar. You end by working each sleeve individually.

The pattern is worked by alternating between the A colors and the B colors, working them in the listed number order for each A or B section. Each stripe is worked across 6 rows/rounds, then you change to the next color. For illustrative purposes, begin working the stripe sections as follows: A1, B1, A2, B2, A3, B3, A4, B1, A1, B2, A2, B3, etc.

Stitch counts and round counts are indicated for each size based on the following size order: XS (S, M, L, XL) (2XL, 3XL, 4XL, 5XL). It is recommended that you highlight the stitch and round counts for your size before beginning to knit.

Stitches that appear between * and * should be worked until the end, unless otherwise indicated.

It is recommended you check your gauge on both the circular needles and double pointed needles (or small circular needles) to ensure your tension is the same. Adjust your needle size as necessary to obtain gauge.

INSTRUCTIONS

Yoke Increases (Worked Flat):

Using long tail cast on and beginning with color B1 in the color order, CO 60 (60, 62, 64, 68) (72, 72, 74, 74) sts. P across the first row. Note: color A1 is reserved for the Collar pick up section.

R1: K3 (3, 3, 3, 3) (3, 3, 3, 3), PM, K12 (10, 10, 10, 12) (14, 14, 14, 14), PM, K30 (34, 36, 38, 38) (38, 38, 40, 40), PM, K12 (10, 10, 10, 12) (14, 14, 14, 14), PM, K3 (3, 3, 3, 3) (3, 3, 3, 3).

R2: P across

For Sizes XS (S, M, L) ONLY:

R3: *K1, M1L, K until 1 st before marker, M1R, K1, SM* until last marker section, K1, M1L, K until 1 st before end, M1R, K1. (10 sts increased)

R4: P across

Repeat R3-4 an additional 6 (7, 8, 9, -) (-, -, -, –) times for a total of 7 (8, 9, 10, -) (-, -, -, –) repeats. Repeat R3 one more time and do not turn your work. You will now have 130 (140, 152, 164, -) (-, -, -, –) sts distributed as follows:

Right Front Panel: 17 (19, 21, 23, -) (-, -, -, –) sts

Sleeve A: 26 (26, 28, 30, -) (-, -, -, –) sts

Back Panel: 44 (50, 54, 58, -) (-, -, -, –) sts

Sleeve B: 26 (26, 28, 30, -) (-, -, -, –) sts

Left Front Panel: 17 (19, 21, 23, -) (-, -, -, –) sts

For Sizes XL (2XL, 3XL, 4XL, 5XL) ONLY:

R3: K1, KFB, K until 2 sts before marker, M1R, K1, M1R, K1, SM, *K1, M1L, K1, M1L, K until 2 sts before marker, M1R, K1, M1R, K1, SM* until last marker section, K1, M1L, K1, M1L, K until 2 sts before end, KFB, K1. (14 sts increased).

R4: P across

Repeat R3-4 an additional – (-, -, -, 5) (6, 6, 7, 9) times for a total of – (-, -, -, 6) (7, 7, 8, 10) repeats. Repeat R3 one more time and do not turn your work. You will now have – (-, -, -, 152) (170, 170, 186, 214) distributed as follows:

Right Front Panel: – (-, -, -, 24) (28, 28, 30, 34) sts

Sleeve A: – (-, -, -, 24) (28, 28, 30, 34) sts

Back Panel: – (-, -, -, 62) (66, 66, 72, 80) sts

Sleeve B: – (-, -, -, 24) (28, 28, 30, 34) sts

Left Front Panel: – (-, -, -, 24) (28, 28, 30, 34) sts

For ALL Sizes:

Yoke Increases (Worked in the Round):

You will begin working in the round. Using the backwards loop cast on method, CO 10 (12, 12, 12, 20) (18, 18, 18, 14) sts on your right needle and K across to the first marker to join the round. This marker now becomes your BOR.

Rd 7: *K1, M1L, K until 1 st before marker, M1R, K1, SM.* (8 sts increased)

Rd 8: K across

Repeat Rds 7-8 an additional 14 (15, 16, 18, 24) (26, 31, 32, 32) times for a total of 15 (16, 17, 19, 25) (27, 32, 33, 33) repeats. You will now have 260 (280, 300, 328, 372) (404, 444, 468, 492) sts distributed as follows:

Sleeve A: 56 (58, 62, 68, 74) (82, 92, 96, 100) sts

Back Panel: 74 (82, 88, 96, 112) (120, 130, 138, 146) sts

Sleeve B: 56 (58, 62, 68, 74) (82, 92, 96, 100) sts

Front Panel: 74 (82, 88, 96, 112) (120, 130, 138, 146) sts

For Sizes M (L) ONLY:

Rd 9: *K to marker, SM, *K1, M1L, K until 1 st before marker, M1R, K1, SM.* (4 sts increased)

Rd 10: K across

Repeat Rds 9-10 an additional – (-, 1, 2, -) (-, -, -, –) times for a total of – (-, 2, 3, -) (-, -, -, –) repeats. You will now have – (-, 308, 340, -) (-, -, -, –) sts distributed as follows:

Sleeve A: – (-, 62, 68, -) (-, -, -, –) sts

Back Panel: – (-, 92, 102, -) (-, -, -, –) sts

Sleeve B: – (-, 62, 68, -) (-, -, -, –) sts

Front Panel: – (-, 92, 102, -) (-, -, -, –) sts

For Sizes XS (S, M, L, XL, 2XL) ONLY:

Rd 11: K across

Repeat Rd 11 a total of 10 (9, 4, -, 10) (2, -, -, -) repeats.

For ALL Sizes:

Try on your piece. The length should fall just below your armpits, where you can comfortably pinch together either side of a sleeve panel under your arms. If it is too short, work Rd 11 until you reach your desired length.

Separate Sleeves from Body:

Rd 12 (Set up Round): Place 56 (58, 62, 68, 74) (82, 92, 96, 100) sts on scrap yarn or stitch holder to save for later, CO 2 (2, 2, 2, 2) (2, 2, 3, 3) sts, place marker for the new BOR, CO 2 (2, 2, 2, 2) (2, 2, 3, 3), K across 74 (82, 92, 102, 112) (120, 130, 138, 146) sts, place 56 (58, 62, 68, 74) (82, 92, 96, 100) sts on scrap yarn or stitch holder to save for later, CO 4 (4, 4, 4, 4) (4, 4, 6, 6) sts, K across 66 (74, 84, 94, 120) (130, 138, 148, 159) sts. You will now have 156 (172, 192, 212, 232) (248, 268, 288, 304) sts on your needles, not counting the sleeve sts on the scrap yarn.

Body:

Rd 13: K across

Repeat Rd 13 a total of 96 (93, 94, 86, 78) (82, 72, 68, 64) times, or until you reach 1 inch less than your desired length.

Rd 14-23: Using Color A1 only, *K1, P1*

Bind off using the tubular bind off in ribbing pattern.

Collar:

Using the circular needle and color A1, pick up and knit 98 (104, 110, 116, 100) (104, 104, 108, 108) sts along the collar and begin working in the round.

Rd 1-10: *K1, P1*

Bind off using the tubular bind off in ribbing pattern.

Sleeves:

(Set up Round): Remove 56 (58, 62, 68, 74) (82, 92, 96, 100) sts from scrap yarn and distribute evenly along double pointed needles or small circular needles. Find the bottom of the armpit (where you cast on sts at the sleeve separation), and pick up 4 (4, 4, 4, 4) (4, 4, 6, 6) sts. PM in the middle of the picked up sts at the bottom of the armpit to mark the BOR.

Rd 1-7 (7, 6, 5, 4) (4, 3, 3, 2): K across

Rd 8 (8, 7, 6, 5) (5, 4, 4, 3): K2tog, K until 2 sts before end, SSK.

Repeat Rds 1-8 (8, 7, 6, 5) (5, 4, 4, 3) for a total of 13 (14, 16, 19, 21) (25, 30, 32, 34) repeats. You will now have 34 (34, 34, 34, 36) (36, 36, 38, 38) sts.

Repeat Rd1 for a total of 10 (8, 8, 6, 15) (1, 6, -, 24) repeats, or until you reach 1 inch less than your desired length.

Rd 9-18: Using Color A1 only, *K1, P1*

Bind off using the tubular bind off in ribbing pattern. Repeat for second sleeve. Weave in ends using a tapestry needle. Block your garment.

THANK YOU!

I hope you enjoyed making the Classic Striped Pullover as much as I did! Tag me on Instagram @knitabitcrochetaway and use #knitabitcrochetaway and #ClassicStripedPullover – I’d love to see your progress and finished product!

Posted on

Knitting Pattern: Pathways Sweater

A circular yoke sweater with a simple colorwork pattern

Skill Level: Advanced Beginner


Find a printer-friendly, PDF version of the Pathways Sweater below!

SIZING

The pattern is designed to have 3 inches of positive ease. Select a size based on your actual bust width plus the 3 inches of positive ease, totaling the bust width in (A).

(A) Bust Width:

32 (36, 40, 44, 48) (52, 56, 60, 64) inches or 81.5 (91.5, 101.5, 112, 122) (132, 142, 152.5, 162.5) cm

(B) Sleeve Length:

21 (21.5, 21.5, 22, 22) (22.5, 22.5, 23, 23) inches or 53.5 (54.5, 54.5, 56, 56) (57, 57, 58.5, 58.5) cm

(C) Total Length:

20.5 (21, 22, 22, 22) (22.5, 23, 23, 22.5) inches or 52 (53.5, 56, 56, 56) (57, 58.5, 58.5, 57) cm

(D) Yoke Length:

8 (8.5, 9.5, 10, 10) (10.5, 11.5, 12, 12) inches or 20.5 (21.5, 24, 25.5, 25.5) (26.5, 29, 30.5, 30.5) cm

(E) Waist Length:

12.5 (12.5, 12.5, 12, 12) (12, 11.5, 11, 10.5) inches or 32 (32, 32, 30.5, 30.5) (30.5, 29, 28, 26.5) cm

(F) Upper Sleeve Width:

13 (13.5, 14, 15, 16.5) (18.5, 20.5, 21.5, 22.5) inches or 33 (34.5, 35.5, 38, 42) (47, 52, 54.5, 57) cm

GAUGE

15 sts x 22 rows = 4 inches (10 cm) in stockinette stitch using size 10 (US), 6.0 mm needles

NOTIONS

Stitch markers

Scrap yarn

Tapestry needle

SUGGESTED NEEDLES

Size 9 (US), 5.5 mm circular needles

Size 9 (US), 5.5 mm double pointed needles or small circular needles

Size 10 (US), 6.0 mm circular needles

Size 10 (US), 6.0 mm double pointed needles or small circular needles

SUGGESTED YARN

3 (4, 4, 5, 5) (5, 6, 6, 7) skeins Knit Picks Simply Wool Worsted in Winnie (MC) or 571 (634, 704, 773, 846) (950, 1049, 1124, 1175) yards or 522 (580, 644, 707, 774) (869, 959, 1028, 1074) meters of worsted weight yarn

1 (1, 1, 1, 1) (1, 1, 1, 1) skeins Classic Elite Yarns Wildwood in Beaver (CC) or 67 (74, 83, 91, 99) (111, 123, 132, 138) yards or 61 (68, 76, 83, 91) (101, 112, 121, 126) meters of worsted weight yarn with a thick and thin or boucle texture

STITCH ABBREVIATIONS

BO – bind off

BOR – beginning of round

CC – contrast color

CO – cast on

K – knit

K2tog – knit two stitches together (decrease)

M1L – pick up the bar between the stitch you knit and the one you’re about to knit, bringing the needle from front to back, and knit into the back of the stitch

MC – main color

P – purl

PM – place marker

Rd(s) – round(s)

RS – right side

Sl – slip

SSK – slip unworked stitch from left needle to right needle knitwise. Slip a second unworked stitch from the left needle to the right needle knitwise. Slip those two unworked stitches separately back to the left needle purlwise. Knit those two stitches together in the back of the stitches (decrease)

St(s) – stitch(es)

SM – slip marker

Wrp-tk – with the yarn in the back, slip the next stitch purl wise, bring the yarn to the front, slip the stitch from the right needle back to the left needle, turn

Wrp-tp – with the yarn in the front, slip the next stitch purl wise, bring the yarn to the back, slip the stitch from the right needle back to the left needle, turn

WS – wrong side

YO – yarn over; bring the working yarn to the front of your work and bring it over the top of the right needle

Pattern Notes

This circular yoke sweater is knit in the round and from the top down, beginning with a close fitting neckline you cast on. Before starting the yoke increases, you work short rows on the back panel so the sweater sits nicely on your torso. Work the short rows back and forth as indicated, leaving the remaining stitches unworked until the short rows are complete. On your first round after the short rows, be sure to pick up your wraps (helpful video tutorial from VeryPink Knits available here).

Then, you work the yoke using corrugated ribbing, which includes a front and a back body panel and the beginning of two sleeve panels. When your yoke is long enough to reach your armpits, you separate the sleeve panels from the body panels, holding the sleeve stitches on scrap yarn. At the sleeve separation round, you will cut the yarn and the first sts after the BOR are half of the sleeve stitches for one sleeve panel to hold on scrap yarn. The other half of the sleeve stitches for that same sleeve panel are held on the same scrap yarn and are at the end of the round. The sleeve sts for one of the sleeve panels are split in half on either side of the BOR to ensure the short row shaping sits in the center of the back.

You will join the body panels on the sleeve separation round, then finish the body of the sweater down to the waist. The pattern includes optional bust darts, including suggested spacing for each size and a description to customize bust darts based on your own measurements. (Note: the sweater in the modeled picture does not feature bust darts.) You then work each sleeve individually and in the round. You finish by picking up stitches at the neckline and working an i-cord bind off for the collar.

Stitch counts and round counts are indicated for each size based on the following size order: XS (S, M, L, XL) (2XL, 3XL, 4XL, 5XL). It is recommended that you highlight the stitch and round counts for your size before beginning to knit.

Stitches that appear between * and * should be worked until the end, unless otherwise indicated.

It is recommended you check your gauge on both the circular needles and double pointed needles (or small circular needles) to ensure your tension is the same. Adjust your needle size as necessary to obtain gauge.

INSTRUCTIONS

Collar:

Using long tail cast on and larger needles, CO 64 (66, 70, 76, 78) (88, 90, 86, 88) sts. PM for BOR and begin working in the round.

Rd 1: K

Short Rows:

Rd 2: (set up round) K32 (33, 35, 38, 39) (44, 45, 43, 44), PM, K to end

R1: K to 3 sts before marker, wrp-tk, turn

R2: P to 3 sts before marker, wrp-tp, turn

R3: K to 3 sts before last wrapped stitch, wrp-tk, turn

R4: P to 3 sts before last wrapped stitch, wrp-tp, turn

Repeat R3-4 one additional time. Knit to BOR. Begin working in the round again and remove the short row marker on your next round. When you work a wrapped stitch for the first time on the next round, pick up the wrap and knit it together with the live stitch.

Yoke Increases:

Rd 3: *K1 in MC, K1 in CC*

Rd 4: *K1 in MC, P1 in CC*

Rd 5: In MC, K to end

Rd 6: In MC, *K2, M1L.* You will now have 96 (99, 105, 114, 117) (132, 135, 129, 132) sts.

Rd 7: *K1 in MC, K1 in CC*

Rd 8-9: *K1 in MC, P1 in CC*

Rd 10: In MC, K to end

Rd 11: In MC, *K3, M1L.* You will now have 128 (132, 140, 152, 156) (176, 180, 172, 176) sts.

Rd 12: *K1 in MC, K1 in CC*

Rd 13-15: *K1 in MC, P1 in CC*

Rd 16: In MC, K to end

Rd 17: In MC, *K4, M1L.* You will now have 160 (165, 175, 190, 195) (220, 225, 215, 220) sts.

Rd 18: *K1 in MC, K1 in CC*

Rd 19-22: *K1 in MC, P1 in CC*

Rd 23: In MC, K to end

Rd 24: In MC, *K5, M1L.* You will now have 192 (198, 210, 228, 234) (264, 270, 258, 264) sts.

Rd 25: *K1 in MC, K1 in CC*

Rd 26-30: *K1 in MC, P1 in CC*

Rd 31: In MC, K to end

Rd 32: In MC, *K12 (7, 6, 5, 4) (5, 3, 2, 2), M1L* until you have 0 (2, 0, 3, 2) (4, 0, 0, 0) sts remaining, K until end. You will now have 208 (226, 245, 273, 292) (316, 360, 387, 396) sts.

Rd 33: *K1 in MC, K1 in CC*

Rd 34-39: *K1 in MC, P1 in CC*

Rd 40: In MC, K to end

Repeat Rd 40 for a total of 7 (10, 13, 16, 18) (20, 24, 27, 29) repeats.

Try on your piece. The length should fall just below your armpits, where you can comfortably pinch together either side of a sleeve panel under your arms. If it is too short, continue working K rounds until you reach the described length. Cut yarn and join again for the next round.

Separate Sleeves from Body:

Rd 41 (Set up Round): Place 23 (24, 25, 27, 29) (33, 36, 38, 40) sts on scrap yarn or stitch holder to save for later, CO 1 (1, 1, 1, 2) (2, 2, 2, 2) sts, PM for the new BOR, CO 1 (1, 1, 1, 2) (2, 2, 2, 2) sts, K across 58 (65, 73, 83, 88) (92, 108, 118, 118) sts, place 46 (48, 50, 54, 58) (66, 72, 76, 80) sts on scrap yarn or stitch holder to save for later, CO 1 (1, 1, 1, 2) (2, 2, 2, 2) sts, PM, CO 1 (1, 1, 1, 2) (2, 2, 2, 2) sts, K across 58 (65, 73, 83, 88) (92, 108, 118, 118) sts, place remaining 23 (24, 25, 27, 29) (33, 36, 38, 40) sts on the same scrap yarn or stitch holder as the sts from the beginning of the round. You will now have 120 (134, 149, 169, 184) (192, 224, 243, 244) sts on your needles, not counting the sleeve sts on the scrap yarn.

Body with Bust Darts: (Optional)

Use this section if you would like to add bust darts to your sweater and make it more form fitting at the waist. For instructions on how to calculate and customize the bust darts to your particular size, please see the Pattern Notes about Adding Bust Darts.

Rd 42: (setup round) K11 (14, 16, 20, 21) (23, 28, 31, 31), PM for bust dart marker, K36 (37, 41, 43, 46) (46, 52, 56, 56), PM for bust dart marker, K across to next underarm marker, SM, K across

Rd 43: K1, K2tog, K until 3 sts before bust dart marker, SSK, K1, K until next bust dart marker, SM, K1, K2tog, K until 3 sts before underarm marker, SSK, K1, SM, K across.

Rd 44: K across

Repeat Rds 43-44 an additional 4 (5, 6, 8, 8) (9, 10, 12, 13) times for a total of 5 (6, 7, 9, 9) (10, 11, 13, 14) repeats. You will now have 88 (94, 109, 129, 144) (152, 180, 191, 188) sts.

Rd 45: K across

Repeat Rd 46 a total of 52 (50, 46, 41, 40) (37, 32, 27, 23) times, or until you reach 1 inch less than your desired length.

Rd 46: Using smaller needles, *Sl1, P1*

Rd 47-52: *K1, P1*

Bind off in ribbing pattern.

Body without Bust Darts:

Rd 42: K across

Repeat Rd 43 a total of 62 (62, 60, 59, 58) (57, 54, 53, 51) times, or until you reach 1 inch less than your desired length.

For Sizes M (L, 4XL) ONLY:

Rd 43: K across until last 2 sts, K2tog

For ALL Sizes:

Rd 44: Using smaller needles, *Sl1, P1*

Rd 45-50: *K1, P1*

Bind off in ribbing pattern.

Sleeves:

(Set up Round): Remove 46 (48, 50, 54, 58) (66, 72, 76, 80) sts from scrap yarn and distribute evenly along larger double pointed needles or small circular needles. Find the bottom of the armpit (where you CO sts at the sleeve separation), and pick up 2 (2, 2, 2, 4) (4, 4, 4, 4) sts. PM in the middle of the picked up sts at the bottom of the armpit to mark the BOR.

Rd 1-7 (7, 6, 5, 4) (3, 3, 2, 2): In MC, K across

Rd 8 (8, 7, 6, 5) (4, 4, 3, 3): In MC, K1, K2tog, K until 3 sts before end, SSK, K1

Repeat Rds 1-8 (8, 7, 6, 5) (4, 4, 3, 3) an additional 10 (11, 12, 14, 16) (20, 23, 24, 26) times for a total of 11 (12, 13, 15, 17) (21, 24, 25, 27) repeats. You will now have 26 (26, 26, 26, 28) (28, 28, 30, 30) sts.

Repeat Rd1 for a total of 19 (14, 19, 23, 28) (32, 20, 43, 37) repeats, or until you reach 1 inch less than your desired length.

Rd 9: Using smaller needles, *Sl1, P1*

Rd 10-15: *K1, P1*

Bind off in ribbing pattern.

Collar:

Using smaller needles, pick up and knit 64 (66, 70, 76, 78) (88, 90, 86, 88) sts along neckline edge. Bind off using the I-Cord Bind Off (video tutorial available here) until the last 3 sts. Using a separate needle, pick up 3 sts along the edge of the CO stitches at the beginning of the round. Holding the two needles together, graft the 3 sts at the end of the round to the 3 picked up sts at the beginning of the round.

Weave in ends using a tapestry needle. Block your garment.

THANK YOU!

I hope you enjoyed making the Pathways Sweater as much as I did! Tag me on Instagram @knitabitcrochetaway and use #knitabitcrochetaway and #PathwaysSweater– I’d love to see your progress and finished product!

Posted on

Knitting Pattern: Side Cable Pullover

A raglan yoke sweater with textured cable knit sleeves

Skill Level: Intermediate


Find a printer-friendly, PDF version of the Side Cable Pullover below!

SIZING

The pattern is designed to have 2 inches of positive ease. Select a size based on your actual bust width plus the 2 inches of positive ease, totaling the bust width in (A).

(A) Bust Width: 32 (35, 39.5, 43.5, 48) (52, 54.5, 60, 63) inches or 81 (89, 100, 110, 122) (132, 138, 152, 160) cm

(B) Sleeve Length: 19 (19.5, 19.5, 20, 20) (20.5, 20.5, 21, 21) inches or 48 (50, 50, 51, 51) (52, 52, 53, 53) cm

(C) Total Length: 20 (20.5, 20.5, 21, 21.5) (21.5, 21.5, 22, 22) inches or 51 (52, 52, 53, 55) (55, 55, 56, 56) cm

(D) Yoke Length: 7.5 (8, 9, 9.5, 9.5) (10, 10.5, 11, 11.5) inches or 19 (20, 23, 24, 24) (25, 27, 28, 29) cm

(E) Waist Length: 12.5 (12.5, 11.5, 11.5, 12) (11.5, 11, 11, 10.5) inches or 32 (32, 29, 29, 30) (29, 28, 28, 27) cm

(F) Upper Sleeve Width: 12 (12.5, 13, 14, 15.5) (17, 19, 20, 21) inches or 30 (32, 33, 36, 39) (43, 48, 51, 53) cm

GAUGE

17 sts x 24 rows = 4 inches (10 cm) in stockinette stitch

NOTIONS

Stitch markers

Cable needle

Scrap yarn

Tapestry needle

SUGGESTED NEEDLES

Size 7 (US), 4.50 mm circular needles

Size 7 (US), 4.50 mm double pointed needles or small circular needles

SUGGESTED YARN

4 (4, 5, 5, 6) (6, 6, 7, 7) skeins Knitologie Swirl in Dance Party

          or 771 (848, 927, 1037, 1163) (1277, 1373, 1520, 1596) yards

          or 705 (775, 848, 948, 1063) (1168, 1255, 1390, 1459) meters of worsted weight yarn

STITCH ABBREVIATIONS

BO – bind off

BOR – beginning of round

C6B – place 6 sts onto a cable needle and hold them to the back, *K1B, P1* across 6 sts, *K1B, P1* across 6 sts held on cable needle

C6F – place 6 sts onto a cable needle and hold them to the front, *K1B, P1* across 6 sts, *K1B, P1* across 6 sts held on cable needle

CO – cast on

K – knit

K1B – (knit 1 below) insert your needle into the stitch below the next live stitch on your left needle and knit into this stitch

K2tog – knit two stitches together (decrease)

M1L – pick up the bar between the stitch you knit and the one you’re about to knit, bringing the needle from front to back, and knit into the back of the stitch (increase)

M1R – pick up the bar between the last stitch you knit and the one you’re about to knit, bringing the needle from the back to the front, and knit into the front of the stitch (increase)

P – purl

P1B – (purl 1 below) insert your needle into the stitch below the next live stitch on your left needle and purl into this stitch

PM – place marker

Rd(s) – round(s)

RS – right side

SM – slip marker

SSK – slip unworked stitch from left needle to right needle knitwise. Slip a second unworked stitch from the left needle to the right needle knitwise. Slip those two unworked stitches separately back to the left needle purlwise. Knit those two stitches together in the back of the stitches (decrease)

St(s) – stitch(es)

Wrp-tk – with the yarn in the back, slip the next stitch purl wise, bring the yarn to the front, slip the stitch from the right needle back to the left needle, turn

Wrp-tp – with the yarn in the front, slip the next stitch purl wise, bring the yarn to the back, slip the stitch from the right needle back to the left needle, turn

WS – wrong side

YO – yarn over; bring the working yarn to the front of your work and bring it over the top of the right needle

FISHERMAN’S RIB CABLE PATTERN

Worked across 24 sts

Rd 1: *K1B, P1*

Rd 2: *K1, P1B*

Rds 3, 5, 7: Repeat Rd 1

Rd 4, 6, 8: Repeat Rd 2

Rd 9: C6F, *K1B, P1*

Rd 10: Repeat Rd 2

Rd 11: *K1B, P1*

Rd 12: *K1, P1B*

Rds 13, 15, 17: Repeat Rd 1

Rd 14, 16, 18: Repeat Rd 2

Rd 19: *K1B, P1* across 12 sts, C6B

Rd 20: Repeat Rd 2

Pattern Notes

This raglan yoke sweater is knit from the top down and in the round. You first work the yoke, which includes a front and a back body panel and the beginning of two sleeve panels. The back panel includes short rows near the back neckline. When your yoke is long enough to reach your armpits, you separate the sleeve panels from the body panels, holding the sleeve stitches on scrap yarn and joining the body panels to finish the body of the sweater down to the waist. The pattern includes optional bust darts, including suggested spacing for each size and a description to customize bust darts based on your own measurements. You end by working each sleeve individually. The arm panels feature a fisherman’s rib cable pattern that carries down the entire sleeve.

Stitch counts and round counts are indicated for each size based on the following size order: XS (S, M, L, XL) (2XL, 3XL, 4XL, 5XL). It is recommended that you highlight the stitch and round counts for your size before beginning to knit.

Stitches that appear between * and * should be worked until the end, unless otherwise indicated.

It is recommended you check your gauge on both the circular needles and double pointed needles (or small circular needles) to ensure your tension is the same. Adjust your needle size as necessary to obtain gauge.

A Note About Beginning the Yoke and the Fisherman’s Rib

The ribbing for the Fisherman’s Rib should line up with the initial ribbing at the collar. The first time you work the Fisherman’s Rib, be sure to work a K/K1B into a knit stitch from the round before and a P/P1B into a purl stitch from the round before. Do not work the first cable in the Fisherman’s Rib Cable Pattern until after you have worked the Ribbing Panel Marker Placement section and have 24 sts for the arm panel between two added markers to keep the fisherman’s rib consistent in the center of the arm panel.

A Note About Sleeve Increases

When working the sleeve increases, be sure to keep the Fisherman’s Rib Cable Pattern consistent as you add stitches, and use the stitch next to it to determine whether you should work a K or a P the first time you are working a new stitch.

If the stitch in the previous round was a M1R or M1L and the Fisherman’s Rib Cable Pattern calls for you to work a K1B or P1B, just do a K or a P stitch for that round only when you are first working the new stitch.

INSTRUCTIONS

Collar:

Using long tail cast on and circular needles, CO 76 (80, 92, 100, 104) (104, 104, 112, 112) sts. PM for BOR and begin working in the round.

Rds 1-6: *K1, P1*

Short Rows:

Set up round: *K1, P1* across 12 (12, 12, 14, 18) (18, 18, 20, 20) sts, PM, K26 (28, 34, 36, 34) (34, 34, 36, 36), PM, *K1, P1* across 12 (12, 12, 14, 18) (18, 18, 20, 20) sts, PM, K26 (28, 34, 36, 34) (34, 34, 36, 36).

Turn your work so the WS is facing

R1: P to 3 sts before marker, wrp-tp, turn

R2: K to 3 sts before marker, wrp-tk, turn

R3: P to 3 sts before last wrapped stitch, wrp-tp, turn

R4: K to 4 sts before last wrapped stitch, wrp-tk, turn

Repeat R3-4 one additional time.  On the last R4, do not turn the work at the end. Begin working in the round again and K to the BOR. When you knit over the wrapped stitches, pick up the wrap and knit it together with the wrapped stitch.

Yoke Increases:

See A Note About Beginning the Yoke and the Fisherman’s Rib in the Pattern Notes

For Sizes XL (2XL, 3XL, 4XL, 5XL) ONLY:

Rd 7: *K1, M1L, Fisherman’s Rib Cable Pattern until 1 st before marker, M1R, K1, SM, K1, M1L, K1, M1L, K until 2 sts before marker, M1R, K1, M1R, K1, SM* (12 increases)

Rd 8: *K1, Fisherman’s Rib Cable Pattern until 1 st before marker, K1, SM, K across to next marker, SM*

Repeat Rd 7-8 an additional – (-, -, -, 2) (2, 2, 1, 1) times.

Ribbing Panel Marker Placement

Rd 9: *K1, PM, M1L, Fisherman’s Rib Cable Pattern until 1 st before marker, M1R, PM, K1, SM, K1, M1L, K1, M1L, K until 2 sts before marker, M1R, K1, M1R, K1, SM* (12 increases)

Rd 10: *K to marker, SM, Fisherman’s Rib Cable Pattern, SM, K to marker, SM, K to next marker, SM*

 Rd 11: *K1, M1L, K to marker, SM, Fisherman’s Rib Cable Pattern, SM, K until 1 st before marker, M1R, SM, K1, M1L, K1, M1L, K until 2 sts before marker, M1R, K1, M1R, K1, SM* (12 increases)

Rd 12: *K to marker, SM, Fisherman’s Rib Cable Pattern, SM, K to marker, SM, K to next marker, SM*

Repeat Rd 11-12 an additional – (-, -, -, 1) (3, 4, 5, 7) times. You will now have – (-, -, -, 176) (200, 212, 220, 244) sts distributed as follows:

Left Sleeve: – (-, -, -, 30) (34, 36, 38, 42) sts

Front Panel: – (-, -, -, 58) (66, 70, 72, 80) sts

Right Sleeve: – (-, -, -, 30) (34, 36, 38, 42) sts

Back Panel: – (-, -, -, 58) (66, 70, 72, 80) sts

For Sizes XS (S, M, L) ONLY:

Rd 13: *K1, M1L, Fisherman’s Rib Cable Pattern until 1 st before marker, M1R, K1, SM, K1, M1L, K until 1 st before marker, M1R, K1, SM* (8 increases)

Rd 14: *K1, Fisherman’s Rib Cable Pattern until 1 st before marker, K1, SM, K across to next marker, SM*

Repeat Rd 13-14 an additional 5 (5, 5, 4, -) (-, -, -, –) times.

Ribbing Panel Marker Placement

Rd 15: *K1, PM, M1L, Fisherman’s Rib Cable Pattern until 1 st before marker, M1R, PM, K1, SM, K1, M1L, K until 1 st before marker, M1R, K1, SM* (8 increases)

Rd 16: *K to marker, SM, Fisherman’s Rib Cable Pattern, SM, K to marker, SM, K to next marker, SM*

For ALL SIZES:

Rd 17: *K1, M1L, K to marker, SM, Fisherman’s Rib Cable Pattern, SM, K until 1 st before marker, M1R, SM, K1, M1L, K until 1 st before marker, M1R, K1, SM* (8 increases)

Rd 18: *K to marker, SM, Fisherman’s Rib Cable Pattern, SM, K to marker, SM, K to next marker, SM*

Repeat Rd 17-18 an additional 12 (14, 15, 16, 17) (19, 21, 24, 24) times. You will now have 236 (256, 276, 284, 320) (360, 388, 420, 444) sts distributed as follows:

Left Sleeve: 52 (56, 58, 60, 66) (74, 80, 88, 92) sts

Front Panel: 66 (72, 80, 82, 94) (106, 114, 122, 130) sts

Right Sleeve: 52 (56, 58, 60, 66) (74, 80, 88, 92) sts

Back Panel: 66 (72, 80, 82, 94) (106, 114, 122, 130) sts

For Sizes L ONLY:

Rd 19: *K to marker, SM, Fisherman’s Rib Cable Pattern, SM, K to marker, SM, K1, M1L, K until 1 st before marker, M1R, K1, SM* (4 increases)

Rd 20: *K to marker, SM, Fisherman’s Rib Cable Pattern, SM, K to marker, SM, K to next marker, SM*

Repeat Rd 19-20 an additional – (-, -, 2, -) (-, -, -, –) times. You will now have 236 (256, 276, 296, 320) (360, 388, 420, 444) sts distributed as follows:

Left Sleeve: 52 (56, 58, 60, 66) (74, 80, 88, 92) sts

Front Panel: 66 (72, 80, 88, 94) (106, 114, 122, 130) sts

Right Sleeve: 52 (56, 58, 60, 66) (74, 80, 88, 92) sts

Back Panel: 66 (72, 80, 88, 94) (106, 114, 122, 130) sts

For Sizes XL (2XL) ONLY:

Rd 21: *K to marker, SM, Fisherman’s Rib Cable Pattern, SM, K to marker, SM, K to next marker, SM*

Repeat Rd 21 an additional – (-, -, -, 7) (2, -, -, –) times.

For ALL Sizes:

Try on your piece. The length should fall just below your armpits, where you can comfortably pinch together either side of a sleeve panel under your arms. If it is too short, repeat Rd 21 until you reach your desired length.

Separate Sleeves from Body:

Rd 22 (Set up Round): Place 52 (56, 58, 60, 66) (74, 80, 88, 92) sts on scrap yarn or stitch holder to save for later, CO 1 (1, 2, 2, 2) (2, 2, 2, 2) sts, PM for the new BOR, CO 1 (1, 2, 2, 2) (2, 2, 2, 2) sts, K across 66 (72, 80, 88, 94) (106, 114, 122, 130) sts, place 52 (56, 58, 60, 66) (74, 80, 88, 92) sts on scrap yarn or stitch holder to save for later, CO 1 (1, 2, 2, 2) (2, 2, 2, 2) sts, PM, CO 1 (1, 2, 2, 2) (2, 2, 2, 2) sts, K across 66 (72, 80, 88, 94) (106, 114, 122, 130) sts. You will now have 136 (148, 168, 184, 196) (220, 236, 252, 268) sts on your needles, not counting the sleeve sts on the scrap yarn.

Body with Bust Darts: (Optional)

Use this section if you would like to add bust darts to your sweater and make it more form fitting at the waist. For instructions on how to calculate and customize the bust darts to your particular size, please see the Pattern Notes about Adding Bust Darts.

Rd 23: (setup round) K13 (15, 18, 20, 22) (26, 29, 32, 34), PM for bust dart marker, K40 (42, 44, 48, 50) (54, 56, 58, 62), PM for bust dart marker, K across to next underarm marker, SM, K across

Rd 24: K1, K2tog, K until 3 sts before bust dart marker, SSK, K1, K until next bust dart marker, SM, K1, K2tog, K until 3 sts before underarm marker, SSK, K1, SM, K across.

Rd 25: K across

Repeat Rds 24-25 an additional 4 (6, 7, 8, 8) (8, 8, 10, 11) times. You will now have 116 (120, 136, 148, 160) (184, 200, 208, 220) sts.

Rd 26: K across

Repeat Rd 26 a total of 57 (52, 46, 43, 45) (43, 40, 36, 31) times, or until you reach 1 inch less than your desired length.

Rd 27-32: *K1, P1*

Bind off in ribbing pattern.

Body without Bust Darts:

Rd 33: K across

Repeat Rd 33 a total of 67 (66, 62, 61, 63) (61, 58, 58, 55) times, or until you reach 1 inch less than your desired length.

Rd 53-58: *K1, P1*

Bind off in ribbing pattern.

Sleeves:

(Set up Round): Remove 52 (56, 58, 60, 66) (74, 80, 88, 92) sts from scrap yarn and distribute evenly along double pointed needles or small circular needles. Find the bottom of the armpit (where you bound off sts at the sleeve separation), and pick up 2 (2, 4, 4, 4) (4, 4, 4, 4) sts. PM in the middle of the picked up sts at the bottom of the armpit to mark the BOR.

Rd1-7 (6, 5, 5, 4) (4, 3, 3, 3): K to marker, SM, Fisherman’s Rib Cable Pattern, SM, K to marker

Rd8 (7, 6, 6, 5) (5, 4, 4, 4): K1, K2tog, K to marker, SM, Fisherman’s Rib Cable Pattern, SM, K until 3 sts before end, SSK, K1

Repeat Rds 1-8 (7, 6, 6, 5) (5, 4, 4, 4) an additional 11 (13, 15, 16, 18) (22, 25, 28, 30) times. You will now have 30 (30, 30, 30, 32) (32, 32, 34, 34) sts.

Repeat Rd1 for a total of 9 (10, 12, 9, 16) (-, 10, 1, –) repeats, or until you reach 1 inch less than your desired length.

Rd11-16: *K1, P1*

Bind off and weave in ends using a tapestry needle. Block your garment.

THANK YOU!

I hope you enjoyed making the Side Cable Pullover as much as I did! Tag me on Instagram @knitabitcrochetaway and use #knitabitcrochetaway and #SideCablePullover– I’d love to see your progress and finished product!

Posted on 2 Comments

Knitting Pattern: Banded Sweater

A top down raglan sweater with thick coordinated stripes

Skill Level: Advanced Beginner


Find a printer-friendly, PDF version of the Banded Sweater below!

SIZING

The pattern is designed to have 2-3 inches of positive ease. Select a size based on your actual bust width plus the 2-3 inches of positive ease, totaling the bust width in (A).

(A) Bust Width: 31.5 (35, 39, 43.5, 47) (51, 55, 58.5, 63) inches or 80 (89, 99, 110, 119) (130, 140, 149, 160) cm

(B) Sleeve Length: 17 (16.5, 16, 15.5, 20) (19.5, 19, 17.5, 16.5) inches or 43 (42, 41, 39, 51) (50, 48, 44, 42) cm

(C) Total Length:  25 (24.5, 24.5, 24, 24.5) (24.5, 24.5, 24.5, 24) inches or 64 (62, 62, 61, 62) (62, 62, 62, 61) cm

(D) Yoke Length: 7.5 (7.5, 8.5, 8.5, 9.5) (9.5, 10.5, 11.5, 12.5) inches or 19 (19, 22, 22, 24) (24, 27, 29, 32) cm

(E) Waist Length: 17.5 (17, 16, 15.5, 15) (15, 14, 13, 11.5) inches or 44 (43, 41, 39, 38) (38, 36, 33, 29) cm

(F) Upper Sleeve Width: 11.5 (12, 13, 14, 15.5) (17.5, 19.5, 20.5, 21.5) inches or 29 (30, 33, 36, 39) (44, 50, 52, 55) cm

GAUGE

21 sts x 28 rows = 4 inches (10 cm) on larger needles in stockinette stitch with MC and CC held together

SUGGESTED NEEDLES

Size 3 (US), 3.25 mm circular needles

Size 3 (US), 3.25 mm double pointed needles or small circular needles

Size 4 (US), 3.5 mm circular needles

Size 4 (US), 3.5 mm double pointed needles or small circular needles

NOTIONS

Stitch markers

Scrap yarn

Tapestry needle

SUGGESTED YARN

4 (5, 5, 6, 9) (11, 13, 13, 14) skeins Hobbii Alpaca Silk in Venezia (MC) or 667 (735, 878, 1001, 1577) (1846, 2206, 2272, 2370) yards or 610 (672, 803, 915, 1442) (1688, 2017, 2078, 2167) meters of fingering weight yarn

2 (2, 3, 3, 4) (5, 6, 6, 6) skeins Hobbii Soft Alpaca Lace in Ocean Waves (CC1) or 698 (769, 919, 1047, 1650) (1931, 2308, 2377, 2480) yards or 638 (703, 840, 957, 1509) (1766, 2110, 2174, 2268) meters of lace weight yarn

1 (2, 2, 2, 3) (3, 4, 4, 4) skeins Hobbii Soft Alpaca Lace in Cappuccino (CC2) or 405 (446, 533, 608, 957) (1120, 1339, 1379, 1438) yards or 370 (408, 487, 556, 875) (1024, 1224, 1261, 1315) meters of lace weight yarn

If you would like to substitute for a DK or similar weight yarn that achieves gauge, select the yardage based on the MC listed above.

STITCH ABBREVIATIONS

BO – bind off

BOR – beginning of round

CC – contrast color

CO – cast on

K – knit

K2tog – knit two stitches together (decrease)

KFB – knit into the front and the back of the next stitch (increase)

M1L – pick up the bar between the stitch you knit and the one you’re about to knit, bringing the needle from front to back, and knit into the back of the stitch (increase)

M1R – pick up the bar between the last stitch you knit and the one you’re about to knit, bringing the needle from the back to the front, and knit into the front of the stitch (increase)

 MC – main color

P – purl

PM – place marker

Rd(s) – round(s)

RS – right side

SM – slip marker

SSK – slip unworked stitch from left needle to right needle knitwise. Slip a second unworked stitch from the left needle to the right needle knitwise. Slip those two unworked stitches separately back to the left needle purlwise. Knit those two stitches together in the back of the stitches (decrease)

St(s) – stitch(es)

WS – wrong side

PATTERN NOTES

This raglan yoke sweater is knit from the top down and flat for the beginning of the yoke, then joined and knit in the round. You first work the yoke, which includes a front and a back body panel and the beginning of two sleeve panels. When your yoke is long enough to reach your armpits, you separate the sleeve panels from the body panels, holding the sleeve stitches on scrap yarn and joining the body panels to finish the body of the sweater down to the waist. Then, you pick up stitches along the cast on edge to knit the collar. You end by working each sleeve individually.

The pattern is worked holding one MC and one CC strand together, alternating between CC1 and CC2 every 32 (32, 32, 32, 32) (34, 34, 34, 34) rows/rounds.

Stitch counts and round counts are indicated for each size based on the following size order: XS (S, M, L, XL) (2XL, 3XL, 4XL, 5XL). It is recommended that you highlight the stitch and round counts for your size before beginning to knit.

Stitches that appear between * and * should be worked until the end, unless otherwise indicated.

It is recommended you check your gauge on both the circular needles and double pointed needles (or small circular needles) to ensure your tension is the same. Adjust your needle size as necessary to obtain gauge.

INSTRUCTIONS

Yoke Increases (Worked Flat):

Using long tail cast on and the larger needles, CO 70 (74, 82, 88, 90) (92, 96, 100, 101) sts.

R1: K3 (3, 3, 3, 3) (3, 3, 3, 3), PM, K18 (18, 20, 22, 22) (22, 24, 26, 26), PM, K28 (32, 36, 38, 40) (42, 42, 42, 43), PM, K18 (18, 20, 22, 22) (22, 24, 26, 26), PM, K3 (3, 3, 3, 3) (3, 3, 3, 3).

R2: P across

For Sizes XS (S, M, L) ONLY:

R3: *K1, M1L, K until 1 st before marker, M1R, K1, SM* until last marker section, K1, M1L, K until 1 st before end, M1R, K1. (10 sts increased)

R4: P across

Repeat R3-4 an additional 4 (5, 5, 6, -) (-, -, -, –) times for a total of 5 (6, 6, 7, -) (-, -, -, –) repeats. Repeat R3 one more time and do not turn your work. You will now have 130 (144, 152, 168, -) (-, -, -, –) sts distributed as follows:

Right Front Panel: 15 (17, 17, 19, -) (-, -, -, –) sts

Sleeve A: 30 (32, 34, 38, -) (-, -, -, –) sts

Back Panel: 40 (46, 50, 54, -) (-, -, -, –) sts

Sleeve B: 30 (32, 34, 38, -) (-, -, -, –) sts

Left Front Panel: 15 (17, 17, 19, -) (-, -, -, –) sts

For Sizes XL (2XL, 3XL, 4XL, 5XL) ONLY:

R3: K1, KFB, K until 2 sts before marker, M1R, K1, M1R, K1, SM, *K1, M1L, K1, M1L, K until 2 sts before marker, M1R, K1, M1R, K1, SM* until last marker section, K1, M1L, K1, M1L, K until 2 sts before end, KFB, K1. (14 sts increased).

R4: P across

Repeat R3-4 an additional – (-, -, -, 8) (9, 10, 11, 12) times for a total of – (-, -, -, 9) (10, 11, 12, 13) repeats. Repeat R3 one more time and do not turn your work. You will now have – (-, -, -, 244) (260, 276, 292, 306) distributed as follows:

Right Front Panel: – (-, -, -, 33) (36, 39, 42, 45) sts

Sleeve A: – (-, -, -, 42) (44, 48, 52, 54) sts

Back Panel: – (-, -, -, 80) (86, 90, 94, 99) sts

Sleeve B: – (-, -, -, 42) (44, 48, 52, 54) sts

Left Front Panel: – (-, -, -, 22) (28, 28, 34, 40) sts

For Sizes ALL SIZES:

Yoke Increases (Worked in the Round):

You will begin working in the round. Using the backwards loop cast on method, CO 10 (12, 16, 16, 14) (14, 12, 10, 9) sts on your right needle and K across to the first marker to join the round. This marker now becomes your BOR.

Rd 7: *K1, M1L, K until 1 st before marker, M1R, K1, SM.* (8 sts increased)

Rd 8: K across

Repeat Rds 7-8 an additional 12 (13, 14, 15, 17) (21, 23, 24, 25) times for a total of 13 (14, 15, 16, 18) (22, 24, 25, 26). You will now have 244 (268, 288, 312, 388) (436, 468, 492, 514) sts distributed as follows:

Sleeve A: 56 (60, 64, 70, 78) (88, 96, 102, 106) sts

Back Panel: 66 (74, 80, 86, 116) (130, 138, 144, 151) sts

Sleeve B: 56 (60, 64, 70, 78) (88, 96, 102, 106) sts

Front Panel: 66 (74, 80, 86, 116) (130, 138, 144, 151) sts

For Sizes M (L, XL, 4XL, 5XL) ONLY:

Rd 9: *K to marker, SM, *K1, M1L, K until 1 st before marker, M1R, K1, SM.* (4 sts increased)

Rd 10: K across

Repeat Rds 9-10 an additional – (-, 1, 3, 1) (-, -, 1, 3) times for a total of – (-, 2, 4, 2) (-, -, 2, 4) repeats. You will now have – (-, 296, 328, 396) (-, -, 500, 530) sts distributed as follows:

Sleeve A: – (-, 64, 70, 78) (-, -, 102, 106) sts

Back Panel: – (-, 84, 94, 120) (-, -, 148, 159) sts

Sleeve B: – (-, 64, 70, 78) (-, -, 102, 106) sts

Front Panel: – (-, 84, 94, 120) (-, -, 148, 159) sts

For Sizes XS (S, M, L, XL, 2XL) ONLY:

Rd 11: K across

Repeat Rd 11 a total of 13 (12, 10, 5, 5) (2, -, -, -) repeats.

For ALL Sizes:

Try on your piece. The length should fall just below your armpits, where you can comfortably pinch together either side of a sleeve panel under your arms. If it is too short, work Rd 11 until you reach your desired length.

Separate Sleeves from Body:

Rd 12 (Set up Round): Place 56 (60, 64, 70, 78) (88, 96, 102, 106) sts on scrap yarn or stitch holder to save for later, CO 2 (2, 2, 2, 2) (2, 3, 3, 3) sts, place marker for the new BOR, CO 2 (2, 2, 2, 2) (2, 3, 3, 3), K across 66 (74, 84, 94, 120) (130, 138, 148, 159) sts, place 56 (60, 64, 70, 78) (88, 96, 102, 106) sts on scrap yarn or stitch holder to save for later, CO 2 (2, 2, 2, 2) (2, 3, 3, 3) sts, PM, CO 2 (2, 2, 2, 2) (2, 3, 3, 3) sts, K across 66 (74, 84, 94, 120) (130, 138, 148, 159) sts. You will now have 140 (156, 176, 196, 248) (268, 288, 308, 330) sts on your needles, not counting the sleeve sts on the scrap yarn.

Body:

Rd 13: K across

Repeat Rd 13 a total of 112 (108, 102, 99, 95) (94, 88, 80, 72) times, or until you reach 1 inch less than your desired length.

Rd 14-23: *K1, P1*

Bind off in ribbing pattern.

Collar:

Using the circular needle, pick up and knit 104 (114, 126, 136, 124) (128, 132, 136, 138) sts along the collar and begin working in the round.

Rd 1-10: *K1, P1*

Bind off in ribbing pattern.

Sleeves:

(Set up Round): Remove 56 (60, 64, 70, 78) (88, 96, 102, 106) sts from scrap yarn and distribute evenly along double pointed needles or small circular needles. Find the bottom of the armpit (where you bound off sts at the sleeve separation), and pick up 4 (4, 4, 4, 4) (4, 6, 6, 6) sts. PM in the middle of the picked up sts at the bottom of the armpit to mark the BOR.

Rd 1-7 (6, 5, 4, 5) (3, 3, 2, -): K across

Rd 8 (7, 6, 5, 6) (4, 4, 3, 2): K2tog, K until 2 sts before end, SSK.

Repeat Rds 1-8 (7, 6, 5, 6) (4, 4, 3, 2) for a total of 12 (14, 16, 19, 21) (26, 31, 33, 35) repeats. You will now have 36 (36, 36, 36, 40) (40, 40, 42, 42) sts.

Repeat Rd1 for a total of 13 (8, 6, 4, 3) (22, 2, 15, 36) repeats, or until you reach 1 inch less than your desired length.

Rd 9-18: *K1, P1*

Bind off in ribbing pattern. Repeat for second sleeve. Weave in ends using a tapestry needle. Block your garment.

THANK YOU!

I hope you enjoyed making the Banded Sweater as much as I did! Tag me on Instagram @knitabitcrochetaway and use #knitabitcrochetaway and #BandedSweater – I’d love to see your progress and finished product!

Posted on

Knitting Pattern: Bristle Sweater

A raglan sweater with decorative shoulder and side seams

Skill Level: Intermediate


Find a printer-friendly, PDF version of the Bristle Sweater below!

SIZING

The pattern is designed to have 2 inches of positive ease. Select a size based on your actual bust width plus the 2 inches of positive ease, totaling the bust width in (A).

(A) Bust Width: 31 (35, 39, 43, 47) (51, 55, 59, 63) inches or 79 (89, 99, 109, 119) (130, 140, 150, 160) cm

(B) Sleeve Length: 18.5 (19, 19, 19.5, 19.5) (20, 20, 20.5, 20.5) inches or 47 (48, 48, 50, 50) (51, 51, 52, 52) cm

(C) Total Length: 22 (22, 22.5, 22.5, 23) (23.5, 23, 23.5, 23.5) inches or 56 (56, 57, 57, 58) (60, 58, 60, 60) cm

(D) Yoke Length: 7 (7.5, 9, 10, 11.5) (11, 12, 12.5, 13.5) inches or 18 (19, 23, 25, 29) (28, 29, 32, 34) cm

(E) Waist Length: 15 (14.5, 13.5, 12.5, 11.5) (12.5, 11, 11, 10) inches or 38 (37, 34, 32, 29) (32, 28, 28, 25) cm

(F) Upper Sleeve Width: 11.5 (12.5, 13, 14, 15.5) (17.5, 19, 20.5, 21.5) inches or 29 (32, 33, 36, 39) (44, 48, 52, 55) cm

GAUGE

20 sts x 26 rows = 4 inches (10 cm) in stockinette stitch

SUGGESTED NEEDLES

Size 5 (US), 3.75 mm circular needles

Size 5 (US), 3.75 mm double pointed needles or small circular needles

NOTIONS

Stitch markers

Scrap yarn

Tapestry needle

SUGGESTED YARN

8 (9, 10, 10, 12) (13, 14, 15, 16) skeins Cloudborn Alpaca Sport or 1402 (1576, 1736, 1916, 2134) (2403, 2563, 2819, 2990) yards or 1282 (1441, 1587, 1752, 1951) (2197, 2344, 2578, 2734) meters of sport weight yarn

STITCH ABBREVIATIONS

K – knit

P – purl

CO – cast on

K2tog – knit two stitches together (decrease)

SM – slip marker

PM – place marker

BO – bind off

BOR – beginning of round

Rd(s) – round(s)

RS – right side

WS – wrong side

St(s) – stitch(es)

KFB – knit into the front and back of the next stitch (increase)

LSS – (left side stitch) insert your right needle from the front to the back of the middle of the knit stitch that is to the right of the marker and one row down from the live stitch on your left needle, wrap yarn as if to knit and pull the loop through the work and pull it back up on your right needle (increase). Video tutorial available here.

RSS – (right side stitch) insert your left needle from the front to the back of the middle of the knit stitch that is to the left of the marker and two rows down from the live stitch on your left needle, wrap yarn as if to knit and pull the loop through the work and pull it back up on your right needle (increase). Video tutorial available here.

SSK – slip unworked stitch from left needle to right needle knitwise. Slip a second unworked stitch from the left needle to the right needle knitwise. Slip those two unworked stitches separately back to the left needle purlwise. Knit those two stitches together in the back of the stitches (decrease)

Pattern Notes

This raglan yoke sweater is knit with the listed yarn held double from the top down and flat for the beginning of the collar, then joined and knit in the round. You first work the yoke, which includes a front and a back body panel and the beginning of two sleeve panels. When your yoke is long enough to reach your armpits, you separate the sleeve panels from the body panels, holding the sleeve stitches on scrap yarn and joining the body panels to finish the body of the sweater down to the waist. The pattern includes optional bust darts, including suggested spacing for each size and a description to customize bust darts based on your own measurements. (Note: the sweater in the modeled picture does not feature bust darts.) You end by working each sleeve individually then picking up and knitting for the collar ribbing.

Stitch counts and round counts are indicated for each size based on the following size order: XS (S, M, L, XL) (2XL, 3XL, 4XL, 5XL). It is recommended that you highlight the stitch and round counts for your size before beginning to knit.

Stitches that appear between * and * should be worked until the end, unless otherwise indicated.

It is recommended you check your gauge on both the circular needles and double pointed needles (or small circular needles) to ensure your tension is the same. Adjust your needle size as necessary to obtain gauge.

When working the LSS and RSS, make sure to pull enough yarn up and out onto the right needle so your piece can lay flat with the number of stitches in between. It is recommended that you knit the stitch right after the LSS and RSS stitch a little looser than normal as well to help with tension.

INSTRUCTIONS

Yoke Increases (Worked Flat):

Using long tail cast on and circular needles with the listed yarn held double, CO 62 (64, 66, 72, 74) (76, 76, 76, 76) sts.

R1: K3 (3, 3, 3, 3) (3, 3, 3, 3), PM, K12 (12, 12, 14, 14) (14, 14, 14, 14), PM, K32 (34, 36, 38, 40) (42, 42, 42, 42), PM, K12 (12, 12, 14, 14) (14, 14, 14, 14), PM, K3 (3, 3, 3, 3) (3, 3, 3, 3).

R2: P across

For Sizes XS (S, M, L, XL) ONLY:

R3: K1, LSS, K to marker, SM, *K3, RSS, K to 3 sts before marker, LSS, K to marker, SM* until last marker, K2, RSS, K1. (8 sts increased)

R4: P across

R5: K to 3 sts before marker, LSS, K to marker, SM, *K3, RSS, K to 3 sts before marker, LSS, K to marker, SM* until last marker, K3, RSS, K to end. (8 sts increased)

R6: P across

Repeat R5-6 an additional 4 (5, 5, 6, 7) (-, -, -, –) times for a total of 5 (6, 6, 7, 8) (-, -, -, –) repeats. Repeat R5 one more time and do not turn your work. You will now have 118 (128, 130, 144, 154) (-, -, -, –) sts distributed as follows:

Right Front Panel: 10 (11, 11, 12, 13) (-, -, -, –) sts

Sleeve A: 26 (28, 28, 32, 34) (-, -, -, –) sts

Back Panel: 46 (50, 52, 56, 60) (-, -, -, –) sts

Sleeve B: 26 (28, 28, 32, 34) (-, -, -, –) sts

Left Front Panel: 10 (11, 11, 12, 13) (-, -, -, –) sts

For Sizes 2XL (3XL, 4XL, 5XL) ONLY:

R3: K1, LSS, KFB, K1, SM, K3, RSS, K to 3 sts before marker, LSS, K to marker, SM, K2, KFB, RSS, K to 3 sts before marker, LSS, KFB, K to marker, SM, K3, RSS, K to 3 sts before marker, LSS, K to marker, SM, K1, KFB, RSS, K1. (12 sts increased)

R4: P across

R5: K to 3 sts before marker, LSS, KFB, K to marker, SM, K3, RSS, K to 3 sts before marker, LSS, K to marker, SM, K2, KFB, RSS, K to 3 sts before marker, LSS, KFB, K to marker, SM, K3, RSS, K to 3 sts before marker, LSS, K to marker, SM, K2, KFB, RSS, K to end. (12 sts increased)

R6: P across

Repeat R5-6 an additional – (-, -, -, -) (3, 4, 6, 8) times for a total of – (-, -, -, -) (4, 5, 7, 9) repeats. Repeat R5 one more time and do not turn your work. You will now have – (-, -, -, -) (148, 160, 184, 208) sts distributed as follows:

Right Front Panel: – (-, -, -, -) (15, 17, 21, 25) sts

Sleeve A: – (-, -, -, -) (26, 28, 32, 36) sts

Back Panel: – (-, -, -, -) (66, 70, 78, 86) sts

Sleeve B: – (-, -, -, -) (26, 28, 32, 36) sts

Left Front Panel: – (-, -, -, -) (15, 17, 21, 25) sts

For Sizes ALL SIZES:

Yoke Increases (Worked in the Round):

You will begin working in the round. Using the backwards loop cast on method, CO 26 (28, 30, 32, 34) (36, 36, 36, 36) sts on your right needle and K across to the first marker to join the round. This marker now becomes your BOR.

Rd 7: K across

Rd 8: *K3, RSS, K to 3 sts before marker, LSS, K to marker, SM* (8 sts increased)

Rd 9: K across

Repeat Rds 8-9 an additional 14 (14, 16, 16, 19) (28, 31, 31, 32) times for a total of 15 (15, 17, 17, 20) (29, 32, 32, 33) repeats. You will now have 264 (276, 296, 312, 348) (416, 452, 476, 508) sts distributed as follows, working the diagram clockwise:

Right Sleeve: 56 (58, 62, 66, 74) (84, 92, 96, 102) sts

Back Panel: 76 (80, 86, 90, 100) (124, 134, 142, 152) sts

Left Sleeve: 56 (58, 62, 66, 74) (84, 92, 96, 102) sts

Front Panel: 76 (80, 86, 90, 100) (124, 134, 142, 152) sts

For Sizes S (M, L, XL) ONLY:

Rd 10: *K1, SSK, RSS, K to 3 sts before marker, LSS, K2tog, K1, SM, K3, RSS, K to 3 sts before marker, LSS, K to marker, SM* (4 sts increased)

Rd 11: K across

Repeat Rds 10-11 an additional – (1, 3, 6, 6) (-, -, -, –) times for a total of – (2, 4, 7, 7) (-, -, -, –) repeats. You will now have – (284, 312, 340, 376) (-, -, -, –) sts distributed as follows:

Right Sleeve: – (58, 62, 66, 74) (-, -, -, –) sts

Back Panel: – (84, 94, 104, 114) (-, -, -, –) sts

Left Sleeve: – (58, 62, 66, 74) (-, -, -, –) sts

Front Panel: – (84, 94, 104, 114) (-, -, -, –) sts

For ALL Sizes:

Rd 12: *K1, SSK, RSS, K to 3 sts before marker, LSS, K2tog, K1, SM*

Try on your piece. The length should fall just below your armpits, where you can comfortably pinch together either side of a sleeve panel under your arms. If it is too short, work the following rounds until you reach your desired length, being sure to end on Rd 14:

Rd 13: K across

Rd 14: *K1, SSK, RSS, K to 3 sts before marker, LSS, K2tog, K1, SM*

Separate Sleeves from Body:

Rd 15 (Set up Round): Place 56 (58, 62, 66, 74) (84, 92, 96, 102) sts on scrap yarn or stitch holder to save for later, CO 1 (2, 2, 2, 2) (2, 2, 3, 3) sts, place marker for the new BOR, CO 1 (2, 2, 2, 2) (2, 2, 3, 3), K across 76 (84, 94, 104, 114) (124, 134, 142, 152) sts, place 56 (58, 62, 66, 74) (84, 92, 96, 102) sts on scrap yarn or stitch holder to save for later, CO 1 (2, 2, 2, 2) (2, 2, 3, 3) sts, PM, CO 1 (2, 2, 2, 2) (2, 2, 3, 3) sts, K across 76 (84, 94, 104, 114) (124, 134, 142, 152) sts. You will now have 156 (176, 196, 216, 236) (256, 276, 296, 316) sts on your needles, not counting the sleeve sts on the scrap yarn.

Body with Bust Darts: (Optional)

Use this section if you would like to add bust darts to your sweater and make it more form fitting at the waist. For instructions on how to calculate and customize the bust darts to your particular size, please see the Pattern Notes about Adding Bust Darts.

Rd 16: (setup round) K1, SSK, RSS, K12 (15, 18, 22, 25) (28, 32, 34, 38), PM for bust dart marker, K46 (48, 52, 54, 58) (62, 64, 68, 70), PM for bust dart marker, K to 3 sts before marker, LSS, K2tog, K1, SM, K1, SSK, RSS, K to 3 sts before marker, LSS, K2tog, K1, SM.

Rd 17: K1, SSK, RSS, K1, K2tog, K until 3 sts before bust dart marker, SSK, K1, K until next bust dart marker, SM, K1, K2tog, K until 6 sts before underarm marker, SSK, K1, LSS, K2tog, K1, SM, K across.

Rd 18: K across

Repeat Rds 17-18 an additional 6 (8, 9, 9, 9) (9, 10, 12, 13) times for a total of 7 (9, 10, 10, 10) (10, 11, 13, 14) repeats. You will now have 128 (140, 156, 176, 196) (216, 232, 244, 260) sts. Remove bust dart markers on the last round.

Rd 19: *K1, SSK, RSS, K to 3 sts before marker, LSS, K2tog, K1, SM*

Rd 20: K across

Repeat Rds 19-20 a total of 38 (35, 30, 27, 24) (27, 22, 19, 15) times, or until you reach 1 inch less than your desired length.

Rd 21-28: *K1, P1*

Bind off in ribbing pattern.

Body without Bust Darts:

Rd 16: *K1, SSK, RSS, K to 3 sts before marker, LSS, K2tog, K1, SM*

Rd 17: K across

Repeat Rds 16-17 a total of 45 (44, 40, 37, 34) (37, 33, 32, 29) times, or until you reach 1 inch less than your desired length.

Rd 18-25: *K1, P1*

Bind off in ribbing pattern.

Sleeves:

(Set up Round): Remove 56 (58, 62, 66, 74) (84, 92, 96, 102) sts from scrap yarn and distribute evenly along double pointed needles or small circular needles. Find the bottom of the armpit (where you bound off sts at the sleeve separation), and pick up 2 (4, 4, 4, 4) (4, 4, 6, 6) sts. PM in the middle of the picked up sts at the bottom of the armpit to mark the BOR.

Rd 1-7 (6, 5, 4, 3) (2, 2, 2, 2): K across

Rd 8 (7, 6, 5, 4) (3, 3, 3, 3): K1, K2tog, K until 3 sts before end, SSK, K1

Repeat Rds 1-8 (7, 6, 5, 4) (3, 3, 3, 3) for a total of 11 (13, 15, 17, 20) (25, 29, 31, 34) repeats. You will now have 36 (36, 36, 36, 38) (38, 38, 40, 40) sts.

Repeat Rd1 for a total of 24 (25, 26, 34, 39) (47, 35, 32, 23) repeats, or until you reach 1 inch less than your desired length.

Rd 9-16: *K1, P1*

Bind off in ribbing pattern.

Collar:

Using the circular needle, pick up and knit 102 (108, 112, 122, 128) (124, 126, 130, 134) sts along the collar and begin working in the round.

Rd 1-8: *K1, P1*

Bind off in ribbing pattern and weave in ends using a tapestry needle. Block your garment.

THANK YOU!

I hope you enjoyed making the Bristle Sweater as much as I did! Tag me on Instagram @knitabitcrochetaway and use #knitabitcrochetaway and #BristleSweater – I’d love to see your progress and finished product!

Posted on

Pattern: Cozy Diamond Sweater

A top down raglan sweater with textured diamond pattern

Skill Level: Intermediate


Find a printer-friendly, PDF version of the Cozy Diamond Sweater below!

SIZING

The pattern is designed to have 2-3 inches of positive ease. Select a size based on your actual bust width plus the 2-3 inches of positive ease, totaling the bust width in (A).

(A) Bust Width: 31.5 (35.5, 39.5, 42, 48) (51.5, 54.5, 60.5, 64) inches or 80 (90, 100, 107, 122) (131, 138, 154, 163) cm

(B) Sleeve Length: 19 (19.5, 19.5, 20, 20) (20.5, 20.5, 21, 21) inches or 48 (50, 50, 51, 51) (52, 52, 53, 53) cm

(C) Total Length: 21.5 (22, 23, 23, 23.5) (23, 23.5, 24, 24) inches or 55 (56, 58, 58, 60) (58, 60, 61, 61) cm

(D) Yoke Length: 8.5 (10.5, 11.5, 12, 12.5) (11.5, 13, 14.5, 15.5) inches or 22 (27, 29, 30, 32) (29, 33, 37, 39) cm

(E) Waist Length: 13 (11.5, 11.5, 11, 11) (11.5, 10.5, 9.5, 8.5) inches or 33 (29, 29, 28, 28) (29, 27, 24, 22) cm

(F) Upper Sleeve Width: 11.5 (12.5, 13, 14, 16) (17, 18.5, 20.5, 21.5) inches or 29 (32, 33, 36, 41) (43, 47, 52, 55) cm

GAUGE

22 sts x 24 rows = 4 inches (10 cm) in Diamond Stitch Pattern

SUGGESTED NEEDLES

Size 5 (US), 3.75 mm circular needles

Size 5 (US), 3.75 mm double pointed needles or small circular needles

NOTIONS

Stitch markers

Scrap yarn

Tapestry needle

SUGGESTED YARN

4 (4, 5, 5, 6) (6, 6, 7, 8) skeins Vindala Dusk by KnitCrate in Midnight or 745 (848, 946, 1020, 1182) (1258, 1363, 1546, 1630) yards or 681 (775, 865, 933, 1081) (1150, 1246, 1414, 1490) meters of DK weight yarn

STITCH ABBREVIATIONS

K – knit

P – purl

CO – cast on

K2tog – knit two stitches together (decrease)

SM – slip marker

PM – place marker

BO – bind off

BOR – beginning of round

Rd(s) – round(s)

RS – right side

WS – wrong side

St(s) – stitch(es)

KFB – knit into the front and the back of the next stitch (increase)

M1L – pick up the bar between the stitch you knit and the one you’re about to knit, bringing the needle from front to back, and knit into the back of the stitch (increase)

M1R – pick up the bar between the last stitch you knit and the one you’re about to knit, bringing the needle from the back to the front, and knit into the front of the stitch (increase)

SSK – slip unworked stitch from left needle to right needle knitwise. Slip a second unworked stitch from the left needle to the right needle knitwise. Slip those two unworked stitches separately back to the left needle purlwise. Knit those two stitches together in the back of the stitches (decrease)

DIAMOND STITCH PATTERN (Worked Flat)

R1: *K2, P1, K1*

R2: *P1, K1, P2*

R3-4: *K1, P1*

R5: *P1, K3*

R6: *P3, K1*

R7-8: *K1, P1*

DIAMOND STITCH PATTERN (Worked in the Round)

R1-2: *K2, P1, K1*

R3-4: *K1, P1*

R5-6: *P1, K3*

R7-8: *K1, P1*

Pattern Notes

This raglan yoke sweater is knit from the top down and flat for the beginning of the yoke, then joined and knit in the round. You first work the yoke, which includes a front and a back body panel and the beginning of two sleeve panels. When your yoke is long enough to reach your armpits, you separate the sleeve panels from the body panels, holding the sleeve stitches on scrap yarn and joining the body panels to finish the body of the sweater down to the waist. Then, you pick up stitches along the cast on edge to knit to collar. You end by working each sleeve individually then picking up and knitting for the collar ribbing.

The pattern includes instructions to work the Diamond Stitch Pattern when you are working flat and in the round. Be sure to work the correct pattern based on whether you are working flat or in the round. When you are working the yoke increases, you will be adding new stitches that need to be incorporated into the Diamond Stitch Pattern in later rows/rounds. Use the nearby Diamond Stitch Pattern stitches to determine whether to K or P a new stitch near the markers.

Stitch counts and round counts are indicated for each size based on the following size order: XS (S, M, L, XL) (2XL, 3XL, 4XL, 5XL). It is recommended that you highlight the stitch and round counts for your size before beginning to knit.

Stitches that appear between * and * should be worked until the end, unless otherwise indicated.

It is recommended you check your gauge on both the circular needles and double pointed needles (or small circular needles) to ensure your tension is the same. Adjust your needle size as necessary to obtain gauge.

INSTRUCTIONS

Yoke Increases (Worked Flat):

Using long tail cast on and circular needles, CO 80 (80, 88, 92, 100) (100, 100, 108, 108) sts.

R1: K4 (4, 4, 4, 4) (4, 4, 4, 4), PM, K16 (16, 16, 16, 20) (20, 20, 22, 22), PM, K40 (40, 48, 52, 52) (52, 52, 56, 56), PM, K16 (16, 16, 16, 20) (20, 20, 22, 22), PM, K4 (4, 4, 4, 4) (4, 4, 4, 4).

R2: P across

For Sizes XS (S, M, L) ONLY:

R3: *K1, M1L, Diamond Stitch Pattern until 1 st before marker, M1R, K1, SM* until last marker section, K1, M1L, Diamond Stitch Pattern until 1 st before end, M1R, K1. (10 sts increased)

R4: *P1, Diamond Stitch Pattern until 1 st before marker, P1, SM.*

Repeat R3-4 an additional 5 (6, 7, 8, -) (-, -, -, –) times for a total of 6 (7, 8, 9, -) (-, -, -, –) repeats. Repeat R3 one more time and do not turn your work. You will now have 150 (160, 178, 192, -) (-, -, -, –) sts distributed as follows:

Right Front Panel: 18 (20, 22, 24, -) (-, -, -, –) sts

Sleeve A: 30 (32, 34, 36, -) (-, -, -, –) sts

Back Panel: 54 (56, 66, 72, -) (-, -, -, –) sts

Sleeve B: 30 (32, 34, 36, -) (-, -, -, –) sts

Left Front Panel: 18 (20, 22, 24, -) (-, -, -, –) sts

For Sizes XL (2XL, 3XL, 4XL, 5XL) ONLY:

R3: K1, KFB, Diamond Stitch Pattern until 2 sts before marker, M1R, K1, M1R, K1, SM, *K1, M1L, K1, M1L, Diamond Stitch Pattern until 2 sts before marker, M1R, K1, M1R, K1, SM* until last marker section, K1, M1L, K1, M1L, Diamond Stitch Pattern until 2 sts before end, KFB, K1. (14 sts increased).

R4: *P1, Diamond Stitch Pattern until 1 st before marker, P1, SM.*

Repeat R3-4 an additional – (-, -, -, 4) (6, 6, 8, 10) times for a total of – (-, -, -, 5) (7, 7, 9, 11) repeats. Repeat R3 one more time and do not turn your work. You will now have – (-, -, -, 184) (212, 212, 248, 276) distributed as follows:

Right Front Panel: – (-, -, -, 22) (28, 28, 34, 40) sts

Sleeve A: – (-, -, -, 32) (36, 36, 42, 46) sts

Back Panel: – (-, -, -, 60) (70, 70, 82, 92) sts

Sleeve B: – (-, -, -, 32) (36, 36, 42, 46) sts

Left Front Panel: – (-, -, -, 22) (28, 28, 34, 40) sts

For Sizes ALL SIZES:

Yoke Increases (Worked in the Round):

You will begin working in the round. Using the backwards loop cast on method, CO 18 (16, 22, 24, 32) (28, 28, 28, 24) sts on your right needle and K across to the first marker to join the round. This marker now becomes your BOR.

Rd 7: *K1, Diamond Stitch Pattern until 1 st before marker, K1, SM.*

Rd 8: *K1, M1L, Diamond Stitch Pattern until 1 st before marker, M1R, K1, SM.* (8 sts increased)

Rd 9: Repeat R7

Repeat Rds 8-9 an additional 14 (15, 16, 18, 25) (26, 30, 32, 33) times for a total of 15 (16, 17, 19, 26) (27, 31, 33, 34). You will now have 288 (304, 336, 368, 392) (428, 460, 512, 548) sts distributed as follows:

Sleeve A: 56 (64, 68, 74, 72) (74, 82, 88, 90) sts

Back Panel: 88 (88, 100, 110, 124) (140, 148, 168, 184) sts

Sleeve B: 56 (64, 68, 74, 72) (74, 82, 88, 90) sts

Front Panel: 88 (88, 100, 110, 124) (140, 148, 168, 184) sts

For Sizes XS (S, M, L) ONLY:

Rd 10: *K1, Diamond Stitch Pattern until 1 st before marker, K1, SM, *K1, M1L, Diamond Stitch Pattern until 1 st before marker, M1R, K1, SM.* (4 sts increased)

Rd 11: *K1, Diamond Stitch Pattern until 1 st before marker, K1, SM.*

Repeat Rds 10-11 an additional 3 (7, 7, 6, -) (-, -, -, –) times for a total of 4 (8, 8, 7, -) (-, -, -, –) repeats. You will now have 304 (336, 368, 396, -) (-, -, -, –) sts distributed as follows:

Sleeve A: 56 (64, 68, 74, -) (-, -, -, –) sts

Back Panel: 96 (104, 116, 124, -) (-, -, -, –) sts

Sleeve B: 56 (64, 68, 74, -) (-, -, -, –) sts

Front Panel: 96 (104, 116, 124, -) (-, -, -, –) sts

For Sizes XL ONLY:

Rd 12: *K1, Diamond Stitch Pattern until 1 st before marker, K1, SM.*

Repeat Rd 12 a total of 10 times.

For ALL Sizes:

Try on your piece. The length should fall just below your armpits, where you can comfortably pinch together either side of a sleeve panel under your arms. If it is too short, work Rd 12 until you reach your desired length.

Separate Sleeves from Body:

Rd 13 (Set up Round): Place 56 (64, 68, 74, 72) (74, 82, 88, 90) sts on scrap yarn or stitch holder to save for later, CO 2 (2, 2, 2, 2) (2, 2, 2, 2) sts, place marker for the new BOR, CO 2 (2, 2, 2, 2) (2, 2, 2, 2), work Diamond Stitch Pattern across 96 (104, 116, 124, 124) (140, 148, 168, 184) sts, place 56 (64, 68, 74, 72) (74, 82, 88, 90) sts on scrap yarn or stitch holder to save for later, CO 2 (2, 2, 2, 2) (2, 2, 2, 2) sts, PM, CO 2 (2, 2, 2, 2) (2, 2, 2, 2) sts, work Diamond Stitch Pattern across 96 (104, 116, 124, 124) (140, 148, 168, 184) sts. You will now have 200 (216, 240, 256, 256) (288, 304, 344, 376) sts on your needles, not counting the sleeve sts on the scrap yarn.

Body:

Rd 14: *Diamond Stitch Pattern, SM*

Repeat Rd 14 a total of 71 (62, 60, 57, 57) (62, 54, 49, 43) times, or until you reach 1 inch less than your desired length.

Rd 15-22: *K1, P1*

Bind off in ribbing pattern.

Collar:

Using the circular needle, pick up and knit 126 (128, 146, 156, 144) (144, 144, 156, 156) sts along the collar and begin working in the round.

Rd 1-8: *K1, P1*

Bind off in ribbing pattern.

Sleeves:

(Set up Round): Remove 56 (64, 68, 74, 72) (74, 82, 88, 90) sts from scrap yarn and distribute evenly along double pointed needles or small circular needles. Find the bottom of the armpit (where you bound off sts at the sleeve separation), and pick up 4 (4, 4, 4, 4) (4, 4, 4, 4) sts. PM in the middle of the picked up sts at the bottom of the armpit to mark the BOR.

Rd 1-8 (6, 5, 4, 5) (5, 4, 3, 3): Diamond Stitch Pattern across

Rd 9 (7, 6, 5, 6) (6, 5, 4, 4): K2tog, K until 2 sts before end, SSK.

Repeat Rds 1-9 (7, 6, 5, 6) (6, 5, 4, 4) for a total of 11 (13, 15, 17, 20) (25, 29, 31, 34) repeats. You will now have 38 (38, 38, 38, 42) (42, 42, 44, 44) sts.

Repeat Rd1 for a total of 6 (3, 6, 11, 9) (6, 4, 21, 17) repeats, or until you reach 1 inch less than your desired length.

Rd 10-17: *K1, P1*

Bind off in ribbing pattern. Repeat for second sleeve. Weave in ends using a tapestry needle. Block your garment.

THANK YOU!

I hope you enjoyed making the Cozy Diamond Sweater as much as I did! Tag me on Instagram @knitabitcrochetaway and use #knitabitcrochetaway and #CozyDiamondSweater – I’d love to see your progress and finished product!

Posted on

Pattern: Waffle Pullover

A circular yoke striped sweater with a textured design

Skill Level: Advanced Beginner


Find a printer-friendly, PDF version of the Waffle Pullover below!

SIZING

The pattern is designed to have 2 inches of positive ease. Select a size based on your actual bust width plus the 2 inches of positive ease, totaling the bust width in (A).

(A) Bust Width: 31.5 (35.5, 39, 42.5, 47) (49.5, 54.5, 59.5, 64.5) inches or 80 (90, 99, 108, 119) (126, 138, 151, 164) cm

(B) Sleeve Length: 9.5 (9.5, 9.5, 9.5, 9.5) (9.5, 9.5, 9.5, 9.5) inches or 24 (24, 24, 24, 24) (24, 24, 24, 24) cm

(C) Total Length: 19 (19, 19, 19.5, 20) (20, 20.5, 20.5, 20.5) inches or 48 (48, 48, 50, 51) (51, 52, 52, 52) cm

(D) Yoke Length: 9 (9.5, 9.5, 10, 11) (11, 11.5, 12, 13) inches or 23 (24, 24, 25, 28) (28, 29, 30, 33) cm

(E) Waist Length: 10 (9.5, 9.5, 9.5, 9) (9, 9, 8.5, 7.5) inches or 25 (24, 24, 24, 23) (23, 23, 22, 19) cm

(F) Upper Sleeve Width: 12 (12, 13, 14, 15.5) (17.5, 19, 20.5, 21.5) inches or 30.5 (30.5, 33, 35.5, 39.5) (44.5, 48.5, 52, 54.5) cm

GAUGE

17 sts x 32 rows = 4 inches (10 cm) in Waffle Stitch pattern

NOTIONS

Stitch markers

Scrap yarn

Tapestry needle

SUGGESTED NEEDLES

Size 4 (US), 3.50 mm circular needles

Size 4 (US), 3.50 mm double pointed needles or small circular needles

SUGGESTED YARN

2 (2, 2, 3, 3) (3, 4, 4, 4) skeins Hobbi Highland Wool in Ash Tree Bark (Color A)

2 (2, 2, 3, 3) (3, 4, 4, 4) skeins Hobbi Highland Wool in Cherry Blossom (Color B)

2 (2, 2, 3, 3) (3, 4, 4, 4) skeins Hobbi Highland Wool in Slate (Color C)

or 861 (963, 1097, 1230, 1394) (1573, 1752, 1945, 2123) yards or 787 (880, 1003, 1124, 1274) (1438, 1601, 1778, 1940) meters total of fingering weight yarn

or 287 (321, 366, 410, 465) (524, 584, 648, 708) yard or 262 (293, 334, 375, 425) (479, 534, 593, 647) meters in Color A, Color B, and Color C

STITCH ABBREVIATIONS

K – knit

P – purl

CO – cast on

P2tog – purl two stitches together (decrease)

SM – slip marker

PM – place marker

MC – main color

CC – contrast color

BO – bind off

BOR – beginning of round

Rd(s) – round(s)

St(s) – stitch(es)

K1B – (knit 1 below) insert your needle into the stitch below the next live stitch on your left needle (or the horizontal bar made by the purl stitch on the previous round) and knit into this stitch

M1R – (purlwise) pick up the horizontal bar between the last stitch worked and the one you’re about the work, bringing the needle from the back to front, then purl through the front loop of the strand (increase)

WAFFLE STITCH PATTERN

Rd 1: (in MC) P

Rd 2: (in CC) *K1, K1B*

Rd 3: (in MC) P

Rd 4: (in CC) *K1B, K1*

WAFFLE STITCH COLOR PATTERN

Rds 1-6: Color A as MC, Color B as CC

Rds 7-12: Color B as MC, Color C as CC

Rds 13-18: Color C as MC, Color A as CC

Repeat Rds 1-18

Pattern Notes

This circular yoke sweater is knit in the round and from the top down, beginning with a collar that is immediately decreased to accommodate the stitch pattern. You work increases across the yoke, which includes a front and a back body panel and the beginning of two sleeve panels. Increase rounds are worked on Rd 1 or Rd 3 of the Waffle Stitch repeats and count towards the repeats in the Waffle Stitch Pattern. When your yoke is long enough to reach your armpits, you separate the sleeve panels from the body panels, holding the sleeve stitches on scrap yarn. You will join the body panels on the sleeve separation round, then finish the body of the sweater down to the waist. Sleeves are worked individually and fall at 3/4 length. Sleeve decrease rounds are worked on Rd 1 or Rd 3 of the Waffle Stitch repeats and count towards the repeats in the Waffle Stitch Pattern.

The sweater uses the Waffle Stitch with repeating six-round color block sections. The Waffle Stitch is very stretchy, so be sure to check your gauge carefully when the garment has been blocked and is laying flat, but not stretched.

Stitch counts and round counts are indicated for each size based on the following size order: XS (S, M, L, XL) (2XL, 3XL, 4XL, 5XL). It is recommended that you highlight the stitch and round counts for your size before beginning to knit.

Stitches that appear between * and * should be worked until the end, unless otherwise indicated.

It is recommended you check your gauge on both the circular needles and double pointed needles (or small circular needles) to ensure your tension is the same. Adjust your needle size as necessary to obtain gauge.

INSTRUCTIONS

Collar:

Using the cable cast on method (video tutorial available here) and circular needles in MC, CO 120 (124, 132, 140, 148) (152, 152, 156, 156) sts. PM for BOR and begin working in the round.

Rd 1: *P2, P2tog* For Sizes S (M, L, XL) (4XL, 5XL) ONLY: skip the last P2tog on the round and P instead. You will now have 90 (94, 100, 106, 112) (114, 114, 118, 118) sts. Rd 1 counts as the first Rd in the Waffle Stitch Pattern.

Yoke Increases:

Rds 2-12: Waffle Stitch Pattern

Rd 13: *P2, M1R.* You will now have 135 (141, 150, 159, 168) (171, 171, 177, 177) sts.

Rds 14-28: Waffle Stitch Pattern

Rd 29: *P3, M1R.* You will now have 180 (188, 200, 212, 224) (228, 228, 236, 236) sts.

Rds 30-44: Waffle Stitch Pattern

Rd 45: *P4, M1R.* You will now have 225 (235, 250, 265, 280) (285, 285, 295, 295) sts.

For Sizes S (M, L, XL) (2XL, 3XL, 4XL, 5XL) ONLY:

Rds 46-64: Waffle Stitch Pattern

Rd 65: *P20 (12, 13, 8) (5, 5, 5, 5), M1R* until you have – (15, 10, 5, 0) (0, 0, 0, 0) sts remaining, P across. You will now have – (246, 270, 285, 315) (342, 342, 354, 354) sts.

For Sizes 3XL (4XL, 5XL) ONLY:

Rds 66-84: Waffle Stitch Pattern

Rd 85: *P10 (6, 4), M1R* until you have 2 (0, 2) sts remaining, P across. You will now have – (-, -, -, -) (-, 376, 413, 442) sts.

For ALL Sizes:

Work the Waffle Stitch Pattern for an additional 25 (7, 13, 13, 19) (25, 7, 13, 13) rounds, or until you reach your desired length.

Try on your piece. The length should fall just below your armpits, where you can comfortably pinch together either side of a sleeve panel under your arms. If it is too short, continue working Waffle Stitch Pattern rounds until you reach the described length, being sure to end on a Rd 2 or Rd 4 of the Waffle Stitch Pattern.

Separate Sleeves from Body:

Rd 86 (Set up Round): Place 48 (50, 54, 56, 62) (70, 76, 84, 88) sts on scrap yarn or stitch holder to save for later, CO 1 (1, 1, 2, 2) (2, 2, 2, 2) sts, PM for the new BOR, CO 1 (1, 1, 2, 2) (2, 2, 2, 2) sts, P across 65 (73, 81, 87, 96) (101, 112, 123, 133) sts, place 48 (50, 54, 56, 62) (70, 76, 84, 88) sts on scrap yarn or stitch holder to save for later, CO 2 (2, 2, 4, 4) (4, 4, 4, 4) sts, P across 65 (73, 81, 87, 96) (101, 112, 123, 133) sts. You will now have 133 (150, 166, 181, 199) (210, 232, 253, 274) sts on your needles, not counting the sleeve sts on the scrap yarn.

Body:

Work the Waffle Stitch Pattern for a total of 80 (78, 72, 78, 72) (66, 70, 64, 64) rounds, or until you reach your desired length. Bind off on a P round.

Sleeves:

(Set up Round): Remove 48 (50, 54, 56, 62) (70, 76, 84, 88) sts from scrap yarn and distribute evenly along double pointed needles or small circular needles. Find the bottom of the armpit (where you bound off sts at the sleeve separation), and pick up 2 (2, 2, 4, 4) (4, 4, 4, 4) sts. PM in the middle of the picked up sts at the bottom of the armpit to mark the BOR.

Rds 1-5 (5, 3, 3, 3) (-, -, -, -): Waffle Stitch Pattern

Rd 6 (6, 4, 4, 4) (2, 2, 2, 2): P1, P2tog, P until 3 sts before end, P2tog, P1

Repeat Rds 1-6 (6, 4, 4, 4) (2, 2, 2, 2) for a total of 10 (11, 13, 15, 17) (21, 24, 27, 29) repeats. You will now have 30 (30, 30, 30, 32) (32, 32, 34, 34) sts.

Work the Waffle Stitch Pattern for a total of 18 (12, 26, 18, 10) (36, 30, 24, 20) rounds, or until you reach your desired length. Bind off on a P round. Repeat for second sleeve.

Weave in ends using a tapestry needle. Block your garment.

THANK YOU!

I hope you enjoyed making the Waffle Pullover as much as I did! Tag me on Instagram @knitabitcrochetaway and use #knitabitcrochetaway and #WafflePullover – I’d love to see your progress and finished product!

Posted on

Pattern: Cable Pullover

A circular yoke sweater with collar cabling

Skill Level: Intermediate


Find a printer-friendly, PDF version of the Cable Pullover below!

SIZING

The pattern is designed to have 3 inches of positive ease. Select a size based on your actual bust width plus the 3 inches of positive ease, totaling the bust width in (A).

(A) Bust Width: 32 (36, 40, 44, 48) (52, 56, 60, 64) inches or 81.5 (91.5, 101.5, 112, 122) (132, 142, 152.5, 162.5) cm

(B) Sleeve Length: 19 (20.5, 20, 20, 19) (19.5, 18.5, 19.5, 21) inches or 48.5 (52, 51, 51, 48.5) (49.5, 47, 49.5, 53.5) cm

(C) Total Length: 22.75 (23.25, 24, 24.25, 25) (25.25, 25.25, 26.25, 26.25) inches or 58 (59, 61, 61.5, 63.5) (64, 64, 66.5, 66.5) cm

(D) Yoke Length: 11.5 (12, 13, 13.5, 14.5) (15, 15.5, 16.5, 17) inches or 29 (30.5, 33, 34.5, 37) (38, 39.5, 42, 43) cm

(E) Waist Length: 11.25 (11.25, 11, 10.75, 10.5) (10.25, 9.75, 9.75, 9.25) inches or 28.5 (28.5, 28, 27.5, 26.5) (26, 25, 25, 23.5) cm

(F) Upper Sleeve Width: 13 (13, 14, 15, 16.5) (18.5, 20, 21.5, 22.5) inches or 33 (33, 35.5, 38, 42) (47, 51, 54.5, 57) cm

GAUGE

23 sts x 32 rows = 4 inches (10 cm) in stockinette stitch

SUGGESTED NEEDLES

Size 4 (US), 3.50 mm circular needles

Size 4 (US), 3.50 mm double pointed needles or small circular needles

NOTIONS

Stitch markers

Scrap yarn

Cable needle

Tapestry needle

SUGGESTED YARN

3 (3, 4, 4, 5) (5, 6, 6, 7) skeins Hobbii Unicorn Solid in Teal or 1188 (1311, 1438, 1620, 1803) (2071, 2292, 2536, 2724) yards or 1086 (1199, 1315, 1481, 1649) (1894, 2096, 2319, 2491) metersof fingering weight yarn

STITCH ABBREVIATIONS

K– knit

P– purl

CO– cast on

K2tog– knit two stitches together (decrease)

SM– slip marker

PM– place marker

BO– bind off

BOR– beginning of round

Rd(s)– round(s)

RS– right side

WS– wrong side

St(s)– stitch(es)

M1L – pick up the bar between the stitch you knit and the one you’re about to knit, bringing the needle from front to back, and knit into the back of the stitch

M1R– pick up the bar between the last stitch you knit and the one you’re about to knit, bringing the needle from the back to the front, and knit into the front of the stitch

M1P– pick up the bar between the last stitch you knit and the one you’re about to knit, bringing the needle from the front to the back, and purl into the front of the stitch

SSK– slip unworked stitch from left needle to right needle knitwise. Slip a second unworked stitch from the left needle to the right needle knitwise. Slip those two unworked stitches separately back to the left needle purlwise. Knit those two stitches together in the back of the stitches (decrease)

K1F– place 1 st on the cable needle and hold them in the front, K1, K1 from cable needle

K1B– place 1 st on the cable needle and hold them in the back, K1, K1 from cable needle

K2F– place 2 sts on the cable needle and hold them in the front, K2, K2 from cable needle

K2B– place 2 sts on the cable needle and hold them in the back, K2, K2 from cable needle

K3F– place 3 sts on the cable needle and hold them in the front, K3, K3 from cable needle

K3B– place 3 sts on the cable needle and hold them in the back, K3, K3 from cable needle

K4F– place 4 sts on the cable needle and hold them in the front, K4, K4 from cable needle

K4B– place 4 sts on the cable needle and hold them in the back, K4, K4 from cable needle

K5F– place 5 sts on the cable needle and hold them in the front, K5, K5 from cable needle

K5B– place 5 sts on the cable needle and hold them in the back, K5, K5 from cable needle

PATTERN NOTES

This circular yoke sweater is knit in the round and from the top down, beginning with a collar that fits close to the neck. You first work the yoke, which includes a front and a back body panel and the beginning of two sleeve panels. When your yoke is long enough to reach your armpits, you separate the sleeve panels from the body panels, holding the sleeve stitches on scrap yarn and joining the body panels to finish the body of the sweater down to the waist. The pattern includes optional bust darts, including suggested spacing for each size and a description to customize bust darts based on your own measurements. (Note: the sweater in the modeled picture does not feature bust darts.) You end by working each sleeve individually.

Stitch counts and round counts are indicated for each size based on the following size order: XS (S, M, L, XL) (2XL, 3XL, 4XL, 5XL). It is recommended that you highlight the stitch and round counts for your size before beginning to knit.

Stitches that appear between * and * should be worked until the end, unless otherwise indicated.

It is recommended you check your gauge on both the circular needles and double pointed needles (or small circular needles) to ensure your tension is the same. Adjust your needle size as necessary to obtain gauge.

INSTRUCTIONS

Collar:

Using long tail cast on and circular needles, loosely cast on CO 80 (84, 90, 94, 100) (104, 110, 120, 124) sts. PM for BOR and begin working in the round, being careful not to twist the first round.

Rd1-6: *K1, P1* For Sizes S (L, 2XL, 5XL) ONLY: work one M1R at the end of Rd 6

Yoke Increases:

Rd 7-11: *K4, P1*

Rd 12: *K1B, K1F, P1*

Rd 13-15: Repeat Rd 7

Rd 16: Repeat Rd 12

Rd 17: Repeat Rd 7

Rd 18: *K1, M1L, K1, M1L, K1, M1R, K1, M1R, P1, M1P.* You will now have 160 (170, 180, 190, 200) (210, 220, 240, 250) sts.

Rd 19: *K8, P2*

Rd 20: *K2B, K2F, P2*

Rd 21-23: Repeat Rd 19

Rd 24: Repeat Rd 20

Rd 25: Repeat Rd 19

Rd 26: *K2, M1L, K2, M1L, K2, M1R, K2, M1R, P2, M1P.* You will now have 240 (255, 270, 285, 300) (315, 330, 360, 375) sts.

Rd 27: *K12, P3*

Rd 28: *K3B, K3F, P3*

Rd 29-31: Repeat Rd 27

Rd 32: Repeat Rd 28

Rd 33: Repeat Rd 27

Rd 34: *M1L, K3, M1L, K6, M1R, K3, M1R, P3.* You will now have 304 (323, 342, 361, 380) (399, 418, 456, 475) sts.

Rd 35: *K16, P3*

Rd 36: *K4B, K4F, P3*

Rd 37-39: Repeat Rd 35

Rd 40: Repeat Rd 36

Rd 41: Repeat Rd 35

For Size XS ONLY:

Rd 42: *M1L, K4, M1L, K8, M1R, K4, M1R, P3, K16, P3* until the end. You will now have 336 (-, -, -, -) (-, -, -, –) sts.

Rd 43: *K20, P3, K16, P3*

Rd 44: *K5B, K5F, P3, K4B, K4F, P3*

Rd 45-51: Repeat Rd 43

Repeat Rds 44-51 an additional 2 (-, -, -, -) (-, -, -, –) times.

For Size S ONLY:

Rd 42: *M1L, K4, M1L, K8, M1R, K4, M1R, P3, K16, P3* until the last 19 sts, then M1L, K4, M1L, K8, M1R, K4, M1R, P3. You will now have – (359, -, -, -) (-, -, -, –) sts.

Rd 43: *K20, P3, K16, P3* until last 23 sts, K20, P3.

Rd 44: *K5B, K5F, P3, K4B, K4F, P3* until last 23 sts, K5B, K5F, P3

Rd 45-51: Repeat Rd 43

Repeat Rds 44-51 an additional – (3, -, -, -) (-, -, -, –) times.

For Size M ONLY:

Rd 42: *M1L, K4, M1L, K8, M1R, K4, M1R, P3, K16, P3* until the end. You will now have – (-, 378, -, -) (-, -, -, –) sts.

Rd 43: *K20, P3, K16, P3*

Rd 44: *K5B, K5F, P3, K4B, K4F, P3*

Rd 45-47: Repeat Rd 43

Rd 48: Repeat Rd 44

Rd 49: Repeat Rd 43

Rd 50: *K20, P3, M1L, K4, M1L, K12, P3* until the end. You will now have – (-, 396, -, -) (-, -, -, –) sts.

Rd 51: *K20, P3, K18, P3*

Rd 52: *K5B, K5F, P3, K5B, K4F, P3*

Rd 53-59: Repeat Rd 51

Repeat Rds 52-59 an additional – (-, 2, -, -) (-, -, -, –) times.

For Size L ONLY:

Rd 42: *M1L, K4, M1L, K8, M1R, K4, M1R, P3, K16, P3* until the last 19 sts, then M1L, K4, M1L, K8, M1R, K4, M1R, P3. You will now have – (-, -, 401, -) (-, -, -, –) sts.

Rd 43: *K20, P3, K16, P3* until last 23 sts, K20, P3.

Rd 44: *K5B, K5F, P3, K4B, K4F, P3* until last 23 sts, K5B, K5F, P3

Rd 45-47: Repeat Rd 43

Rd 48: Repeat Rd 44

Rd 49: Repeat Rd 43

Rd 50: *K20, P3, M1L, K4, M1L, K12, P3* until the last 23 sts, K20, P3. You will now have – (-, -, 420, -) (-, -, -, –) sts.

Rd 51: *K20, P3, K18, P3* until the last 23 sts, K20, P3.

Rd 52: *K5B, K5F, P3, K5B, K4F, P3* until the last 23 sts, K20, P3.

Rd 53-59: Repeat Rd 51

Repeat Rds 52-59 an additional – (-, -, 3, -) (-, -, -, –) times.

For Size XL ONLY:

Rd 42: *M1L, K4, M1L, K8, M1R, K4, M1R, P3* until the end. You will now have – (-, -, -, 460) (-, -, -, –) sts.

Rd 43: *K20, P3*

Rd 44: *K5B, K5F, P3*

Rd 45-51: Repeat Rd 43

Repeat Rds 44-51 an additional – (-, -, -, 4) (-, -, -, –) times.

For Sizes 2XL ONLY:

Rd 42: *M1L, K4, M1L, K8, M1R, K4, M1R, P3* until the end.   You will now have – (-, -, -, -) (483, -, -, –) sts.

Rd 43: *K20, P3*

Rd 44: *K5B, K5F, P3*

Rd 45-47: Repeat Rd 43

Rd 48: Repeat Rd 44

Rd 49: Repeat Rd 43

Rd 50: *K20, M1P, P3.* You will now have – (-, -, -, -) (504, -, -, –) sts.

Rd 51: *K20, P4*

Rd 52: *K5B, K5F, P4*

Rd 53-59: Repeat Rd 51

Repeat Rds 52-59 an additional – (-, -, -, -) (4, -, -, –) times.

For Sizes 3XL-5XL ONLY:

Rd 42: *M1L, K4, M1L, K8, M1R, K4, M1R, P3* until the end. You will now have – (-, -, -, -) (-, 506, 552, 575) sts.

Rd 43: *K20, P3*

Rd 44: *K5B, K5F, P3*

Rd 45-47: Repeat Rd 43

Rd 48: Repeat Rd 44

Rd 49: Repeat Rd 43

Rd 50: *K20, M1P, P3, M1P.* You will now have – (-, -, -, -) (-, 550, 600, 625) sts.

Rd 51: *K20, P5*

Rd 52: *K5B, K5F, P5*

Rd 53-59: Repeat Rd 51

Repeat Rds 52-59 an additional – (-, -, -, -) (-, 4, 5, 5) times.

For ALL Sizes:

Try on your piece. The length should fall just below your armpits, where you can comfortably pinch together either side of a sleeve panel under your arms. If it is too short, continue repeating the cable repeats for your size until you reach the described length.

Separate Sleeves from Body:

Rd 60 (Set up Round): Place 70 (72, 76, 82, 90) (100, 110, 118, 124) sts on scrap yarn or stitch holder to save for later, CO 2 (2, 2, 2, 2) (3, 3, 3, 3) sts, place marker for the new BOR, CO 2 (2, 2, 2, 2) (3, 3, 3, 3), K across 98 (108, 122, 128, 140) (152, 165, 182, 189) sts, place 70 (72, 76, 82, 90) (100, 110, 118, 124) sts on scrap yarn or stitch holder to save for later, CO 2 (2, 2, 2, 2) (3, 3, 3, 3) sts, PM, CO 2 (2, 2, 2, 2) (3, 3, 3, 3), K across 98 (108, 122, 128, 140) (152, 165, 182, 189) sts. You will now have 204 (223, 234, 245, 288) (295, 298, 328, 339) sts on your needles, not counting the sleeve sts on the scrap yarn.

Body with Bust Darts: (Optional)

Use this section if you would like to add bust darts to your sweater and make it more form fitting at the waist. For instructions on how to calculate and customize the bust darts to your particular size, please see the Pattern Notes aboutAdding Bust Darts.

Rd 61: (setup round) K21 (24, 29, 31, 35) (39, 43, 49, 51), PM for bust dart marker, K56 (60, 64, 66, 70) (74, 79, 84, 87), PM for bust dart marker, K across to next underarm marker, SM, K across

Rd 62: K1, K2tog, K until 3 sts before bust dart marker, SSK, K1, K until next bust dart marker, SM, K1, K2tog, K until 3 sts before underarm marker, SSK, K1, SM, K across.

Rd 63: K across

Repeat Rds 62-63 an additional 7 (9, 11, 11, 11) (11, 11, 14, 16) times for a total of 8 (10, 12, 12, 12) (12, 12, 15, 17) repeats. You will now have 172 (183, 186, 197, 240) (247, 250, 268, 271) sts.

Rd 64: K across

Repeat Rd 64 a total of 74 (70, 64, 62, 60) (58, 54, 48, 40) times, or until you reach 1 inch less than your desired length.

Rd 65-70: *K1, P1*

Bind off in ribbing pattern.

Body without Bust Darts:

Rd 71: K across

Repeat Rd 71 a total of 90 (90, 88, 86, 84) (82, 78, 78, 74) times, or until you reach 1 inch less than your desired length.

Rd 72-77: *K1, P1*

Bind off in ribbing pattern.

Sleeves:

(Set up Round): Remove 70 (72, 76, 82, 90) (100, 110, 118, 124) sts from scrap yarn and distribute evenly along double pointed needles or small circular needles. Find the bottom of the armpit (where you bound off sts at the sleeve separation), and pick up 4 (4, 4, 4, 4) (6, 6, 6, 6) sts. PM in the middle of the picked up sts at the bottom of the armpit to mark the BOR.

Rd1-8 (8, 7, 6, 5)(4, 3, 3, 3): K across

Rd9 (9, 8, 7, 6) (5, 4, 4, 4): K1, K2tog, K until 3 sts before end, SSK, K1

Repeat Rds 1-9 (9, 8, 7, 6)(5, 4, 4, 4) for a total of 17 (18, 20, 23, 26) (32, 37, 39, 42) repeats. You will now have 40 (40, 40, 40, 42) (42, 42, 46, 46) sts.

Repeat Rd1 for a total of 3 (0, 0, 3, 8) (8, 20, 16, 4) repeats, or until you reach 1 inch less than your desired length.

Rd10-15: *K1, P1*

Bind off and weave in ends using a tapestry needle. Block your garment.

THANK YOU!

I hope you enjoyed making the Cable Pullover as much as I did! Tag me on Instagram @knitabitcrochetaway and use #knitabitcrochetaway and #CablePullover– I’d love to see your progress and finished product!

Posted on

Pattern: Cable Cardigan

A cardigan featuring cable edging that continues through the collar

Skill Level: Advanced


Find a printer-friendly, PDF version of the Cable Cardigan below!

SIZING

The pattern is designed to have 4 inches of positive ease. Select a size based on your actual bust width plus the 4 inches of positive ease, totaling the bust width in (A).

(A) Bust Width: 33 (37, 41, 45, 49) (53, 57, 61, 65) inches or 84 (94, 104, 114, 124) (135, 145, 155, 165) cm

(B) Sleeve Length: 21 (22, 22, 22, 22) (22, 22, 22, 22) inches or 53 (56, 56, 56, 56) (56, 56, 56, 56) cm

(C) Total Length: 22 (23.5, 22.5, 23, 23.5) (23, 23, 23.5, 23.5) inches or 56 (60, 57, 58, 60) (58, 58, 60, 60) cm

(D) Yoke Length: 8 (8.5, 10.5, 11.5, 13) (12, 13, 14, 14.5) inches or 20 (22, 27, 29, 33) (30, 33, 36, 37) cm

(E) Waist Length: 14 (15, 12, 11.5, 10.5) (11, 10, 9.5, 9) inches or 36 (38, 30, 29, 27) (28, 25, 24, 23) cm

(F) Upper Sleeve Width: 13.75 (14.25, 15, 16, 17.5) (19.5, 21, 22.5, 23.5) inches or 35 (36, 38, 41, 44) (50, 53, 57, 60) cm

GAUGE

18 sts x 22 rows = 4” (10 cm) in stockinette stitch

SUGGESTED NEEDLES

Size 6 (US), 4.00 mm circular needles

Size 6 (US), 4.00 mm double pointed needles or small circular needles

NOTIONS

Stitch markers

Scrap yarn

Cable needle

18-30 inch (46-51 cm) zipper (optional)

Sewing needle and thread (optional)

SUGGESTED YARN

3 (4, 4, 4, 5) (5, 6, 6, 6) skeins Hobbii Evergreen in Oat or 741 (823, 901, 986, 1082) (1207, 1295, 1427, 1505) yardsor 678 (753, 824, 902, 989) (1104, 1184, 1305, 1376) metersof fingering weight yarn

3 (4, 4, 4, 5) (5, 5, 6, 6) skeins Hobbii Diablo in Powder Rose or 741 (823, 901, 986, 1082) (1207, 1295, 1427, 1505) yards or 678 (753, 824, 902, 989) (1104, 1184, 1305, 1376)  metersof lace weight yarn

3 (4, 4, 4, 5) (5, 5, 6, 6) skeins Hobbii Diablo Wild Prints in Desert Fox or 741 (823, 901, 986, 1082) (1207, 1295, 1427, 1505) yards or 678 (753, 824, 902, 989) (1104, 1184, 1305, 1376) meters of lace weight yarn

STITCH ABBREVIATIONS

K– knit

P– purl

CO– cast on

K2tog– knit two stitches together (decrease)

SM– slip marker

PM– place marker

BOR– beginning of round

R(d)– row (round)

RS– right side

WS– wrong side

PCO– provisional cast on

St(s)– stitch(es)

BO– bind off

SSK– slip unworked stitch from left needle to right needle knitwise. Slip a second unworked stitch from the left needle to the right needle knitwise. Slip those two unworked stitches separately back to the left needle purlwise. Knit those two stitches together in the back of the stitches (decrease).

K3F– place 3 sts on the cable needle and hold them in the front, K3, K3 from cable needle

K3B– place 3 sts on the cable needle and hold them in the back, K3, K3 from cable needle

K2F– place 2 sts on the cable needle and hold them in the front, K2, K2 from cable needle

K2B– place 2 sts on the cable needle and hold them in the back, K2, K2 from cable needle

RIGHT CABLE EDGE PATTERN

R1: (RS) P2, K8, P2

R2: (WS) K2, P8, K2

R3: P2, K1, K3F, K1, P2

R4: Repeat R2

R5-8: Repeat R1-2

LEFT CABLE EDGE PATTERN

R1: (RS) P2, K8, P2

R2: (WS) K2, P8, K2

R3: P2, K1, K3B, K1, P2

R4: Repeat R2

R5-8: Repeat R1-2

RIGHT CABLE COLLAR PATTERN

R1: (RS) P2, K6

R2: (WS) P6, K2

R3: P2, K1, K2F, K1

R4: Repeat R2

R5-8: Repeat R1-2

LEFT CABLE COLLAR PATTERN

R1: (RS) K6, P2

R2: (WS) K2, P6

R3: K1, K2B, K1, P2

R4: Repeat R2

R5-8: Repeat R1-2

PATTERN NOTES

This raglan sweater is worked flat with the three listed yarns held together and from the bottom up, beginning with the body first. When you get to the sleeve separation point, you work the provisional cast on to create the sleeve sts and hold those live sleeve stitches on scrap yarn for later. Then, you work the yoke decreases until you reach the neck. The collar is worked by continuing the cable edging from the body of the sweater and turning your work back and forth to join the collar to the neckline using decreases. You end by working each sleeve individually, starting by picking up the live stitches from the provisional cast on.

Stitch counts and round counts are indicated for each size based on the following size order: XS (S, M, L, XL) (2XL, 3XL, 4XL, 5XL). It is recommended that you highlight the stitch and round counts for your size before beginning to knit.

Stitches that appear between * and * should be worked until the end, unless otherwise indicated.

It is recommended you check your gauge on both the circular needles and double pointed needles (or small circular needles) to ensure your tension is the same. Adjust your needle size as necessary to obtain gauge.

A Note About Sleeves and the Provisional Cast On

When you are working the provisional cast on to create the sleeve stitches at the sleeve separation, it is recommended that you work the sleeve panel stitches on separate needles, either double pointed needles or small circular needles, for the first 5-6 rows, or until you have enough length that the sts can be worked comfortably on the same needle as the remainder of the body sts without being pulled.

A Note About Yoke Decreases and Maintaining the Cable Pattern

When you are working the yoke decreases and as you get closer to the neckline, your cable edges will no longer have enough stitches to work the entire Right Cable Edge Pattern and Left Cable Edge Pattern. As you decrease sts, eliminate the stitch from the pattern in the Right Cable Edge Pattern or Left Cable Edge Pattern that appears closest to the marker first.

INSTRUCTIONS

Edging:

Using long tail cast on, CO 152 (164, 188, 204, 220) (236, 256, 276, 292) sts.

R1-10: *K1, P1*

Body:

R11: Right Cable Edge Pattern, K across until last 12 sts, Left Cable Edge Pattern

R12: Left Cable Edge Pattern, P across until last 12 sts, Right Cable Edge Pattern

Repeat R11-12 for a total of 66 (62, 56, 51, 45) (50, 44, 43, 42) rows, or until you reach your desired body length before the sleeve separation.

Separate Sleeve and Body Sections:

Please see Pattern Notes for A Note About Sleeves and the Provisional Cast On

R13: Work across 36 (39, 45, 49, 53) (57, 62, 66, 70) sts, beginning with the Right Cable Edge Pattern then K across, BO 4 (4, 4, 4, 4) (4, 4, 6, 6) sts, K72 (78, 90, 98, 106) (114, 124, 132, 140), BO 4 (4, 4, 4, 4) (4, 4, 6, 6) sts, work across 36 (39, 45, 49, 53) (57, 62, 66, 70) sts, beginning with K until the last 12 sts, then Left Cable Edge Pattern.

R14: Work across 36 (39, 45, 49, 53) (57, 62, 66, 70) sts, beginning with the Left Cable Edge Pattern then P across, PM, PCO 58 (60, 64, 68, 74) (84, 90, 96, 100) sts onto scrap yarn, PM, P72 (78, 90, 98, 106) (114, 124, 132, 140), PM, PCO 58 (60, 64, 68, 74) (84, 90, 96, 100) sts onto scrap yarn, PM, work across 36 (39, 45, 49, 53) (57, 62, 66, 70) sts, beginning with P until the last 12 sts, then Right Cable Edge Pattern. You will now have 260 (276, 308, 332, 360) (396, 428, 456, 480) live sts on your needles, distributed as follows:

Right Front Panel: 36 (39, 45, 49, 53) (57, 62, 66, 70) sts

Sleeve A: 58 (60, 64, 68, 74) (84, 90, 96, 100) sts

Back Panel: 72 (78, 90, 98, 106) (114, 124, 132, 140) sts

Sleeve B: 58 (60, 64, 68, 74) (84, 90, 96, 100) sts

Left Front Panel: 36 (39, 45, 49, 53) (57, 62, 66, 70) sts

Yoke Decrease:

Please see Pattern Notes for A Note About Yoke Decreases and Maintaining the Cable Pattern

For Sizes M, L, XL ONLY:

R15: Right Cable Edge Pattern, SSK, K until 3 sts before marker, K2tog, K1, SM, K across to marker, SM, K1, SSK, K until 3 sts before marker, K2tog, K1, SM, K across to marker, SM, K1, SSK, K until 2 sts before Left Cable Edge Pattern, K2tog, Left Cable Edge Pattern. (6 decreases total).

R16: Left Cable Edge Pattern, P across until last 12 sts, Right Cable Edge Pattern.

R17: Right Cable Edge Pattern, K until 3 sts before marker, K2tog, K1, SM, K across to marker, SM, K1, SSK, K until 3 sts before marker, K2tog, K1, SM, K across to marker, SM, K1, SSK, K until last 12 sts, Left Cable Edge Pattern. (4 decreases total).

R18: Repeat R16

Repeat R15-18 an additional – (-, 0, 1, 2) (-, -, -, -) times for a total of – (-, 1, 2, 3) (-, -, -, -) repeats. Repeat R17-18 one time. You will now have – (-, 294, 308, 326) (-, -, -, -,) sts total distributed as follows:

Right Front Panel: – (-, 41, 42, 43) (-, -, -, -) sts

Sleeve A: – (-, 64, 68, 74) (-, -, -, -) sts

Back Panel: – (-, 84, 88, 92) (-, -, -, -) sts

Sleeve B: – (-, 64, 68, 74) (-, -, -, -) sts

Left Front Panel: – (-, 41, 42, 43) (-, -, -, -) sts

For ALL Sizes:

R19: Right Cable Edge Pattern, SSK, K to 3 sts before marker, K2tog, K1, SM, *K1, SSK, K until 3 sts before marker, K2tog, K1, SM* until last marker section, K1, SSK, K to 2 to before Left Cable Edge Pattern, K2tog, Left Cable Edge Pattern (10 decreases total).

R20: Left Cable Edge Pattern, P across until last 12 sts, Right Cable Edge Pattern.

R21: Right Cable Edge Pattern, K to 3 sts before marker, K2tog, K1, SM, *K1, SSK, K until 3 sts before marker, K2tog, K1, SM* until last marker section, K1, SSK, K until last 12 sts, Left Cable Edge Pattern (8 decreases total).

R22: Repeat R20

Repeat R19-22 an additional 6 (7, 6, 6, 6) (9, 9, 9, 9) times for a total of 7 (8, 7, 7, 7) (10, 10, 10, 10)

repeats.

For Sizes M, L ONLY:

Repeat R19-20 one time.

For ALL Sizes:

R23: Right Cable Edge Pattern, K to 3 sts before marker, K2tog, K1, SM, *K1, SSK, K until 3 sts before marker, K2tog, K1, SM* until last marker section, K1, SSK, K to Left Cable Edge Pattern, Left Cable Edge Pattern (8 decreases total).

R24: Left Cable Edge Pattern, P across until last 12 sts, Right Cable Edge Pattern.

Repeat R23-24 an additional 6 (6, 9, 10, 13) (6, 7, 7, 7) times for a total of 7 (7, 10, 11, 14) (7, 8, 8, 8) repeats.

You will now have 78 (76, 78, 84, 88) (160, 184, 212, 236) sts total distributed as follows:

Right Front Panel: 8 (8, 8, 8, 8) (20, 24, 28, 32) sts

Sleeve A: 16 (14, 14, 16, 18) (30, 34, 40, 44) sts

Back Panel: 30 (32, 34, 36, 36) (60, 68, 76, 84) sts

Sleeve B: 16 (14, 14, 16, 18) (30, 34, 40, 44) sts

Left Front Panel: 8 (8, 8, 8, 8) (20, 24, 28, 32) sts

For Sizes 2XL, 3XL, 4XL, 5XL ONLY:

R25: Right Cable Edge Pattern, K to 5 sts before marker, K2tog, K2tog, K1, SM, K1, SSK, K until 3 sts before marker, K2tog, K1, SM, K1, SSK, SSK, K until 5 sts before marker, K2tog, K2tog, K1, SM, K1, SSK, K until 3 sts before marker, K2tog, K1, SM, K1, SSK, SSK, K to Left Cable Edge Pattern, Left Cable Edge Pattern (12 decreases total).

R26: Left Cable Edge Pattern, P across until last 12 sts, Right Cable Edge Pattern.

Repeat R25-26 an additional – (-, -, -, -) (5, 7, 9, 11) times for a total of – (-, -, -, -) (6, 8, 10, 12) repeats. You will now have – (-, -, -, -) (88, 88, 92, 92) sts total distributed as follows:

Right Front Panel: – (-, -, -, -) (8, 8, 8, 8) sts

Sleeve A: – (-, -, -, -) (18, 18, 20, 20) sts

Back Panel: – (-, -, -, -) (36, 36, 36, 36) sts

Sleeve B: – (-, -, -, -) (18, 18, 20, 20) sts

Left Front Panel: – (-, -, -, -) (8, 8, 8, 8) sts

Collar:

Begin working the collar on the Right Cable Edge first. With each row, you will be pulling in a new stitch from around the collar to work a decrease with an existing stitch of the collar edge.

R27: (RS) Right Cable Collar Pattern across 7 sts, K2tog, Sl 1, turn

R28: (WS) P2tog, Right Cable Collar Pattern until end, turn

Repeat R27-28 until you have 31 (32, 33, 34, 34) (34, 34, 34, 34) live sts remaining, inclusive of both the Right Cable Edge sts you just worked and the Left Cable Edge and surrounding sts left unworked.

Cut yarn. Join yarn at the Left Cable Edge, with the wrong side facing.

Note: you will begin with R2 of the Left Cable Collar Pattern

R29: (WS) Left Cable Collar Pattern across 7 sts, P2tog, Sl 1, turn

R30: (RS) SSK, Left Cable Collar Pattern until end, turn

Repeat R29-30 until you have 16 sts remaining, with 8 sts on the Right Cable Edge you left unworked after cutting the yarn, and 8 sts on the Left Cable Edge you just finished working. Cut yarn, leaving a long tail. With the RS of the work facing and using a tapestry needle, use the kitchener stitch to attach the Right Cable Edge to the Left Cable Edge.

Sleeves:

(Set up Round): Unzip 58 (60, 64, 68, 74) (84, 90, 96, 100) PCO sts from scrap yarn and distribute evenly along double pointed needles or small circular needles. Find the bottom of the armpit (where you bound off sts at the sleeve separation), and pick up 4 (4, 4, 4, 4) (4, 4, 6, 6) sts. PM in the middle of the picked up sts at the bottom of the armpit to mark the BOR.

Rd1-6 (6, 5, 4, 4)(3, 2, 2, 2): K across

Rd7 (7, 6, 5, 5) (4, 3, 3, 3): K1, K2tog, K until 3 sts before end, SSK, K1

Repeat Rd1-7 (7, 6, 5, 5) (4, 3, 3, 3)for a total of 15 (16, 18, 20, 22) (27, 30, 33, 35) repeats. You will now have 32 (32, 32, 32, 34) (34, 34, 36, 36) sts.

Rd8 (8, 7, 6, 6) (5, 4, 4, 4)-17 (17, 16, 15, 15) (14, 13, 13, 13): *K1, P1*

Bind off and weave in ends using a tapestry needle. Block your garment.

Zipper: (Optional)

Helpful video tutorial from Yarnspirations linked here.

Before measuring for and attaching your zipper, is it important to block your garment to its finished measurements first.

Measure the length from the bottom of the cardigan to the start of the collar edge decreases and select a zipper that is the same length.

Lay your garment flat. Starting from the bottom of the garment and with the zipper tab closed and at the top of the garment, line up the zipper along the edges of the garment. Pin the edge of the garment so it lines up with the edge of the zipper. Be sure the edges of the garment line up to touch each other, but do not overlap because you do not want the garment to get caught in the zipper.

Using a needle and thread, sew the zipper to the WS edge of the last K stitch on the garment edge.

THANK YOU!

I hope you enjoyed making the Cable Cardigan as much as I did! Tag me on Instagram @knitabitcrochetaway and use #knitabitcrochetaway and #CableCardigan– I’d love to see your progress and finished product!