Posted on

Pattern: Pottery Barn Cable Knit Throw

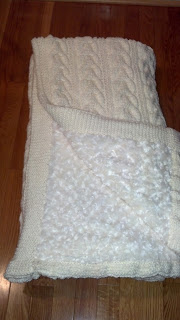
Make a blanket inspired by this Pottery Barn throw, also pictured above on the left. Once you knit the blanket, you’ll sew some faux fur fabric onto the wrong side of the piece.

Finished Measurements:
60 inches X 72 inches

Materials:
Four (4) skeins Loops & Threads Impeccable Big! in Aran
Size 10 1/2 Circular Knitting Needle
Cable Needle
Sewing Needle
Faux Sheepskin fabric, measuring approx. 60 inches X 72 inches
White thread
Safety pins

Abbreviations:
K – knit
P – purl
Sts – stitches
CN – cable needle
Sl – slip


Instructions:
Knitting:
CO 336
Rows 1-10: K across.
Row 11: (WS) K10, P6, *P12, K2, P1, K1, P1, K2.* Repeat from * to * until last 16 sts. P6, K10.
Row 12: (RS) K16, *P2, K1, P1, K1, P2, K12.* Repeat from * to * until last 16 sts, K16.
Row 13: Repeat Row 11.
Row 14: Repeat Row 12.
Row 15: Repeat Row 11.
Row 16: K16, *P2, K1, P1, K1, P2, sl 3 sts to CN and hold to the back, K3, K3 from CN, sl 3 sts to CN and hold to the front, K3, K3 from CN.* Repeat from * to * until last 16 sts. K16.

Row 17: Repeat Row 11.
Row 18: Repeat Row 12.
Row 19: Repeat Row 11.
Row 20: Repeat Row 12.
Row 21: Repeat Row 11.
Row 22: Repeat Row 12.
Row 23: Repeat Row 11.
Row 24: Repeat Row 16.

Repeat Rows 17-24 until you reach the desired length.

Last 10 rows: K across.

Sewing:

Do not sew the fabric onto the K edging along the blanket. The K edging will be folded over later to hide the rough fabric edge. 


Lay the fabric, right side facing up, on top of the wrong side of the knitted blanket and attach using safety pins. Using a sewing needle and thread the same color as the yarn, sew the fabric onto the wrong side of the blanket. The seam should be inside the edging where the repeating pattern begins.


Sew diagonal lines across the blanket, 10 inches apart from each other. This will keep the fabric attached to the knitted blanket, even in the center. The thread you use should be thin enough that the lines will not be visible.


Fold over the knit edge along the top first, safety pinning it down. Sew the knit border to the blanket. Fold the knit edge along the side of the blanket next, being sure to fold it over the top edge just sewed down. Sew the knit border to the blanket. Repeat for the bottom edge and other side edge.


Viola! Edging complete.

Posted on

Pattern: Pinwheel Hot Pad


Make the perfect pinwheel star hot pad that is even along the edges to create a flat surface for those hot pots and pans.

Materials:

1 skein Cotlin (pink)
1/2 skein Cotlin (cream)
size “H” crochet hook

This post contains affiliate links. If you do decide to purchase though the links in this post, a small portion of the sale may go to support this site, at no additional cost to you.

Instructions:

Starting with pink yarn, chain 4. Slip stitch to form a ring.


Chain 3 (counts as 1st dc), 13 dc in ring. Slip stitch in top of chain 3.


Row 1: *Chain 27. Skip next dc, slip stitch in next dc. (1st petal). Repeat from * 5 times. Chain 27, slip stitch at base of 1st petal. (7 petals)

Row 2: *1 sc in first 13 chains of 1st petal. 3 sc in next chain (top of 1st petal). 1 sc in each of last 13 chains of 1st petal. (29 sc). Skip slip stitch. Repeat from * for each of the remaining petals all the way around.

Row 3:  *1 sc in each of the first 14 sc of 1st petal. 3 sc in next sc (top of petal). 1 sc in each of the remaining 14 sc of 1st petal. (31 sc). Repeat from * for each of the remaining petals all the way around.

Row 4: *1 sc in each of the first 15 sc of 1st petal. 3 sc in next sc (top of petal). 1 sc in each of the remaining 15 sc of 1st petal. (33 sc). Repeat from * for each of the remaining petals all the way around.

Row 5: *1 sc in each of the first 16 sc of 1st petal. 3 sc in next sc (top of petal). 1 sc in each of the remaining 16 sc of 1st petal. (35 sc). Repeat from * for each of the remaining petals all the way around. Fasten off.


Your work should look like this, with the petals not laying completely flat:


Hold the 1st petal at the tip (at the 3 sc in 1 sc point).


Twist the petal clockwise 180°, folding the petal on top of itself.


Halfway down the left side of the petal, make a crease so the front portion near the base is facing. Spread and flatten to create the shape.


Continue folding all 7 petals the same way. 


The back of the petal at the tip should be facing you. The front of the bottom half of the petal on the left should be facing you. Work Rows 6-8 with the work folded this way.


Row 6: Change to cream yarn. *Starting at the tip of the 1st petal, 3 sc in 1 sc. 1 sc in the next 7 sc. Attach the 1st petal to the 2nd petal using 1 sc at the 8th sc from the tip of each petal. 1 sc in the next 7 sc along the 2nd petal. Repeat from * for each of the remaining petals.


Row 7: Working in back loops only, 1 sc in each sc around.

Row 8: Working in front loops from Row 6 only, 1 sc in each sc around.


Work complete! The double edge ensures that hot pots or pans won’t wobble.