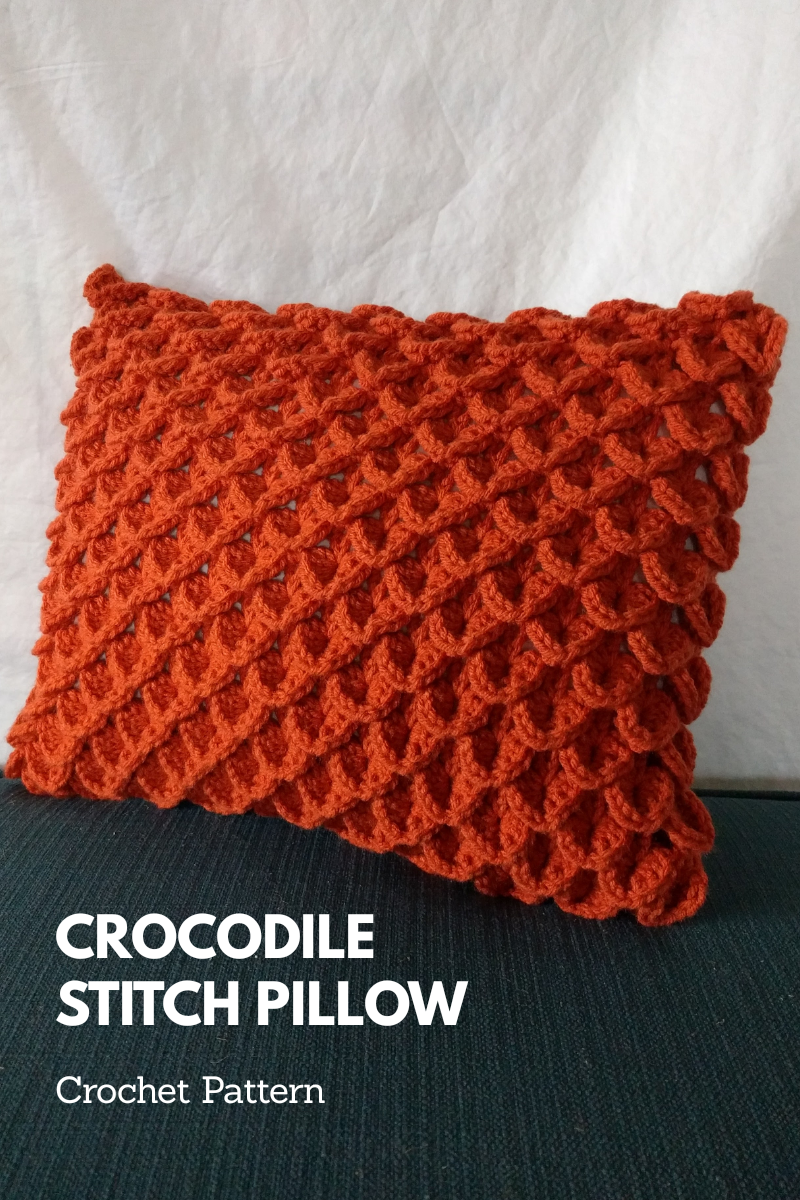
Make this trendy ruffle pillow as an accessory to your couch that also provides great lumbar support. The brighter the color, the better!
Finished Measurements:
Approximately 12″ x 16″
Materials:
Two (2) skeins Loops & Threads Impeccable in Fern
Size H crochet hook
12″ x 16″ pillow form
Sewing needle
Abbreviations:
Ch – chain
Dc – double crochet
St(s) – stitch(es)
Sc – single crochet
Instructions:
 Crochet Pillow Front:
Ch 64 (or any multiple of 3 +4 sts)
Row 1: skip first 3 ch (counts as first dc) 1 dc in fourth ch from hook, *ch 2, skip 2 sts, 2 dc in next st.* Repeat from * to * until the end. Each dc is referred to as a post and each 2 dc set is referred to as a cluster.
Row 2: turn, ch 3 (counts as 1 dc), 4 dc down one side of the first post of the first cluster, ch 1, 5 dc up the second post of the first cluster, ch 1, *skip the next cluster, 5 dc down the first post of the next cluster, ch 1, 5 dc up the second post of the same cluster, ch 1.* Repeat from * to * until the last cluster, 1 sc in the last dc.
Row 3: turn, ch 3 (counts as 1 dc), 1 dc in first sc, ch 2, 2 dc in the first crocodile stitch (in the cluster from Row 1), *ch 2, 2 dc into next cluster from Row 1 (including the ch 1 between the crocodile stitches from Row 2), ch 2, 2 dc in next crocodile stitch.* Repeat from * to * until the end.
Row 4: turn, ch 2, sc in first post, ch 1, *5 dc down the first post of the next cluster, ch 1, 5 dc up the second post of the same cluster, ch 1, skip the next cluster.* Repeat from * to * until the last cluster, 1 sc in the last dc.
Row 5: turn, ch 3 (counts as 1 dc), 1 dc in first sc, *ch 2, 2 dc in next crocodile stitch (in the cluster from Row 3), ch 2, 2 dc in next cluster from Row 3 (including the ch 1 between the crocodile stitches from Row 4).* Repeat from * to * until the last sc, 2 dc in last sc.
Repeat Rows 2-5 nine (9) more times (ten times total), Repeat Row 2. Piece should measure 12 inches. If you need to do more or less repeats, be sure to end on an even row.
If you would like to see how the stitches are worked up and down the posts, I created an instructional video available here.

Crochet Pillow Back:
Ch 58
Row 1: skip first 2 ch, 1 dc in each ch across.
Row 2: turn, ch 2, 1 dc in each dc across.
Repeat Row 2 until piece measures 12 inches.
Sewing:
Using a sewing needle and the same color yarn as the pillow and holding the wrong side of the front and back panels together, sew along three of the edges.
When a crocodile stitch is the last stitch on the end of a row, be sure to sew into the middle of the post so one half of the crocodile stitch hangs off of the end to make frills.
Turn the pillow right side facing out and insert the pillow form, being sure to push the corners all the way in. Sew along the last edge, knot at the end, and hide the yarn end.


