Posted on

Pattern: Spring Fling Tank

ABOUT

Skill Level:

Beginner

Pattern Notes:

When stitches appear between * and *, repeat until the end, unless otherwise indicated

This tank is worked in two rectangular pieces – the front panel and the back panel – that are sewn together in the end. Easy peasy!

This tank has 1-2 inches of positive ease.

Materials:

2 (2, 3, 3, 3, 3, 3, 3, 3) skeins Lily Sugar N Cream in Ecru Doux (MC)

2 (2, 3, 3, 3, 3, 3, 3, 3) skeins Lily Sugar N Cream in Camomile (CC)

Size K/10.5 (US) 6.5 mm crochet hook

Tapestry needle

Sizes:

XS (S, M, L, XL, 2XL, 3XL, 4XL, 5XL)

Finished Measurements:

Bust: 31″ (35, 39, 43, 47, 51, 55, 59, 63″)

Length: 20″ (20.5, 21.5, 22, 22, 23, 23, 24, 24)

Gauge:

8 sts x 9 rows = 4 inches (in Ch 1, HDC, counts as 1 st)

STITCH ABBREVIATIONS

Ch – chain

HDC – half double crochet

MC – main color

CC – contrast color

St(s) – stitch(es)

INSTRUCTIONS

Front Panel:

In CC, Ch 53 (55, 59, 61, 63, 65, 65, 67, 67)

Row 1: HDC in 2nd Ch from hook, HDC in each Ch across

Row 2: Ch 1, HDC in first st, *Ch 1, skip next st, HDC in next st.*

Row 3: *Ch 1, HDC in next Ch space* until you worked the last Ch space, Ch 1, HDC in first st from previous row.

Repeat Row 3 an additional 18 (19, 20, 20, 20, 21, 21, 22, 22) times.

In MC, repeat Row 3 for a total of 26 (27, 28, 29, 29, 30, 30, 31, 31) times.

Cut yarn.

Back Panel:

Repeat Front Panel steps to create a back panel.

Sewing:

Note: when sewing, make sure to use the MC when sewing together MC sts or rows, and use the CC when sewing together CC sts or rows. This means you will need to change colors when sewing up the side seams.

With wrong sides of the panels facing, line up the rows so the MC and CC rows match each other. The bottom of the panel is in the CC and the top of the panel is in the MC. Sew up the sides first, going from the bottom to the top. Leave 12 (13, 14, 14, 15, 16, 17, 17, 18) rows unworked at the top for the armhole.

At the top of the panel, sew 12 (12, 13, 13, 14, 14, 14, 15, 15) sts together on the left side and sew 12 (12, 13, 13, 14, 14, 14, 15, 15) sts together on the right side, leaving 28 (30, 32, 34, 34, 36, 36, 36, 36) sts un-sewn for the neck hole.

Weave in ends and wear with pride!

THANK YOU!

I hope you enjoyed making the Spring Fling Tank as much as I did! Tag me on Instagram @knitabitcrochetaway and use #knitabitcrochetaway and #SpringFlingTank – I’d love to see your progress and finished product!

Posted on

Pattern: Entangled Scarf


Find a printer-friendly, PDF version of Entangled Scarf below!

ABOUT

Skill Level:

Advanced Beginner

Pattern Notes:

When stitches appear between * and *, repeat until the end, unless otherwise indicated

When stitches appear between ( and ), work those stitches in the same stitch indicated

Because you skip the last DC and SC (or SC and DC) at the end of each row, each row gets shorter, leaving a staircase-looking edge

The piece is shaped like a long isosceles trapezoid (math is fun!)

COMPONENTS

Materials:

4 skeins Lion Brand Wool Ease Thick & Quick in Jam Cookie

Size M/13 (US) / 9 mm crochet hook

Tapestry needle

Finished Measurements:

12 inches wide x 84 inches long at the longer edge (excluding tassels)

Gauge:

6.5 sts x 8 rows = 4 inches (in SC)

STITCH ABBREVIATIONS

Ch – chain

SC – single crochet

DC – double crochet

WS – wrong side

INSTRUCTIONS

Scarf:

Ch 152

Row 1: 1 DC in 2ndch from hook, *ch 1, skip next ch, 1 SC in next ch, 1 DC in next ch,* turn.

Row 2: Ch 1, skip 1stDC and SC, (1 DC, 1 SC) in next ch space, *ch 1, (1 DC, 1 SC) in next ch space,* through last ch space, leaving last DC and SC unworked, turn.

Row 3: Ch 1, skip 1stSC and DC, (1 SC, 1 DC) in next ch space, *ch 1, (1 SC, 1 DC) in next ch space,* through last ch space, leaving last SC and DC unworked, turn.

Repeat Rows 2-3 seven more times (eight repeats total).

Tassels:

A video tutorial for attaching the tassels is available here, or written instructions are below.

Cut the remaining yarn you have into 15” pieces until you have 90 pieces to form the tassels. You will need 18 tassels total, with 9 tassels per side, and 5 pieces of string per tassel.

The tassels are attached to the ch space closest to the edge of the row. Tassels are only attached to the odd numbered rows (i.e. the first row, the last row, and alternating rows in between).

To attach a tassel, fold the 5 pieces of string in half, creating a loop in the middle. With the WS of the work facing, put the loop through the ch space, inserting it from the bottom of the work to the top of the work. Pull the tassel ends through the loop and pull tight.

THANK YOU!

I hope you enjoyed making the Entangled Scarf as much as I did! Tag me on Instagram @knitabitcrochetaway and use #knitabitcrochetaway and #EntangledScarf– I’d love to see your progress and finished product!

Posted on

Pattern: Sadie Bonnet

A simple crochet bonnet with easy drawstring


Find a printer-friendly, PDF version of Sadie Bonnet below!
 

ABOUT

Skill Level:

Beginner

Pattern Notes:

This bonnet is made in one piece with the back edge sewn together at the end.

A drawstring pulls the base of the bonnet to frame the face

COMPONENTS

Materials:

Size I crochet hook

1 skein I Love This Yarn! or 125 (150, 175) yards of worsted weight yarn

Tapestry needle

Pompom (optional)

Size:

Small (Medium, Large)

3-6 months (6-12 months, 12-24 months)

Finished Measurements:

6.5 inches tall, 5.25 inches deep (7.5 inches tall, 6 inches deep; 8.5 inches tall, 7 inches deep)

Gauge:

14 sts x 7.5 rows = 4 inches

STITCH ABBREVIATIONS

Ch – chain

DC – double crochet

INSTRUCTIONS

Bonnet:

Ch 49 (57, 65)

Row 1: 1 DC in 4thch from hook and each ch across, turn.

Row 2: Ch 3, 1 DC in front loops only in each DC across, turn.

Row 3: Ch 3, 1 DC in back loops only in each DC across, turn.

Repeat Rows 2-3 three (four, five) more times.

For Size Large ONLY, Repeat Row 2.

Cut yarn.

With the wrong sides facing, fold in half and sew the ch row together using the tapestry needle.

Drawstring:

Crochet an I-cord until your string measures 25 (30, 35) inches. Here is a linkto great instructions on how to crochet an I-cord.

Weave your drawstring in an out of each space between the first and second DC of each row along the bottom edge of the bonnet.

Pompom: (Optional)

With your favorite faux fur or yarn pompom, attach it to the top corner of the bonnet, with the majority of the pompom resting on top of the corner, rather than the bottom of the corner where you sewed the ch row together up the back of the bonnet. This ensures it won’t flop around too much when worn.

THANK YOU!

I hope you enjoyed making the Sadie Bonnet as much as I did! Tag me on Instagram @knitabitcrochetaway and use #knitabitcrochetaway and #SadieBonnet – I’d love to see your progress and finished product!

Posted on

Pattern: Envelope Button Cowl

Materials:
1 skein Loops & Threads Cozy Wool
Size K crochet hook
2 matching buttons, 1 inch in diameter
Needle and thread that matches the button

Finished Measurements:
26 inches x 7 inches

Instructions:
Cowl
Ch 69, turn

Row 1: 1 sc in second chain from hook. 1 sc in each ch until end, turn.
Row 2: Ch 3 (counts as 1 dc and ch 1 space), skip first sc, 1 dc in second sc, *ch 1, skip next sc, 1 dc in next sc.* Repeat from * to * until end, turn.
Rows 3-4: Ch 3 (counts as 1 dc and ch 1 space), *1 dc in next ch 1 space, ch 1.* Repeat from * to * until last ch 1 space, 1 dc in last ch 1 space, turn.
Row 5: Ch 1, *1 sc in ch 1 space, 1 sc next dc.* Repeat from * to * until last ch 1 space, 1 sc in last ch 1 space, turn.
Row 6: Repeat Row 2.
Row 7: Repeat Row 3.
Row 8: Repeat Row 5.
Row 9: Repeat Row 2.
Rows 10-11: Repeat Rows 3-4.
Row 12: Repeat Row 5.

Cut yarn and weave in ends.

Buttons
Lay the piece flat and vertical so the shorter (7ish inches) edge is horizontal. Using the needle and threads, attach one button to the bottom right corner. Attach the second button approximately six inches up from the first button and in the middle of the shorter edge (approximately 3.5 inches in from either side). It it helpful if you fold the piece over itself like the picture below to make sure you are attaching the second button in a spot that lines up with a hole the button can go through and the piece lays flat.

Posted on

Pattern: Triangle Cluster Button Cowl

Materials:
Size H (US) crochet hook
2 skeins Loops & Threads Impeccable in Gold
Three brown buttons to match. I got my buttons here.
Sewing needle
Thread that matches the color of the buttons (brown, navy blue, or dark grey look nice. Even a gold would make it pop)
Stitch marker

Gauge:
18 sts X 24 rows = 4 inches

Finished Measurements:
10 inches X 40 inches

Instructions:
Ch 34 loosely

Row 1: Sc in second ch from hook, *(1 sc, 1 dc, 1 tr) in next ch, ch 1, (1 tr, 1 dc, 1 sc) in next ch, ch 2, skip next 3 ch.* Repeat from * to * until last 2 ch, (1 sc, 1 dc, 1 tr,) in next ch, ch 1, (1 tr, 1 dc, 1 sc) in next ch (7 clusters total).

Row 2: Ch 4, turn, *1 sc in ch 1 space, (1 dtr, ch 3, 1 dtr) in next ch 2 space.* Repeat from * to * until last cluster, 1 sc in ch 1 space of last cluster, 1 dtr in last sc.

Row 3: Ch 4, turn, (1 dc, 1 sc) in first dtr, *ch 2, (1 sc, 1 dc, 1 tr, ch 1, 1 tr, 1 dc, 1 sc) in next ch 3 space.* Repeat from * to * until after the last ch 3 space, ch 2, (1 sc, 1 dc, 1 tr) in last dtr.

Row 4: Ch 2, turn, 1 sc in tr st, *(1 dtr, ch 3, 1 dtr) in next ch 2 space, 1 sc in ch 1 space.* Repeat from * to * until before last ch 2 space, (1 dtr, ch 3, 1 dtr) in next ch 2 space, 1 sc in last ch 4.

Row 5: Ch 2, turn, 1 sc in first sc, *(1 sc, 1 dc, 1 tr, ch 1, 1 tr, 1 dc, 1 sc) in ch 3 space, ch 2.* Repeat from * to * until last ch 3 space, (1 sc, 1 dc, 1 tr, ch 1, 1 tr, 1 dc, 1 sc) in ch 3 space, 1 sc in last sc.

Row 6: Repeat Row 2.

Repeat Rounds 2-5 until you reach your desired length. I made mine long enough to wrap comfortably around my neck and overlap the edges so they were perpendicular. 

Finishing:
Wrap the cowl around your neck so the edges are perpendicular and overlapping, with the RS facing. Since the two edges of the cowl overlap with the RS facing up on each edge, I will refer to the top side and bottom side of the cowl for the instructions below. Both the top and bottom have the RS facing out – do not confuse top/bottom below with RS/WS!

The buttons fit nicely into the holes along the second row of holes, specifically the 2nd, 4th, and 6th holes (there should be 7 holes total, meaning there is one unused opening on each edge and one opening between each button). 

With the edges lined up with each other, find the spot where the button openings on the top side of the cowl line up with the spot on the bottom side of the cowl where the buttons will be attached. Place one stitch marker in each of those three spots on the bottom side. Using your needle and thread, sew each button onto the bottom side of the cowl.

Posted on

Pattern: Anthropologie Inspired Blanket

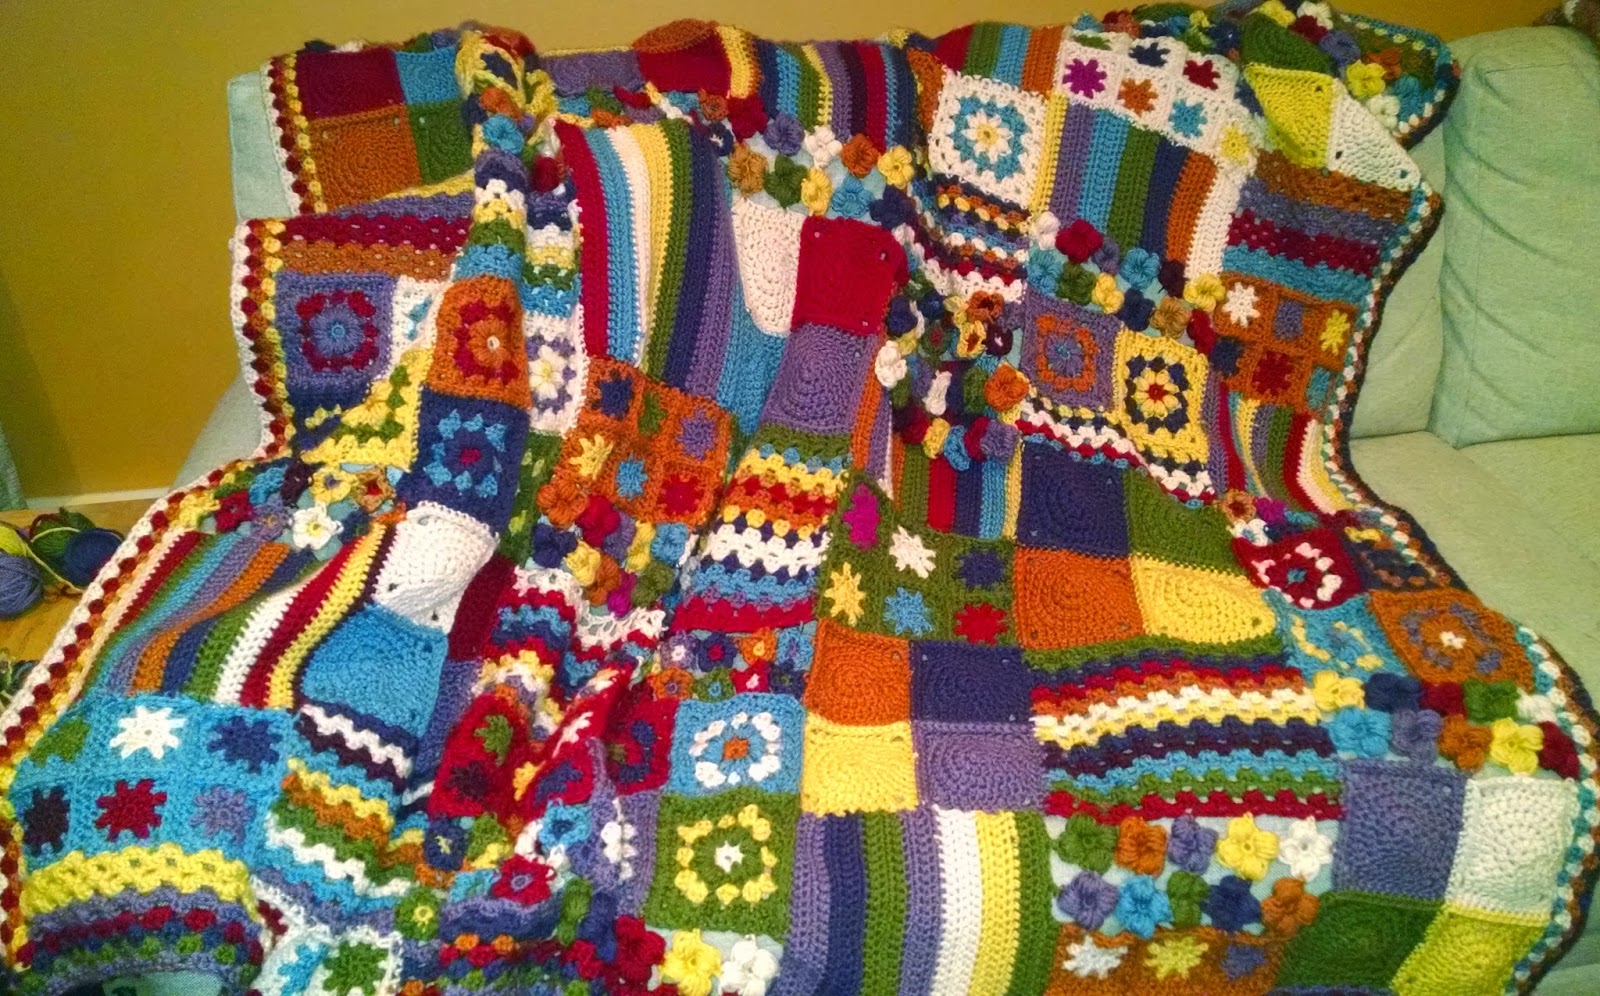
I was inspired by this blanket from a Pinterest pic that I think is (was) from Anthropologie at one point in time.

Materials:
3 skeins Vanna’s Choice in Purple
3 skeins Vanna’s Choice in Olive
3 skeins Vanna’s Choice in Rust
3 skeins Vanna’s Choice in Cranberry
3 skeins Vanna’s Choice in Dusty Blue
3 skeins Vanna’s Choice in Dusty Purple
3 skeins Vanna’s Choice in Beige
3 skeins Vanna’s Choice in Mustard
Size J crochet hook

Measurements:
Approximately 66 inches x 62 inches

Instructions:
Think of this as a blanket recipe rather than a complete pattern. There’s a semi-ordered randomness to this blanket that I absolutely love. Mix up the colors evenly throughout the blanket, but try not to overthink it too much!

Below are instructions for each section of the blanket. You can attach the sections however you want and here is a link to a helpful list of different methods to join your work. I think #4 “join as you go” is the best method for this blanket because you have a mixture of granny squares and lines of DCs and HDCs.

Star Patches:

Round 1: Using the magic loop method, 8 dc.
Round 2: *Ch 3, 1 sl st in 2nd ch from hook, 1 sl st in next ch, sl st in next dc.* Repeat from * to * until end so you have 8 points total. Sl st in first dc of Round 1.
Round 3: Change colors. Working in back loops only, sl st in ending sl st of Round 2, dc in same sl st, *ch 1, sl st in first sl st at the top of the point from Round 1, sc in second sl st of the point, dc in sl st from Round 2.* Repeat from * to * until you have worked 7 points, ch 1, sl st in first sl st at the top of the last point from Round 1, sc in second sl st of the point, sl st in beginning dc.
Round 4: Ch 1, *sc in ch 1 space, dc in next sc, (1 tr, ch 1, 1 tr) in next dc, dc in next ch 1 space, sc in next sc, sc in next dc.* Repeat from * to * until end, sl st in beginning ch.

Repeat this star patch five more times, with a 2×3 grid of the patches. I recommend making the stars all different colors and the border all the same color.

Puff Stitch Flowers:

I used the really helpful tutorial available here, but only started with 8 sc using the magic loop method to make 4 petals (instead of 6 petals on the website).

I made 10 flowers of all different colors in a section in a 2×5 grid.

Vertical Lines:

This section is a good filler space to connect an awkwardly shaped section end (like the puff stitch flowers) with a flat section. 

Round 1: Sl st in the corner of the previous section, ch 27 perpendicular from the previous section.
Round 2: Turn, ch 2, 1 dc in each ch across, sl st in previous section.

Repeat Round 2 until you fill the section space. Change colors every couple of rows.

Circle Center Granny Square:

Round 1: Using magic loop method, 8 dc.
Round 2: Ch 2 (counts as dc), 1 dc in first st, *2 dc in next st.* Repeat from * to * until end, sl st in starting ch.
Round 3: Ch 2 (counts as dc), 1 dc in first st, 1 dc in next st, *2 dc in next st, 1 dc in next st.* Repeat from * to * until end, sl st in starting ch.
Round 4: Ch 2 (counts as dc), 1 dc in first st, 1 dc in next 2 sts, *2 dc in next st, 1 dc in next 2 sts.* Repeat from * to * until end, sl st in starting ch.
Round 5: Ch 1, 1 sc in next 2 sts, 1 dc in next 2 sts, (1 tr, ch 2, 1 tr) in next st, *1 dc in next 2 sts, 1 sc in next 3 sts, 1 dc in next 2 sts, (1 tr, ch 2, 1 tr) in next st.* Repeat from * to * until end, 1 sc in last st, sl st in starting ch.
Round 6: Ch 2, 1 dc in next 4 sts, *(2 dc, ch 1, 2 dc) in ch 2 space, 1 dc in next 9 sts.* Repeat from * to * until end, 1 dc in next 4 sts, sl st in starting ch.

Repeat three more times in different colors for four squares total per section in a 2×2 grid.

Multi Colored Flowers:

Round 1: Using magic loop method, 10 sc.
Round 2: Change colors. Ch 1 (counts as sc), 2 dc in first st, sl st in next st, *3 dc in next st, sl st in next st.* Repeat from * to * until end, sl st in starting ch. 5 petals total.

Make 12 flowers total for a section with a 2×6 grid.

Granny Cluster Stripes:

Like the vertical lines, this is another good filler section to make your sections even at the end. If you’re joining with a section that doesn’t have a straight edge, like the multi colored flowers or the puff stitch flowers, start with a chain row running across the whole section and connected to the previous section.

Round 1: Turn, ch 2 (counts as first hdc), 2 hdc in ch space, *ch 2, skip 2 sts, 3 hdc in next st.* Repeat from * to * until end, 1 hdc as ending st.

Repeat Round 1 until you fill in the section and change colors every couple of rows.

Daisy Granny Squares:

There’s a helpful tutorial available here.

Make 4 squares total for a section with a 2×2 grid.

Edging:
Once you have made the blanket to your desired length, the edging is very simple. Sl st in a corner, ch 2, 2 dc in first st, *skip 2 sts, 3 dc in next st.* Repeat from * to * until end.

I alternated colors so each side had a different color and I worked 4 rows of edging.

My Recipe
I worked my blanket in vertical panels and tried to make sure each panel used at least one of each pattern section before repeating a pattern section. Below is how I organized mine, but feel free to improvise!

Panel 1: Multi Colored Flowers, Vertical Lines, Star Patches, Puff Stitch Flowers, Circle Center Granny Square, Granny Cluster Stripes, Daisy Granny Squares, Multi Colored Flowers, Vertical Lines, Star Patches

Panel 2: Circle Center Granny Square, Multi Colored Flowers, Vertical Lines, Star Patches, Puff Stitch Flowers, Granny Cluster Stripes, Daisy Granny Squares, Circle Center Granny Square, Granny Cluster Stripes, Star Patches

Panel 3: Multi Colored Flowers, Daisy Granny Squares, Granny Cluster Stripes, Circle Center Granny Square, Multi Colored Flowers, Vertical Lines, Star Patches, Puff Stitch Flowers, Granny Cluster Stripes, Star Patches, Multi Colored Flowers

Panel 4: Circle Center Granny Square, Multi Colored Flowers, Star Patches, Vertical Lines, Puff Stitch Flowers, Circle Center Granny Square, Granny Cluster Stripes, Multi Colored Flowers, Daisy Granny Squares, Puff Stitch Flowers

Panel 5: Circle Center Granny Square, Vertical Lines, Daisy Granny Squares, Granny Cluster Stripes, Multi Colored Flowers, Puff Stitch Flowers, Vertical Lines, Star Patches, Circle Center Granny Square, Vertical Lines

Panel 6: Granny Cluster Stripes, Multi Colored Flowers, Star Patches, Vertical Lines, Puff Stitch Flowers, Daisy Granny Squares, Granny Cluster Stripes, Circle Center Granny Square, Granny Cluster Stripes, Puff Stitch Flowers, Star Patches

Panel 7: Puff Stitch Flowers, Circle Center Granny Square, Granny Cluster Stripes, Star Patches, Vertical Lines, Multi Colored Flowers, Daisy Granny Squares, Puff Stitch Flowers, Circle Center Granny Square

There were some points where the panel ends did not line up when I went to do the ending, so I just did a few rows of the Granny Cluster Stripes until the panels all lined up.

Posted on

Pattern: Trailing Flowers Beach Cover Up

This crochet beach cover up is perfect for your next trip to the beach. Think of this as a pattern recipe to make a cover up that fits your body as snug or loose as you want.

The bottom of the cover up has alternating green and orange flowers with these colored flowers trailing up the spine. The piece is worked from the bottom up.


Note: when counting the flower petals in this pattern, work clockwise.


Materials:

6 skeins Aunt Lydia’s Crochet Thread, Fashion 3, in Natural
1 skein Aunt Lydia’s Crochet Thread, Fashion 3, in Copper Mist
1 skein Aunt Lydia’s Crochet Thread, Fashion 3, in Sage
Size D crochet hook

Yarn Substitute: Curio #10

This post contains affiliate links. If you do decide to purchase though the links in this post, a small portion of the sale may go to support this site, at no additional cost to you.

Finished Measurements:

34″ long
Snugly fits a women’s size small

Instructions:

Spine
Work the flowers for the spine first. 

Using magic loop method, 8 sc.
Round 1: Ch 3 (counts as 1 dc), 1 dc in first st, 2 dc in each st across the next 6 sts, turn (14 sts total).
Round 2: Ch 4, *1 dc in next st, 1 ch.* Repeat from * to * until end, turn.
Round 3: Ch 3, *1 dc in next st from Round 2, ch 3, 6 dc down the 1 dc from this Round, sl st in next st from Round 2.* Repeat from * to * until 4 more times (5 petals total), ch 8, sl st in starting ch from previous Round.

Rounds 1-3 completes one half flower. The final ch 8 from Round 3 makes up the magic loop starting round for the rest of the half flowers so they are attached.

Work one half flower in green, then work the next half flower in orange. The finished product has all orange flowers on one side and all green flowers on the other side. Continue working the flowers until you reach your desired length. Mine uses 20 spine flowers total. 

The top of the flowers will rest between your shoulder blades and the bottom will rest approximately 2.5″ from the end of the piece. There will be an additional edge on the bottom.

Bottom Edging
The bottom edge flowers alternate green and orange, but make a full circle with the petals, as opposed to a half circle of petals with the flowers trailing up the spine. Written instructions are below:

Round 1: Using magic loop method, 8 sc

Round 2: Ch 3 (counts as first dc), 1 dc in next st, 2 dc in next st and in each st until the end, sl st to join. (16 sts total)
Round 3: Ch 4, dc in next st, *ch 1, dc in next st,* repeat from * to * until end, ch 1, sl st to join.
Round 4: Make petal the same as in the spine flowers and continue until you have 8 petals total.

For my size, I made 13 flower motifs. To join, attach the first petal of one flower to the sixth petal of a second flower, and attach the second petal of that same one flower to the fifth petal of the second flower. This leaves two petals unattached on the top and two petals unattached on the bottom of each flower.


To join the bottom edge to the trailing spine of flowers, join the third petal of one bottom edge flower to the bottom petal of the first flower in the spine.

Body Flower Motifs
The flowers on the body are white and are one round larger than the bottom edging flowers.

Round 1: Using magic loop method, 8 sc
Round 2: Ch 3 (counts as first dc), 1 dc in next st, 2 dc in next st and in each st until the end, sl st to join. (16 sts total)
Round 3: Ch 3 (counts as first dc), 1 dc in first st, *1 dc in next st, 2 dc in next st,* repeat from * to * until end, 1 dc in last st, sl st to join. (24 sts total)
Round 4: Ch 4 (counts as first dc and first ch), dc in next st, *ch 1, dc in next st,* repeat until end, ch 1, sl st to join.
Round 5: Make petal the same as in the spine flowers and continue until you have 12 petals total.

Body Motif Joining

To attach the flowers on the body, work 5 ch between a petal of one flower and a petal of a second flower.

Starting with the bottom edging flowers, sl st in third petal of edging flower (also the same flower with joined spine flowers), ch 5, sl st in fourth petal of edging flower, ch 5, sl st in joined petals of two flowers, ch 5, sl st in third petal of next flower, ch 5, join to first petal of white body flower, ch 5, sl st in fourth petal of edge flower.


Continue joining body flowers to edge flowers in this manner by working 3 sections of 5chs and sl st in next petal before attaching another body flower. For the 13 edge flowers, I attached 9 body flowers.

To join one row of body flowers to another row of body flowers, sl st in fifth petal of bottom row body flower, ch 5, sl st in eleventh petal of body flower in top row, ch 5, sl st in sixth petal of bottom row body flower, ch 5, sl st in tenth petal of top row body flower, ch 5, sl st in seventh petal of bottom row body flower, ch 5, sl st in third petal of next top row body flower, ch 5, sl st in eighth petal of bottom row body flower, ch 5, sl st in second petal of top row body flower, ch 5, sl st in ninth petal of bottom row body flower, ch 5, sl st in first petal of top row body flower, ch 5.

Continue attaching the body flowers in the same manner. Attach the body flower rows to the spine flowers as you go. The height of one row of body flowers is equal to the height of one green spine flower and one orange spine flower.


To add a little shape, decrease by one body flower motif as you go up the rows. 

Row 1 of body flowers: 9 motifs
Row 2 of body flowers: 8 motifs
Row 3 of body flowers: 7 motifs
Row 4 of body flowers: 6 motifs
Row 5 of body flowers: 6 motifs
Row 6 of body flowers: 6 motifs – this row will make up the bottom of the armholes. 

Row 7: attach one body flower motif on either side of the spine flowers. Attach three body flower motifs in the same row to the four front body motifs of the sixth row. Do not attach the motifs on either side of the spine to the front three motifs.

Row 8 (back shoulder): working in the back only, attach one motif on either side of the spine. Work a half flower for either side of the shoulder in the same manner as the spine motifs, but with an additional row like the body motifs to they are larger (6 petals total).


Row 9 (front shoulder): working in the front only, work one body flower motif on either shoulder and attach to Row 8.


Notice how there is a gap between the flower motifs in a row between the fourth petal of one flower and the tenth petal of another flower. You can either leave this gap open or you can close it by doing the following:


Ch 4 between the tenth petal of the first flower and the fourth petal of the second flower. Sl st in ninth petal of first flower, ch 5, sl st in ch 4 space, ch 5, sl st in fifth petal of second flower. Sl st in eleventh petal of first flower, ch 5, sl st in ch 4 space, ch 5, sl st in third petal of second flower.


I left the gap on the third row of body flowers, around where the stomach is, but filled in the gap on all other rows.


Good luck and enjoy! Please let me know if you have any questions. I may try to make a chart to make it easier to explain.

Posted on

Pattern: Color Changing Ladder Cowl

Finished Measurements:
9 inches long
13 inches diameter

Stitches:
Ch – chain
Sl st – slip stitch
Sc – single crochet

Materials:
1 skein Shibui Heichi in grey
1 skein Shibui Heichi in pink
1 skein Blue Sky Alpaca Silk in lime green
Size G crochet hook

Instructions:
When changing colors through the piece, always be sure to leave the unworked loop behind the work so it doesn’t show. You can either cut the string when changing colors or work the color up behind the piece when you need that color again. I prefer the later to avoid wasting yarn and generally ch a few in the back to start the new color again.

In black, ch 120. Sl st in the first ch. Be careful not to twist! Leave unworked loop behind.

Round 1: In pink, join with sl st in beginning. Ch 1, *2 sc in next ch, ch 1, skip 2 ch.* Repeat from * to * until end, ch 1, sl st in first ch in beginning.
Round 2: In grey, join with sl st in beginning. Ch 2, *sc in first skipped ch from the foundation row, ch 2.* Repeat from * to * until end, sl st in first ch in beginning.

Round 3: In pink, join with sl st in beginning. Ch 1, *2 sc in next ch 2 space, ch 1.* Repeat from * to * until end, ch 1, sl st in first ch in beginning.
Round 4: In grey, join with sl st in beginning. Ch 2, *sc in sc from the previous even numbered row, ch 2.* Repeat from * to * until end, sl st in first ch in beginning.

Round 5: In pink, repeat Round 3. 
Round 6: In grey, repeat Round 4.
Round 7: In green, repeat Round 3.
Round 8: In grey, repeat Round 4.
Round 9: In green, repeat Round 3.
Round 10: In grey, repeat Round 4.

Round 11: In green, repeat Round 3.
Round 12: In pink, repeat Round 4.
Round 13: In green, repeat Round 3.
Round 14: In pink, repeat Round 4.
Round 15: In green, repeat Round 3.
Round 16: In pink, repeat Round 4.
Round 17: In grey, repeat Round 3.
Round 18: In pink, repeat Round 4.

Repeat the color changes in this manner. Each color is worked five times before switching to another color. The color sequence is pink, green, grey. The picture below hopefully explains it:

Posted on

Pattern: Honeycomb Infinity Scarf

This cozy infinity scarf is really easy to make and has a nice border to edge the honeycomb pattern.

Materials:
Crochet hook Size J
2 skeins Vanna’s Choice in Taupe

Stitches:
Ch – chain
Hdc – half double crochet
Sl st – slip stitch

Instructions:
Ch 225, sl st in first ch to join in the round (careful not to twist!), ch 1 (do not turn).
Row 1: 1 hdc in each ch across, sl st in turning ch, ch 1, turn.
Row 2: 1 hdc in each st across, sl st in turning ch, ch 1, turn.
Row 3: 1 hdc in each st across, sl st in turning ch, ch 2, turn.
Row 4: skip first st, 1 hdc in next st, *ch 1, skip st, 1 hdc in next st.* Repeat from * to * until end, ch 1, sl st in second starting ch, ch 2, turn.

Row 5: 1 hdc in ch 1 space, ch 1, *1 hdc in next ch 1 space, ch 1.* Repeat from * to * until end, sl st in second starting ch, ch 2, turn.

Repeat Row 5 15 more times (16 times total), or until you reach the desired width before the edging.

Row 6: *1 hdc in ch 1 space, 1 hdc in next st.* Repeat from * to * until end, 1 hdc in last ch 1 space, sl st in turning ch, ch 1, turn.
Row 7: 1 hdc in each st across, sl st in turning ch. Cut and weave in ends.

Posted on

Pattern: Checkered Hunting Hat

Materials:
Size H crochet hook
1 skein Loops & Threads Impeccable Solids in Navy (MC)
1 skein Loops & Threads Impeccable Solids in Grey (CC)

Stitches:
Dc – double crochet
Sl st – slip stitch
MC – main color
CC – contrast color
Sc2tog – single crochet two together

Instructions:
Hat Body
The colors switch after three rounds. Once you are done increasing, each color section has 7 stitches in it.

Round 1: Using magic circle, *1 dc in MC, 1 dc in CC.* Repeat from * to * four more times (five color sections total). Sl st to 1st dc made. (10 dc)
Round 2: Using MC, ch2, dc in first st. In CC, 2dc in next st.  *In MC, 2dc in next st. In CC, 2dc in next st.* Repeat from * to * three more times (five color sections total). Sl st in first dc. (20 dc)

Round 3: Using MC, ch2, 2dc in next st. Using CC, dc in next st, 2 dc in next st. *Using MC, dc in next st, 2dc in next st. Using CC, dc in next st, 2dc in next st.* Repeat from * to * three more times (five color sections total). Sl st in first dc. (30 dc)

Round 4: Using CC, ch2, dc in next st, 2dc in next st. Using MC, dc in next 2 sts, 2dc in next st. *Using CC, dc in next 2 sts, 2dc in next st. Using MC, dc in next 2 sts, 2dc in next st.* Repeat from* to * three more times (five color sections total). Sl st in first dc. (40 dc)

Round 5: Using CC, ch2, dc in next 2 sts, 2dc in next st. Using MC, dc in next 3 sts, 2dc in next st. *Using CC, dc in next 3 sts, 2dc in next st. Using MC, dc in next 3 sts, 2dc in next st.* Repeat from* to * three more times (five color sections total). Sl st in first dc. (50 dc) 
Round 6: Using CC, ch2, dc in next 3 sts, 2 dc in next st. Using MC, dc in next 4 sts, 2dc in next st. *Using CC, dc in next 4 sts, 2dc in next st. Using MC, dc in next 4 sts, 2dc in next st.* Repeat from* to * three more times (five color sections total). Sl st in first dc. (60 dc) 

Round 7: Using MC, ch2, dc in next 4 sts, 2 dc in next st. Using CC, dc in next 5 sts, 2dc in next st. *Using MC, dc in next 5 sts, 2dc in next st. Using CC, dc in next 5 sts, 2dc in next st.* Repeat from* to * three more times (five color sections total). Sl st in first dc. (70 dc)
Rounds 8-9: Using MC, ch2, dc in next 7 sts. Using CC, dc in next 7 sts. *Using MC, dc in next 7 sts. Using CC, dc in next 7 sts.* Repeat from * to * until end.

Rounds 10-12: Using CC, ch2, dc in next 7 sts. Using MC, dc in next 7 sts. *Using CC, dc in next 7 sts. Using MC, dc in next 7 sts.* Repeat from * to * until end. Sl st in first dc.

Rounds 13-15: Using MC, ch2, dc in next 7 sts. Using CC, dc in next 7 sts. *Using MC, dc in next 7 sts. Using CC, dc in next 7 sts.* Repeat from * to * until end.

Rounds 16-18: Using CC, ch2, dc in next 7 sts. Using MC, dc in next 7 sts. *Using CC, dc in next 7 sts. Using MC, dc in next 7 sts.* Repeat from * to * until end. Sl st in first dc.

Left Ear Flap:
Flip the hat inside out. With the RS facing, look for the join (the beginning/end point) and count 10 sts to the right from there. With the RS facing, sl st in that 10th st from join. 

Row 1: In MC, ch1, sc in next 14 sts. Ch1, turn. (15 sc)
Row 2: Sc across, ch1, turn.
Row 3: Sc2tog, sc across, ch1, turn.
Row 4: Repeat row 3.
Rows 5-7: Repeat Rows 2-4 one more time.


Right Ear Flap:
With the hat still flipped inside out and with the WS facing, count 19 sts to the right from the join. Sl st in that 19th st from join.
Work rows 1-7 of the left ear flap.

Front Flap:
With the hat still flipped inside out and with the WS facing, count 36 sts to the left from the join. Sl st in that 36th st from join. Note: if the counting is getting confusing, just work the front flap in all of the unworked sts in the larger of the two spaces between the left and right ear flaps. 

Row 8: Working in back loops only and in MC, ch 1, sc in next 25 sts, ch1, turn. (26 sc)
Row 9-14: Sc across, ch1, turn.

Edging:
With the hat still flipped inside out, with the RS facing, and using MC, sl st in each st across.