Posted on

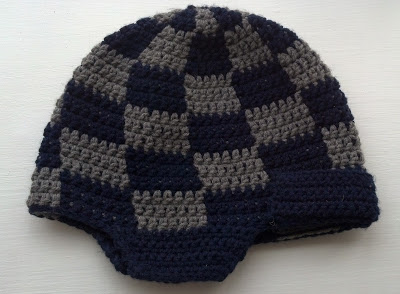
Pattern: Checkered Hunting Hat

Materials:
Size H crochet hook
1 skein Loops & Threads Impeccable Solids in Navy (MC)
1 skein Loops & Threads Impeccable Solids in Grey (CC)

Stitches:
Dc – double crochet
Sl st – slip stitch
MC – main color
CC – contrast color
Sc2tog – single crochet two together

Instructions:
Hat Body
The colors switch after three rounds. Once you are done increasing, each color section has 7 stitches in it.

Round 1: Using magic circle, *1 dc in MC, 1 dc in CC.* Repeat from * to * four more times (five color sections total). Sl st to 1st dc made. (10 dc)
Round 2: Using MC, ch2, dc in first st. In CC, 2dc in next st.  *In MC, 2dc in next st. In CC, 2dc in next st.* Repeat from * to * three more times (five color sections total). Sl st in first dc. (20 dc)

Round 3: Using MC, ch2, 2dc in next st. Using CC, dc in next st, 2 dc in next st. *Using MC, dc in next st, 2dc in next st. Using CC, dc in next st, 2dc in next st.* Repeat from * to * three more times (five color sections total). Sl st in first dc. (30 dc)

Round 4: Using CC, ch2, dc in next st, 2dc in next st. Using MC, dc in next 2 sts, 2dc in next st. *Using CC, dc in next 2 sts, 2dc in next st. Using MC, dc in next 2 sts, 2dc in next st.* Repeat from* to * three more times (five color sections total). Sl st in first dc. (40 dc)

Round 5: Using CC, ch2, dc in next 2 sts, 2dc in next st. Using MC, dc in next 3 sts, 2dc in next st. *Using CC, dc in next 3 sts, 2dc in next st. Using MC, dc in next 3 sts, 2dc in next st.* Repeat from* to * three more times (five color sections total). Sl st in first dc. (50 dc) 
Round 6: Using CC, ch2, dc in next 3 sts, 2 dc in next st. Using MC, dc in next 4 sts, 2dc in next st. *Using CC, dc in next 4 sts, 2dc in next st. Using MC, dc in next 4 sts, 2dc in next st.* Repeat from* to * three more times (five color sections total). Sl st in first dc. (60 dc) 

Round 7: Using MC, ch2, dc in next 4 sts, 2 dc in next st. Using CC, dc in next 5 sts, 2dc in next st. *Using MC, dc in next 5 sts, 2dc in next st. Using CC, dc in next 5 sts, 2dc in next st.* Repeat from* to * three more times (five color sections total). Sl st in first dc. (70 dc)
Rounds 8-9: Using MC, ch2, dc in next 7 sts. Using CC, dc in next 7 sts. *Using MC, dc in next 7 sts. Using CC, dc in next 7 sts.* Repeat from * to * until end.

Rounds 10-12: Using CC, ch2, dc in next 7 sts. Using MC, dc in next 7 sts. *Using CC, dc in next 7 sts. Using MC, dc in next 7 sts.* Repeat from * to * until end. Sl st in first dc.

Rounds 13-15: Using MC, ch2, dc in next 7 sts. Using CC, dc in next 7 sts. *Using MC, dc in next 7 sts. Using CC, dc in next 7 sts.* Repeat from * to * until end.

Rounds 16-18: Using CC, ch2, dc in next 7 sts. Using MC, dc in next 7 sts. *Using CC, dc in next 7 sts. Using MC, dc in next 7 sts.* Repeat from * to * until end. Sl st in first dc.

Left Ear Flap:
Flip the hat inside out. With the RS facing, look for the join (the beginning/end point) and count 10 sts to the right from there. With the RS facing, sl st in that 10th st from join. 

Row 1: In MC, ch1, sc in next 14 sts. Ch1, turn. (15 sc)
Row 2: Sc across, ch1, turn.
Row 3: Sc2tog, sc across, ch1, turn.
Row 4: Repeat row 3.
Rows 5-7: Repeat Rows 2-4 one more time.


Right Ear Flap:
With the hat still flipped inside out and with the WS facing, count 19 sts to the right from the join. Sl st in that 19th st from join.
Work rows 1-7 of the left ear flap.

Front Flap:
With the hat still flipped inside out and with the WS facing, count 36 sts to the left from the join. Sl st in that 36th st from join. Note: if the counting is getting confusing, just work the front flap in all of the unworked sts in the larger of the two spaces between the left and right ear flaps. 

Row 8: Working in back loops only and in MC, ch 1, sc in next 25 sts, ch1, turn. (26 sc)
Row 9-14: Sc across, ch1, turn.

Edging:
With the hat still flipped inside out, with the RS facing, and using MC, sl st in each st across.

Posted on

Pattern: Vintage Ribbed Toe Up Socks


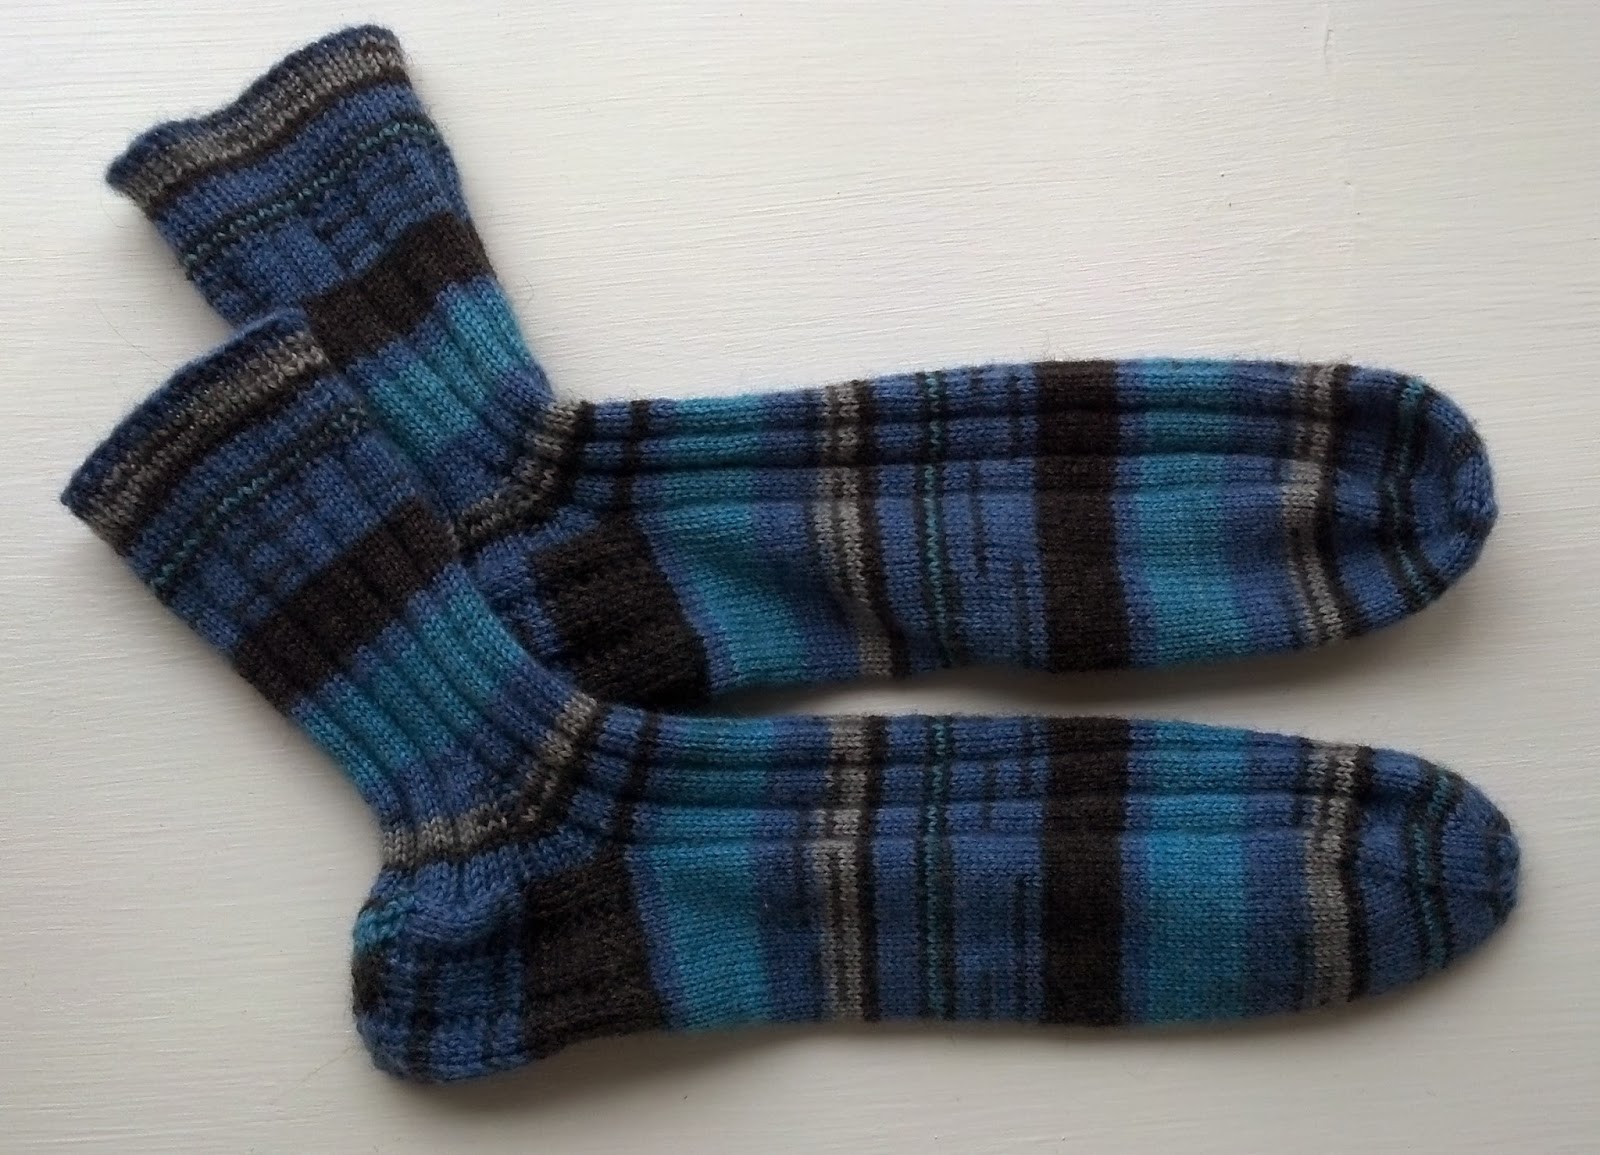
These vintage inspired socks are built for comfort with no ribbing on the bottom of the foot but ribbing that stretches on the rest of the sock.

Finished Measurements:
Pattern written for men’s size 13 socks, shown in the blue sock, but it is easily customizable to fit any foot size. The red/grey socks are for men’s size 9 socks.

Materials:
Size 0 double pointed needles
2 skeins Sensations Truly Pattern in Turq Pattern (fort the blue socks)
or 2 skeins Patons Kroy Socks, Ragg Shades in Grey Brown Marl (for the red/grey socks)
Scrap yarn

Yarn Substitute: Stroll

This post contains affiliate links. If you do decide to purchase though the links in this post, a small portion of the sale may go to support this site, at no additional cost to you.


Stitches:
K – knit
P – purl
Sl – slip unworked stitch from left needle to right needle
SSK – slip unworked stitch from left needle to right needle knitwise. Slip a second unworked stitch from the left needle to the right needle knitwise. Slip those two unworked stitches separately back to the left needle purlwise. Knit those two stitches together in the back of the stitches (decrease).
K2tog – knit two stitches together (decrease).
P2tog – purl two stitches together (decrease).
Inc – knit into the front and back of the same stitch (increase).


Instructions:

Toe Shaping
Using provisional cast on method, cast on 12 stitches
Round 1: P across
Round 2: K across
Round 3: P across
Round 4: K across

Remove live stitches from scrap yarn and place them on a double pointed needle. You should have 24 sts on two needles. Begin knitting in the round.

Round 5: *K2, Inc, K1 (add a needle) K1, Inc, K2.* Repeat from * to * (28 sts)

Rounds 6-8: Needle 1 – K2, Inc, K across needle
          Needle 2 – K across needle to last 3 sts, Inc, K2
          Needle 3 – K2, Inc, K across needle
          Needle 4 – K across needle to last 3 sts, Inc, K2

Increase until you have 40 sts total (10 sts per needle)


Round 9: K across
Round 10: Needle 1 – K2, Inc, K across needle
        Needle 2 – K across needle to last 3 sts, Inc, K2
Needle 3 – K2, Inc, K across needle
Needle 4 – K across needle to last 3 sts, Inc, K2

Repeat Round 9 and Round 10 until you have 72 sts total (18 sts per needle)


Foot:
Round 11: Needles 1 and 2 – *K4, P2.* Repeat from * to * across.
        Needles 3 and 4 – K across

Repeat Round 11 until sock is the length from the toe to the bend of your ankle at the top of your foot.


Heel Flap:
Turn so WS is facing and Work Needles 3 and 4 ONLY (36 sts)
Leave Needles 1 and 2 unworked for the heel flap

Row 12: Sl1, P across.

Row 13: Sl1, K3, P2, *K4, P2.* Repeat from * to * to end.
Repeat Rows 12 and 13, 14 more times (15 repeats total, 30 rows total).

Note: If you want to make the size smaller or larger than a men’s size 13 sock, then just measure it against your heel as you work. The heel flap should be the same length as your heel.

Heel Shaping:
Row 14: Sl1, P17, P2tog, P1, turn. Leave remaining sts unworked. Continue in this manner.
Row 15: Sl1, P1, K2, K2tog, K1, turn. 
Row 16: Sl1, P4, P2tog, P1, turn. 
Row 17: Sl1, P2, K3, K2tog, K1, turn. 
Row 18: Sl1, P6, P2tog, P1, turn. 
Row 19: Sl1, K1, P2, K4, K2tog, K1, turn. 
Row 20: Sl1, P8, P2tog, P1, turn. 
Row 21: Sl1, K2, P2, K4, P1, K2tog, K1, turn. 
Row 22: Sl1, P10, P2tog, P1, turn. 
Row 23: Sl1, K3, P2, K4, P2, K2tog, K1, turn. 
Row 24: Sl1, P12, P2tog, P1, turn. 
Row 25: Sl1, K4, P2, K4, P2, K1, K2tog, K1, turn. 
Row 26: Sl1, P14, P2tog, P1, turn. 
Row 27: Sl1, P1, K4, P2, K4, P2, K2, K2tog, K1, turn.
Row 28: Sl1, P16, P2tog, P1, turn.
Row 29: Sl1, P2, K4, P2, K4, P2, K3, K2tog, K1, turn.
Row 30: Sl1, P17, P2tog, P1, turn.

Begin working in the round again.

Round 31: K1, P2, K4, P2, K4, P2, K4. Using the same needle (called Needle 4), pick up 16 sts and work *K4, P2* pattern. Work *K4, P2* pattern along Needles 1 and 2. Using the last spare needle (called Needle 3), pick up 16 sts and work in the following: P1, K4, P2, K4, P2, K3. Using the same needle, work the following heel flap sts from Needle 4: K1, P2, K4, P2.


The stitches should be distributed along your needles in the following way:
Needle 1: 18 sts
Needle 2: 18 sts 
Needle 3: 25 sts (with the heel flap sts split down the middle)
Needle 4: 26 sts (with the heel flap sts split down the middle)

Gusset Shaping (decrease)
Round 32: Needle 1 – *K4, P2.* Repeat from * to * to end.
       Needle 2 – *K4, P2.* Repeat from * to * to end.
       Needle 3 – Knit if the first st is a knit st, purl if the first st is a purl st, SSK, knit the knit sts and purl the purl sts across
       Needle 4 – Knit the knit sts and purl the purl sts until the last 3 sts, K2tog, knit if the last st is a knit st, purl if the last st is a purl st.

Round 33: Needle 1 – *K4, P2.* Repeat from * to * to end.
       Needle 2 – *K4, P2.* Repeat from * to * to end.
       Needle 3 – Knit the knit sts and purl the purl sts across.
       Needle 4 – Knit the knit sts and purl the purl sts across.

Repeat Round 32 and Round 33 until there are 18 sts on each needle (72 sts total).

Leg
Continue working *K4, P2* pattern until you reach 1 inch below your desired leg length.

Ribbing:

*K1, P1* across all needles for 1 inch.

Bind off using the Icelandic Bind-Off for a stretchy finish. Video tutorial available here.

Posted on

Pattern: Celtic Cable Toe Up Socks

Finished Measurements:
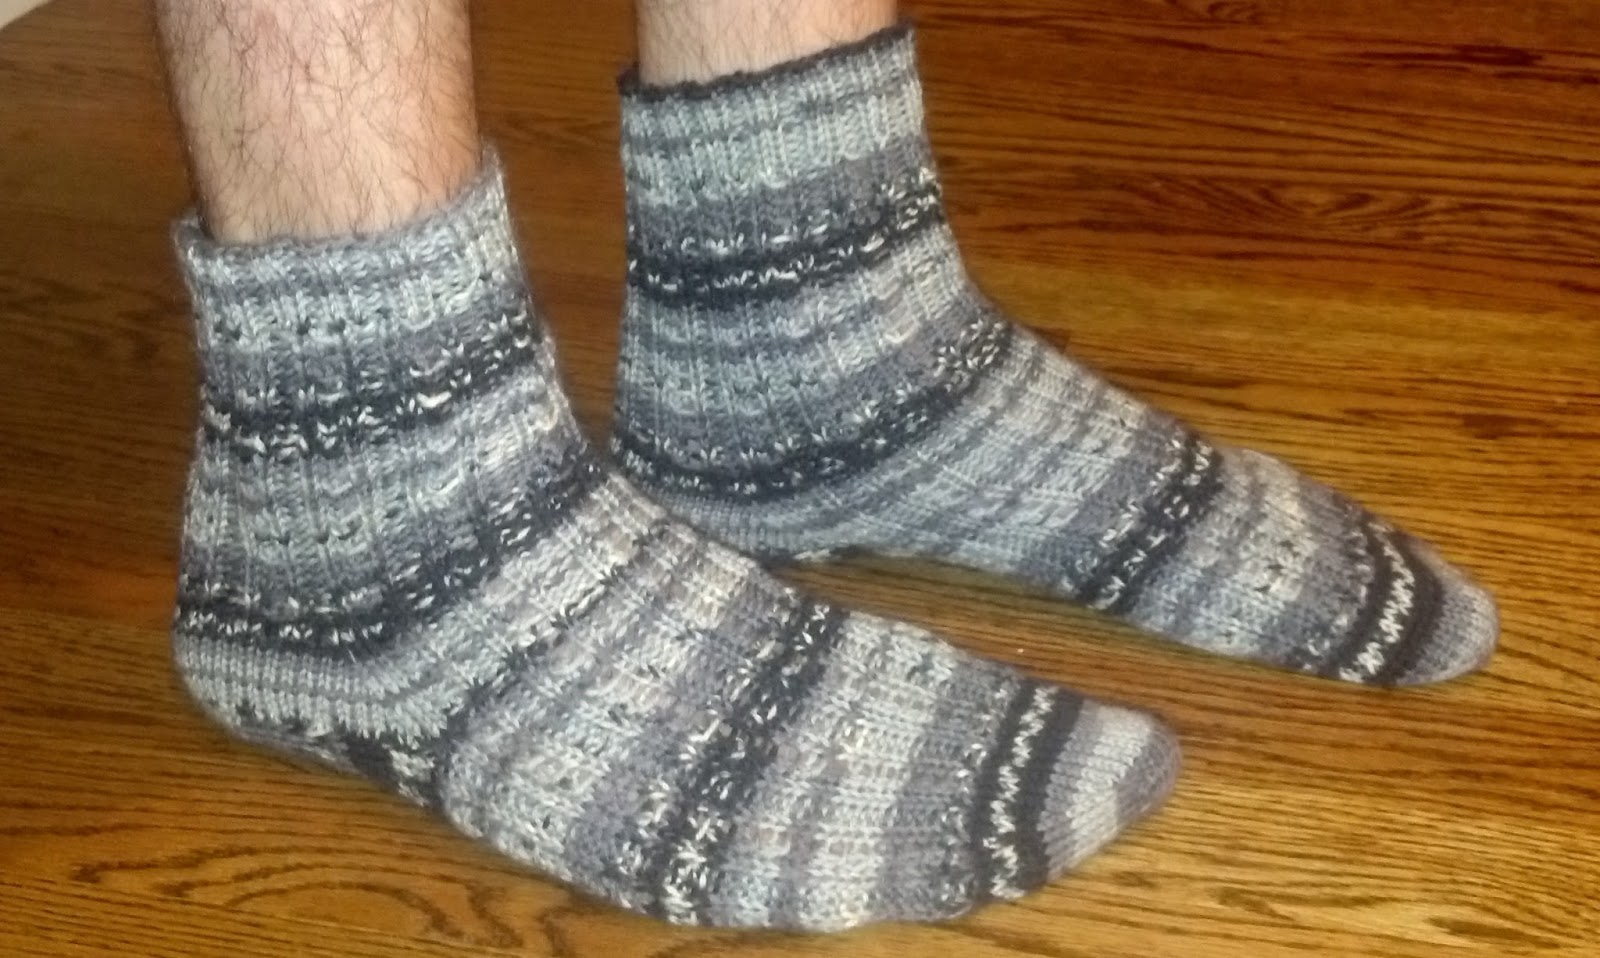
Comfortably fits size 8 women’s sock, but easily adaptable to fit any adult shoe size.

Materials:

2 skeins Patons Kroy Socks FX in Camo Colors
Size 2 double pointed needles
Scrap yarn

Yarn Substitute: Stroll

This post contains affiliate links. If you do decide to purchase though the links in this post, a small portion of the sale may go to support this site, at no additional cost to you.


Stitches:

K – knit
P – purl
Sl – slip unworked stitch from left needle to right needle
SSK – slip unworked stitch from left needle to right needle knitwise. Slip a second unworked stitch from the left needle to the right needle knitwise. Slip those two unworked stitches separately back to the left needle purlwise. Knit those two stitches together in the back of the stitches (decrease).
K2tog – knit two stitches together (decrease).
P2tog – purl two stitches together (decrease).
Inc – knit into the front and back of the same stitch (increase).
C4F (cable 4 front) – slip 2 stitches to a cable needle and hold at the front of the work, knit 2, then knit the 2 stitches from the cable needle.

C4B (cable 4 back) – slip 2 stitches to a cable needle and hold at the back of the work, knit 2, then knit the 2 stitches from the cable needle.

C2B (cable 2 back) – slip 1 stitch to a cable needle and hold at the back of the work, knit 1, then knit the 1 stitch from the cable needle.
Cr3L – slip 2 stitches to a cable needle and hold at the front of the work, purl 1, then knit 2 from the cable needle.

Cr3R – slip 1 stitch to a cable needle and hold at the back of the work, knit 2, then purl 1 from the cable needle.

Cr4L – slip 2 stitches to a cable needle and hold at the front of the work, purl 2, then knit 2 from the cable needle.

Cr4R – slip 2 stitch to a cable needle and hold at the back of the work, knit 2, then purl 2 from the cable needle.

An easy way to remember the stitches is to always have the purl stitches in the back of the knit stitches.


Celtic Knot Pattern:

Row 1: P2, K2, P1, (P2, C4B, P2) x 3, P1, K2, P2.
Row 2: P2, K2, P3, (K4, P4) X 2, K4, P3, K3, P1. 
Row 3: P2, C2B, P2, Cr3R, (Cr4L, Cr4R) x 2, Cr3L, P2, C2B, P2.
Row 4: (P2, K2) X 2, P3, K4, P4, K4, P3, (K2, P2) X 2.
Row 5: P2, K2, P1, Cr3R, P1, (P2, C4F, P2) x 2, P1, Cr3L, P1, K2, P2.
Row 6: P2, C2B, P1, K2, (P4, K4) X 2, P4, K2, P1, C2B, P2.
Row 7: P2, K2, P1, K2, P2, (Cr4R, Cr4L) x 2, P2, K2, P1, K2, P2.
Row 8: P2, K2, P1, K2, P2, K2, P4, K4, P4, K2, P2, K2, P1, K2, P2.
Row 9: P2, C2B, P1, (K2, P2) x 2, P2, C4B, P2, (P2, K2) x 2, P1, C2B, P2.
Row 10: P2, K2, P1, K2, P2, K2, P4, K4, P4, K2, P2, K2, P1, K2, P2
Row 11: P2, K2, P1, K2, P2, (Cr4L, Cr4R) x 2, P2, K2, P1, K2, P2.
Row 12: P2, C2B, P1, K2, (P4, K4) x 2, P4, K2, P1, C2B,P2.
Row 13: P2, K2, P1, Cr3L, P1, (P2, C4F, P2) x 2, P1, Cr3R, P1, K2, P2.
Row 14: P2, K2, P2, K2, P3, K4, P4, K4, P3, K2, P2, K2, P2.
Row 15: P2, C2B, P2, Cr3L, (Cr4R, Cr4L) x 2, Cr3R, P2, C2B, P2.
Row 16: P2, K2, P3, (K4, P4) x 2, K4, P3, K2, P2.
Row 17: P2, K2, P1, (P2, K4, P2) x 3, P1, K2, P2.
Row 18: P2, C2B, P1, (P2, K4, P2) x 3, P1, C2B, P2.

Instructions:
Toe Shaping
Using provisional cast on method, cast on 8 stitches
Round 1: P across
Round 2: K across
Round 3: P across
Round 4: K across

Remove live stitches from scrap yarn and place them on a double pointed needle. You should have 16 sts on two needles. Begin knitting in the round.


Round 5: *K2, Inc, K1 (add a needle) K1, Inc, K2.* Repeat from * to * (20 sts)

Rounds 6-8: Needle 1 – K2, Inc, K across needle
          Needle 2 – K across needle to last 3 sts, Inc, K2
          Needle 3 – K2, Inc, K across needle
          Needle 4 – K across needle to last 3 sts, Inc, K2

Increase until you have 32 sts total (8 sts per needle)


Round 9: K across

Round 10: Needle 1 – K2, Inc, K across needle
        Needle 2 – K across needle to last 3 sts, Inc, K2
Needle 3 – K2, Inc, K across needle
Needle 4 – K across needle to last 3 sts, Inc, K2

Repeat Round 9 and Round 10 until you have 68 sts total (17 sts per needle)

Foot:

Round 11: Needles 1 and 2 – Work Celtic Knot Pattern
        Needles 3 and 4 – K across

Repeat Round 11 until you work all 18 rows of the celtic knot pattern twice.


Heel Flap:

Turn so WS is facing and Work Needles 3 and 4 ONLY (34 sts)
Leave Needles 1 and 2 unworked for the heel flap

Row 12: Sl1, P across.

Row 13: *Sl1, K1.* Repeat from * to * to end.
Repeat Rows 12 and 13, 11 more times (12 repeats total, 24 rows total).

Heel Shaping:

Row 14: Sl1, P16, P2tog, P1, turn. (Leave 14 sts remaining unworked).
Row 15: Sl1, K3, K2tog, K1, turn. (Leave 12 sts remaining unworked).
Row 16: Sl1, P4, P2tog, P1, turn. (Leave 12 sts remaining unworked).
Row 17: Sl1, K5, K2tog, K1, turn. (Leave 10 sts remaining unworked). 
Row 18: Sl1, P6, P2tog, P1, turn. (Leave 10 sts remaining unworked).
Row 19: Sl1, K7, K2tog, K1, turn. (Leave 8 sts remaining unworked).
Row 20: Sl1, P8, P2tog, P1, turn. (Leave 8 sts remaining unworked).
Row 21: Sl1, K9, K2tog, K1, turn. (Leave 6 sts remaining unworked).
Row 22: Sl1, P10, P2tog, P1, turn. (Leave 6 sts remaining unworked).
Row 23: Sl1, K11, K2tog, K1, turn. (Leave 4 sts remaining unworked).
Row 24: Sl1, P12, P2tog, P1, turn. (Leave 4 sts remaining unworked).
Row 25: Sl1, K13, K2tog, K1, turn. (Leave 2 sts remaining unworked).
Row 26: Sl1, P14, P2tog, P1, turn. (Leave 2 sts remaining unworked).
Row 27: Sl1, K15, K2tog, K1, turn.
Row 28: Sl1, P16, P2tog, P1, turn.

Begin working in the round again.

Round 29: K across 19 sts of heel flap. Using the same needle (called Needle 4), pick up and K8 sts along the heel flap. Work Celtic Knot Pattern along Needles 1 and 2. Using the last spare needle (called Needle 3), pick up and K8 sts along the other side of the heel flap.

Distribute sts along the needles as follows:
Needle 1: 17 sts (keep these as the same sts with the Celtic Knot Pattern)
Needle 2: 17 sts (keep these as the same sts with the Celtic Knot Pattern)
Needle 3: 17 sts
Needle 4: 18 sts

Gusset Shaping (decrease)
Round 30: Needle 1 – work Celtic Knot Pattern
       Needle 2 – work Celtic Knot Pattern
       Needle 3 – K1, SSK, K across until end of needle
       Needle 4 – K across until last 3 sts of needle, SSK, K1

Round 31: Needle 1 – work rib pattern
       Needle 2 – work rib pattern
       Needle 3 – K across
       Needle 4 – K across

Repeat Round 30 and Round 31 until there are 14 sts each on Needles 3 and 4, leaving 17 sts each on Needles 1 and 2. (62 sts total). Note: since Needle 4 has one more st than Needle 3, you will decrease on Needle 4 for one more round than on Needle 3.

Leg
K across Needles 3 and 4 and work Celtic Knot Pattern on Needles 1 and 2 until you have worked the entire Celtic Knot Pattern twice.

Ribbing:

Rounds 32-37: K2, P2.

Bind off using the Icelandic Bind-Off for a stretchy finish. Video tutorial available here.
Posted on

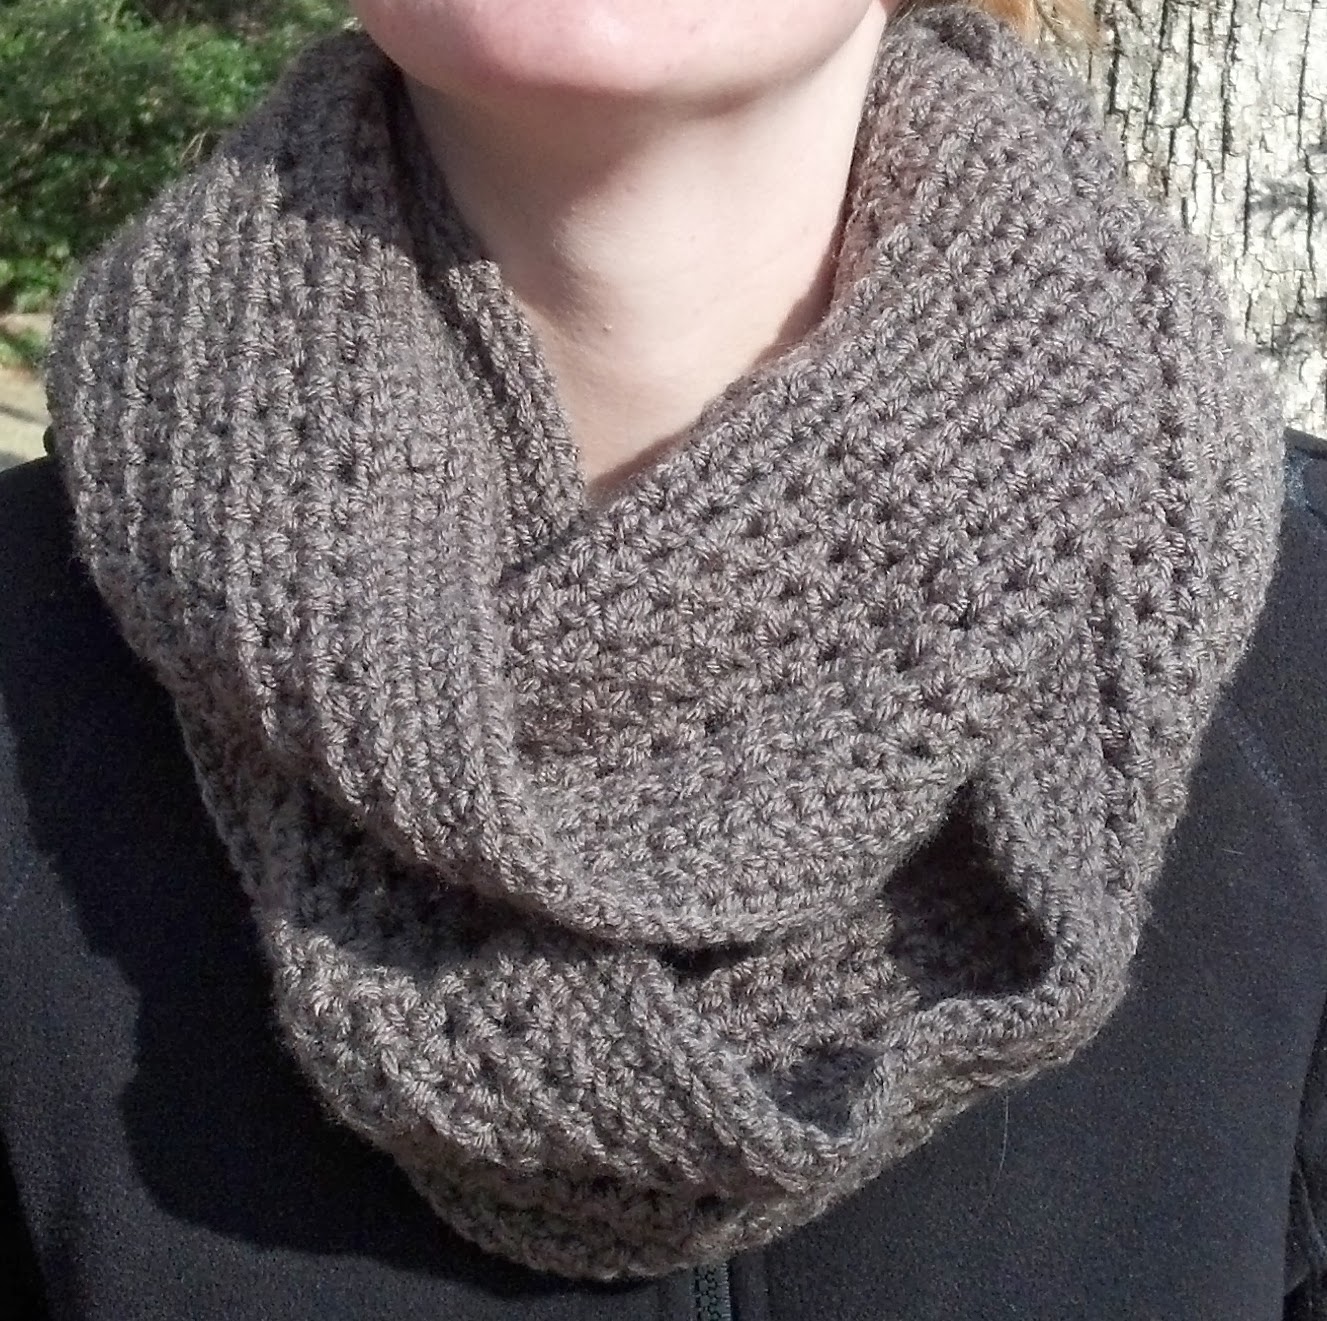
Pattern: Knotted Rib Toe-Up Socks

Finished Measurements:
Fits men’s size 12/13 but is easily adapted to fit any foot size. If you want a smaller width, keep the st count in multiples of 6.

Materials:
Two (2) skeins Patons Kroy Socks in Slate Jacquard
Size 2 double pointed needles
Scrap yarn

Yarn Substitute: Stroll

This post contains affiliate links. If you do decide to purchase though the links in this post, a small portion of the sale may go to support this site, at no additional cost to you.


Abbreviations:
K – knit
P – purl
Sts – stitches
Inc – increase, knit into the front and back of the stitch
Yo – yarn over
K2tog – knit two sts together
P2tog – purl two sts together
Sl – slip stitch unworked from the left needle to the right
Pyoo yo and K2tog – on the right hand needle just worked, pass the first yo made over the second yo made and the K2tog stitch

Instructions:

Toe Shaping
Cast on 8 sts using the provisional cast on method.

Work back and forth across the same needle:
Row 1: K across
Row 2: P across
Row 3: K across
Row 4: P across
Row 5: K across

Remove 8 live sts from the scrap yarn and place them on a double pointed needle. You will have 16 sts on two needles, 8 sts per needle. Begin knitting in the round.

Round 6: *K2, Inc, K1 (add a needle) K1, Inc, K2.* Repeat from * to * until the end. (20 sts)

Rounds 7-9: Needle 1 – K2, Inc, K across needle
      Needle 2 – K across needle to last 3 sts, Inc, K2
      Needle 3 – K2, Inc, K across needle
      Needle 4 – K across needle to last 3 sts, Inc, K2

You should have 32 sts total (8 sts per needle).

Round 10: K across

Round 11: Needle 1 – K2, Inc, K across needle
      Needle 2 – K across needle to last 3 sts, Inc, K2
      Needle 3 – K2, Inc, K across needle
      Needle 4 – K across needle to last 3 sts, Inc, K2

Repeat Round 10 and Round 11 until you have 60 sts total (15 sts per needle).

Foot
Rounds 12 and 13 make up the repeating Knotted Rib pattern.

Round 12: *P2, K4.* Repeat from * to * until the end.
Round 13: *P2, K1, yo twice, K2tog, pyoo yo and K2tog, K1.* Repeat from * to * until the end. While this round uses increase and decrease stitches, it evens out and you should still have 60 sts total (15 sts per needle).

Repeat Rounds 12 and 13 until
 sock is the length from the toe to the bend of your ankle at the top of your foot.

Heel Flap
Work needles 1 and 2 ONLY, leave needles 3 and 4 unworked. You will not be working in the round for the heel flap and you will be working across needles 1 and 2 flat, turning your work after each row.

Row 14: *Sl 1, K1.* Repeat from * to * until the end.
Row 15: Sl 1, P across.
Row 16: Sl 1, K1, *K1, Sl 1* Repeat from * to * until the last 2 sts, K2.
Row 17: Sl 1, P across.

Repeat Rows 14-17 five (5) more times (6 times total).

Heel Shaping
Continue working on needles 1 and 2 ONLY.

Row 18: Sl 1, K15, K2tog, K1, turn (leave 11 sts unworked).
Row 19: Sl 1, P3, P2tog, P1, turn (leave 11 sts unworked).
Row 20: Sl 1, K4, K2tog, K1, turn (continue leaving sts unworked).
Row 21: Sl 1, P5, P2tog, P1, turn.
Row 22: Sl 1, K6, K2tog, K1, turn.
Row 23: Sl 1, P7, P2tog, P1, turn.
Row 24: Sl 1, K8, K2tog, K1, turn.
Row 25: Sl 1, P9, P2tog, P1, turn.
Row 26: Sl 1, K10, K2tog, K1, turn.
Row 27: Sl 1, P11, P2tog, P1, turn.
Row 28: Sl 1, K12, K2tog, K1, turn.
Row 29: Sl 1, P13, P2tog, P1, turn.
Row 30: Sl 1, K14, K2tog, turn.
Row 31: Sl 1, P14, P2tog, turn.

You should have 16 sts remaining (8 sts per needle). Continue working in the round.

Round 32: Needle 1 – K across
      Needle 2 – K across, pick up and K 14 sts along the length of the heel flap
      Needle 3 – work across in Knotted Rib pattern
      Needle 4 – work across in Knotted Rib pattern
Pick up and K 14 sts along the length of the other side of the heel flap and add it to Needle 1.

Your sts should be distributed as follows:
      Needle 1 – 22 sts
      Needle 2 – 22 sts
      Needle 3 – 15 sts (keep these as the same Knotted Rib pattern sts held aside during the heel flap and heel shaping sections)
      Needle 4 – 15 sts (keep these as the same Knotted Rib pattern sts held aside during the heel flap and heel shaping sections)

Gusset Shaping
Round 33: Needle 1 – K1, SSK, K across until end of needle
      Needle 2 – K across until last 3 sts of needle, SSK, K1
      Needle 3 – work in Knotted Rib pattern
      Needle 4 – work in Knotted Rib pattern


Round 34: Needle 1 – K across
      Needle 2 – K across
      Needle 3 – work in Knotted Rib pattern
      Needle 4 – work in Knotted Rib pattern


Repeat Rounds 33 and 34 until there are 60 sts total (15 sts per needle).

Leg
Work Knotted Rib pattern on all needles until you reach 1 inch less than the desired length.

Finish with 10 rows of K2, P2 ribbing.

Bind off using the Icelandic Bind-Off for a stretchy finish. Video tutorial available here.

Posted on

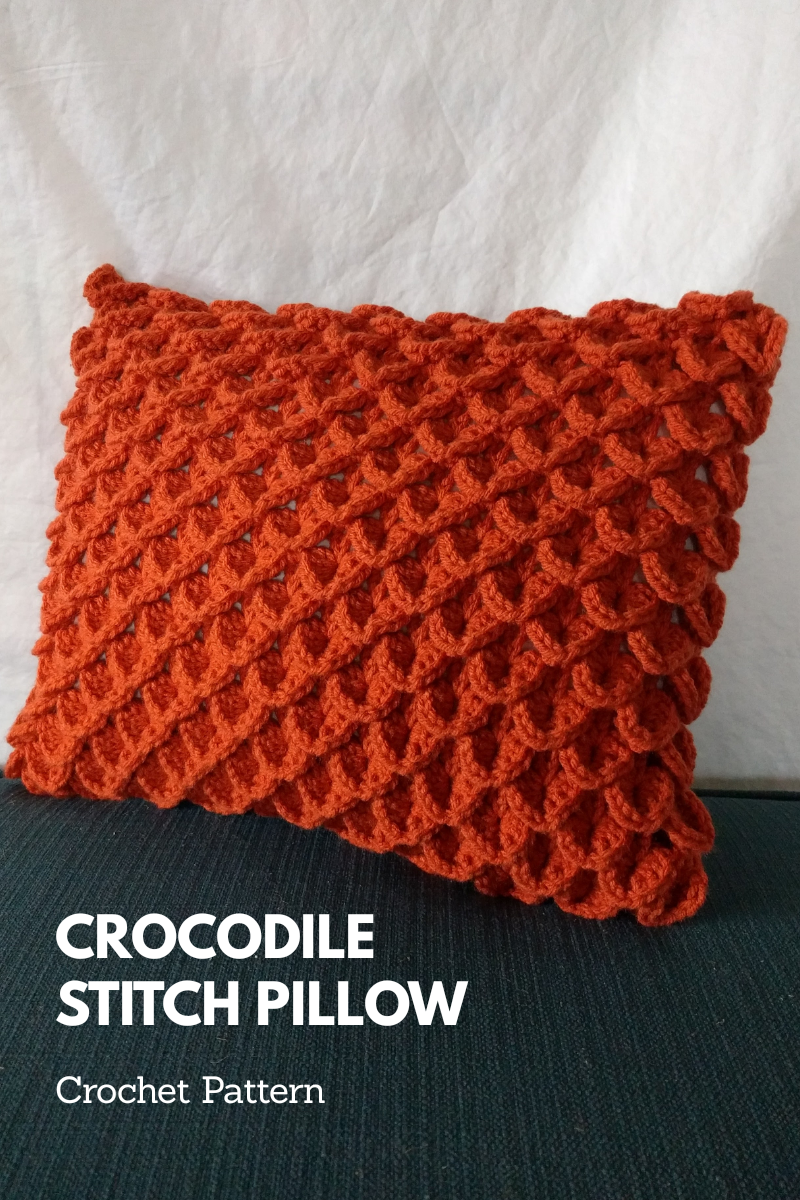
Pattern: Crocodile Stitch Pillow

Make this trendy ruffle pillow as an accessory to your couch that also provides great lumbar support. The brighter the color, the better!


Find a printer-friendly, PDF version of the Crocodile Stitch Pillow below!

Finished Measurements:

Approximately 12″ x 16″

Materials:
Two (2) skeins Loops & Threads Impeccable in Fern
Size H crochet hook
12″ x 16″ pillow form
Sewing needle

Abbreviations:
Ch – chain
Dc – double crochet
St(s) – stitch(es)
Sc – single crochet

Instructions:

Crochet Pillow Front:
Ch 64 (or any multiple of 3 +4 sts)

Row 1: skip first 3 ch (counts as first dc) 1 dc in fourth ch from hook, *ch 2, skip 2 sts, 2 dc in next st.* Repeat from * to * until the end. Each dc is referred to as a post and each 2 dc set is referred to as a cluster.

Row 2: turn, ch 3 (counts as 1 dc), 4 dc down one side of the first post of the first cluster, ch 1, 5 dc up the second post of the first cluster, ch 1, *skip the next cluster, 5 dc down the first post of the next cluster, ch 1, 5 dc up the second post of the same cluster, ch 1.* Repeat from * to * until the last cluster, 1 sc in the last dc.

Row 3: turn, ch 3 (counts as 1 dc), 1 dc in first sc, ch 2, 2 dc in the first crocodile stitch (in the cluster from Row 1), *ch 2, 2 dc into next cluster from Row 1 (including the ch 1 between the crocodile stitches from Row 2), ch 2, 2 dc in next crocodile stitch.* Repeat from * to * until the end.

Row 4: turn, ch 2, sc in first post, ch 1, *5 dc down the first post of the next cluster, ch 1, 5 dc up the second post of the same cluster, ch 1, skip the next cluster.* Repeat from * to * until the last cluster, 1 sc in the last dc.

Row 5: turn, ch 3 (counts as 1 dc), 1 dc in first sc, *ch 2, 2 dc in next crocodile stitch (in the cluster from Row 3), ch 2, 2 dc in next cluster from Row 3 (including the ch 1 between the crocodile stitches from Row 4).* Repeat from * to * until the last sc, 2 dc in last sc.

Repeat Rows 2-5 nine (9) more times (ten times total), Repeat Row 2. Piece should measure 12 inches. If you need to do more or less repeats, be sure to end on an even row.

If you would like to see how the stitches are worked up and down the posts, I created an instructional video available here.


Crochet Pillow Back:
Ch 58

Row 1: skip first 2 ch, 1 dc in each ch across.
Row 2: turn, ch 2, 1 dc in each dc across.

Repeat Row 2 until piece measures 12 inches.

Sewing:
Using a sewing needle and the same color yarn as the pillow and holding the wrong side of the front and back panels together, sew along three of the edges. 

When a crocodile stitch is the last stitch on the end of a row, be sure to sew into the middle of the post so one half of the crocodile stitch hangs off of the end to make frills.

Turn the pillow right side facing out and insert the pillow form, being sure to push the corners all the way in. Sew along the last edge, knot at the end, and hide the yarn end.

Posted on

Pattern: Pottery Barn Cable Knit Throw

Make a blanket inspired by this Pottery Barn throw, also pictured above on the left. Once you knit the blanket, you’ll sew some faux fur fabric onto the wrong side of the piece.

Finished Measurements:
60 inches X 72 inches

Materials:
Four (4) skeins Loops & Threads Impeccable Big! in Aran
Size 10 1/2 Circular Knitting Needle
Cable Needle
Sewing Needle
Faux Sheepskin fabric, measuring approx. 60 inches X 72 inches
White thread
Safety pins

Abbreviations:
K – knit
P – purl
Sts – stitches
CN – cable needle
Sl – slip


Instructions:
Knitting:
CO 336
Rows 1-10: K across.
Row 11: (WS) K10, P6, *P12, K2, P1, K1, P1, K2.* Repeat from * to * until last 16 sts. P6, K10.
Row 12: (RS) K16, *P2, K1, P1, K1, P2, K12.* Repeat from * to * until last 16 sts, K16.
Row 13: Repeat Row 11.
Row 14: Repeat Row 12.
Row 15: Repeat Row 11.
Row 16: K16, *P2, K1, P1, K1, P2, sl 3 sts to CN and hold to the back, K3, K3 from CN, sl 3 sts to CN and hold to the front, K3, K3 from CN.* Repeat from * to * until last 16 sts. K16.

Row 17: Repeat Row 11.
Row 18: Repeat Row 12.
Row 19: Repeat Row 11.
Row 20: Repeat Row 12.
Row 21: Repeat Row 11.
Row 22: Repeat Row 12.
Row 23: Repeat Row 11.
Row 24: Repeat Row 16.

Repeat Rows 17-24 until you reach the desired length.

Last 10 rows: K across.

Sewing:

Do not sew the fabric onto the K edging along the blanket. The K edging will be folded over later to hide the rough fabric edge. 


Lay the fabric, right side facing up, on top of the wrong side of the knitted blanket and attach using safety pins. Using a sewing needle and thread the same color as the yarn, sew the fabric onto the wrong side of the blanket. The seam should be inside the edging where the repeating pattern begins.


Sew diagonal lines across the blanket, 10 inches apart from each other. This will keep the fabric attached to the knitted blanket, even in the center. The thread you use should be thin enough that the lines will not be visible.


Fold over the knit edge along the top first, safety pinning it down. Sew the knit border to the blanket. Fold the knit edge along the side of the blanket next, being sure to fold it over the top edge just sewed down. Sew the knit border to the blanket. Repeat for the bottom edge and other side edge.


Viola! Edging complete.

Posted on

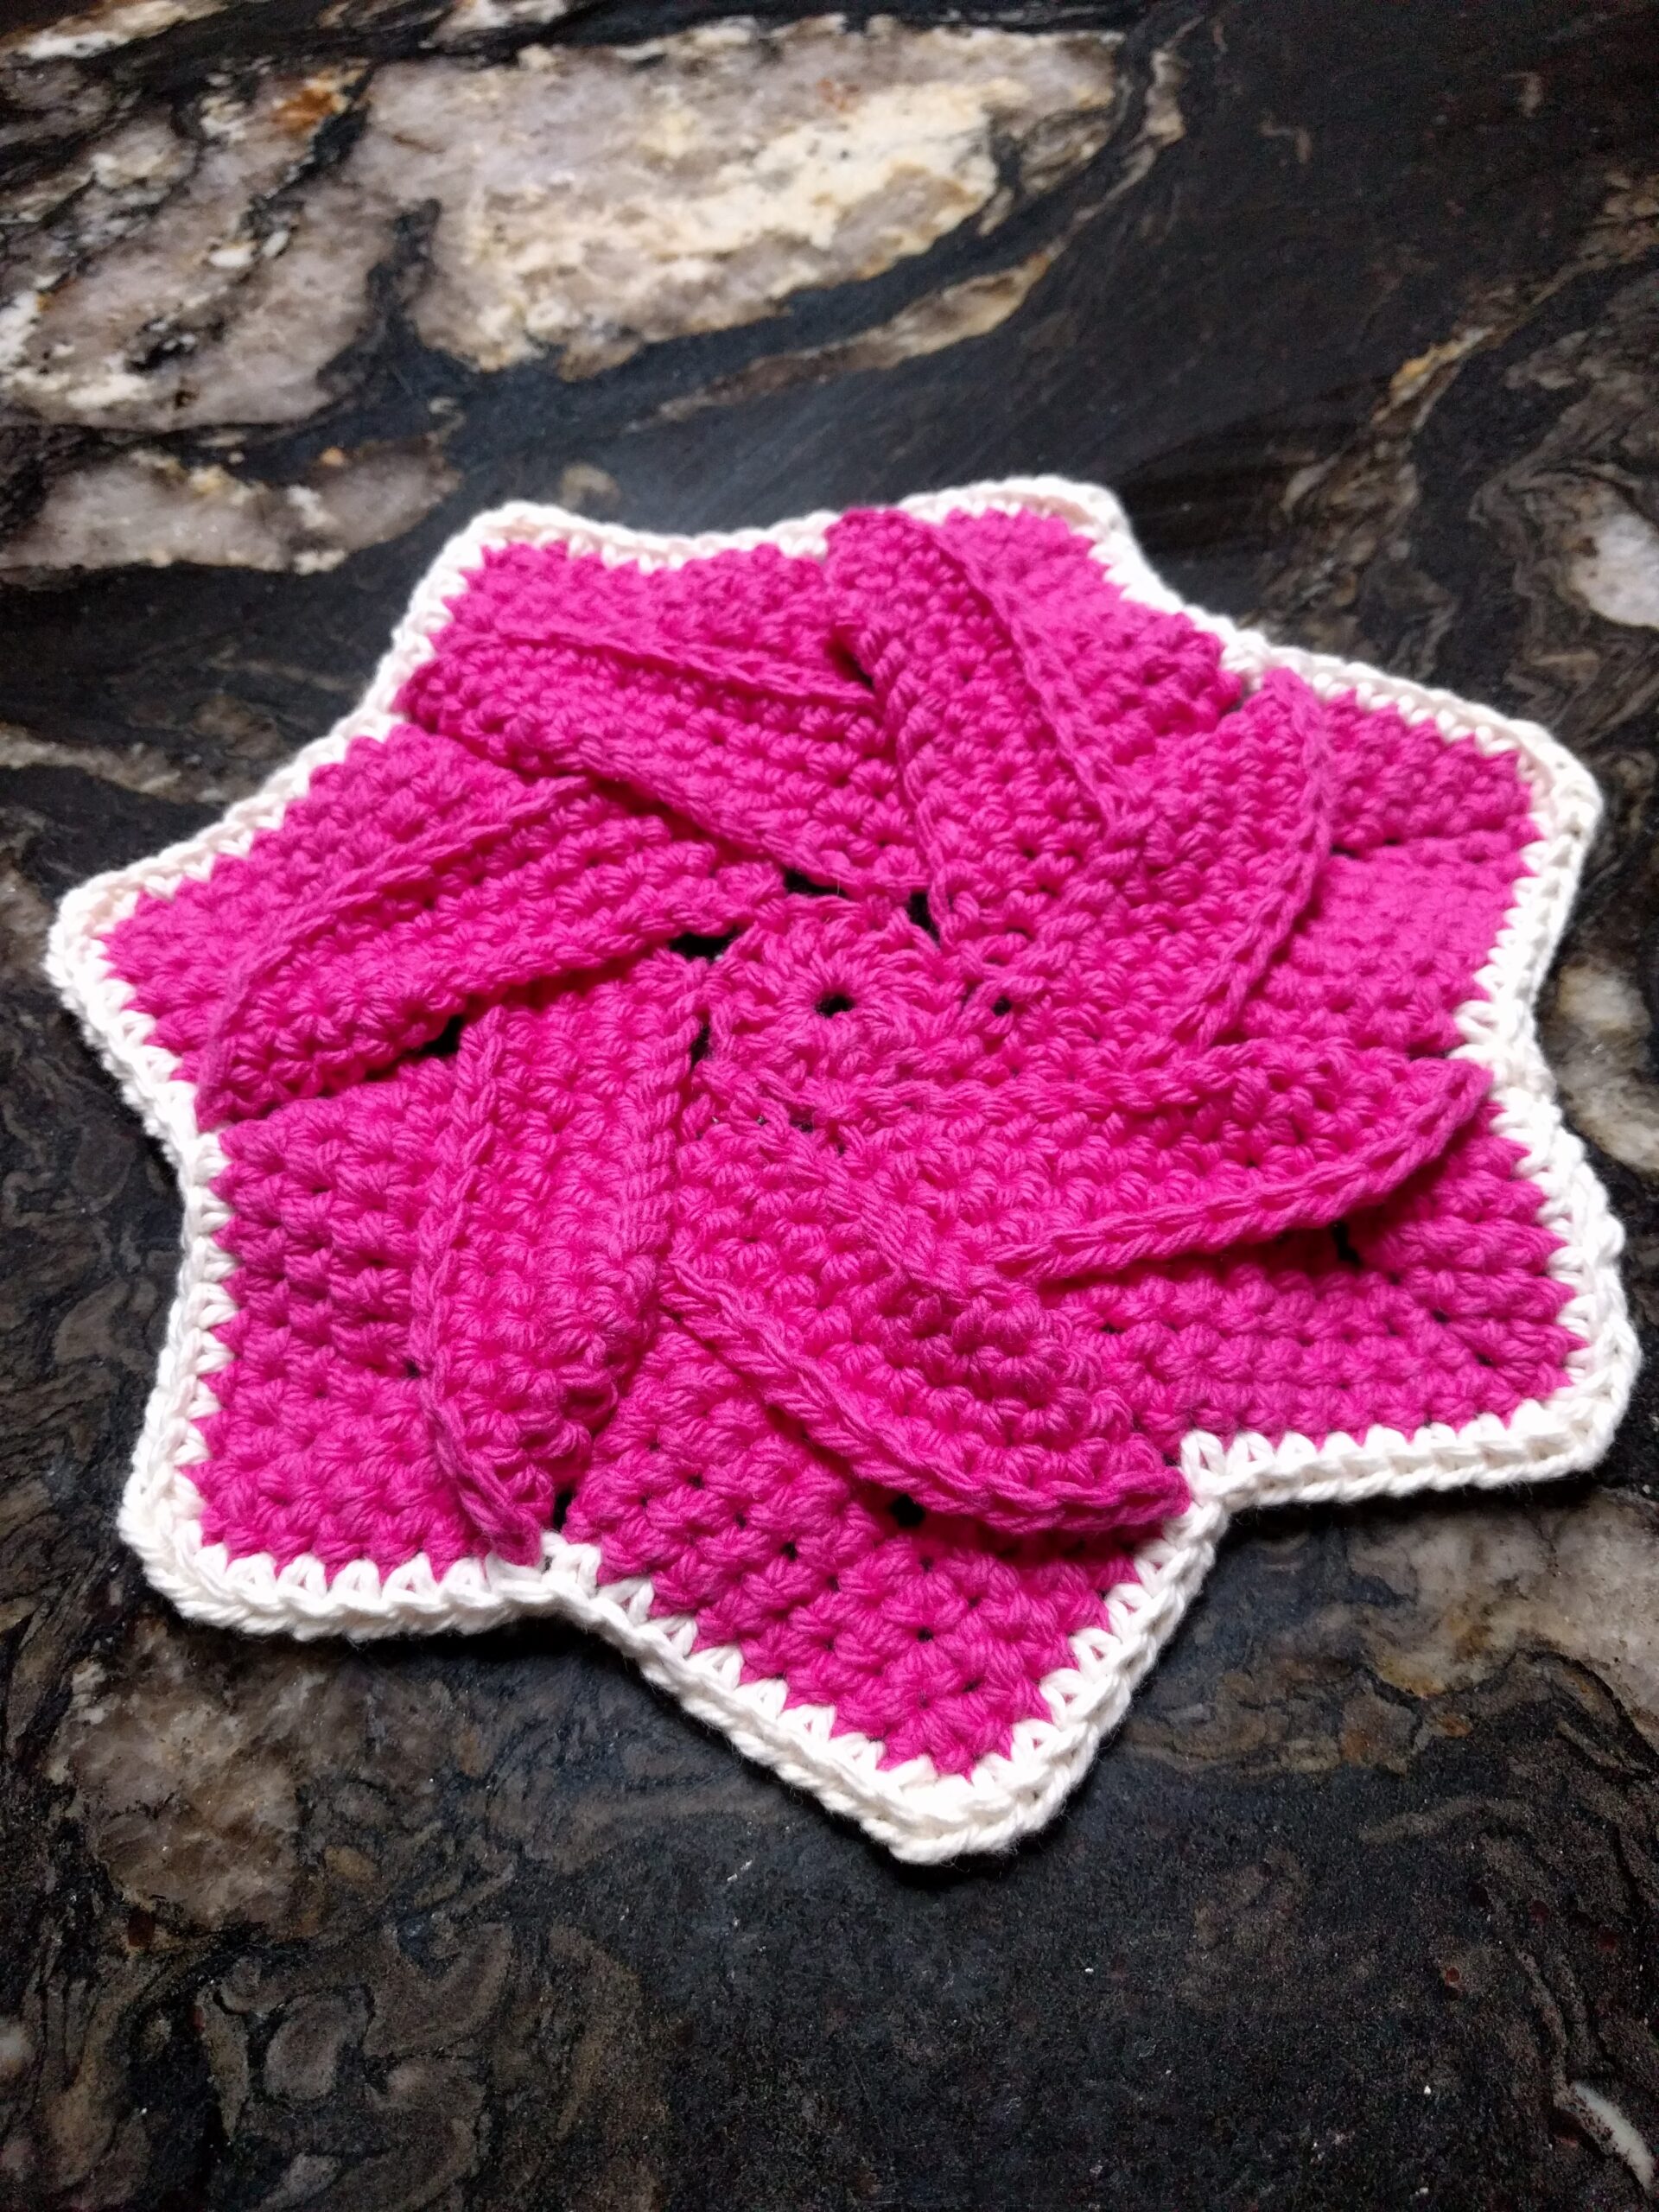
Pattern: Pinwheel Hot Pad


Make the perfect pinwheel star hot pad that is even along the edges to create a flat surface for those hot pots and pans.

Materials:

1 skein Cotlin (pink)
1/2 skein Cotlin (cream)
size “H” crochet hook

This post contains affiliate links. If you do decide to purchase though the links in this post, a small portion of the sale may go to support this site, at no additional cost to you.

Instructions:

Starting with pink yarn, chain 4. Slip stitch to form a ring.


Chain 3 (counts as 1st dc), 13 dc in ring. Slip stitch in top of chain 3.


Row 1: *Chain 27. Skip next dc, slip stitch in next dc. (1st petal). Repeat from * 5 times. Chain 27, slip stitch at base of 1st petal. (7 petals)

Row 2: *1 sc in first 13 chains of 1st petal. 3 sc in next chain (top of 1st petal). 1 sc in each of last 13 chains of 1st petal. (29 sc). Skip slip stitch. Repeat from * for each of the remaining petals all the way around.

Row 3:  *1 sc in each of the first 14 sc of 1st petal. 3 sc in next sc (top of petal). 1 sc in each of the remaining 14 sc of 1st petal. (31 sc). Repeat from * for each of the remaining petals all the way around.

Row 4: *1 sc in each of the first 15 sc of 1st petal. 3 sc in next sc (top of petal). 1 sc in each of the remaining 15 sc of 1st petal. (33 sc). Repeat from * for each of the remaining petals all the way around.

Row 5: *1 sc in each of the first 16 sc of 1st petal. 3 sc in next sc (top of petal). 1 sc in each of the remaining 16 sc of 1st petal. (35 sc). Repeat from * for each of the remaining petals all the way around. Fasten off.


Your work should look like this, with the petals not laying completely flat:


Hold the 1st petal at the tip (at the 3 sc in 1 sc point).


Twist the petal clockwise 180°, folding the petal on top of itself.


Halfway down the left side of the petal, make a crease so the front portion near the base is facing. Spread and flatten to create the shape.


Continue folding all 7 petals the same way. 


The back of the petal at the tip should be facing you. The front of the bottom half of the petal on the left should be facing you. Work Rows 6-8 with the work folded this way.


Row 6: Change to cream yarn. *Starting at the tip of the 1st petal, 3 sc in 1 sc. 1 sc in the next 7 sc. Attach the 1st petal to the 2nd petal using 1 sc at the 8th sc from the tip of each petal. 1 sc in the next 7 sc along the 2nd petal. Repeat from * for each of the remaining petals.


Row 7: Working in back loops only, 1 sc in each sc around.

Row 8: Working in front loops from Row 6 only, 1 sc in each sc around.


Work complete! The double edge ensures that hot pots or pans won’t wobble.