Posted on

Pattern: Quatrefoil Reversible Slipper Socks

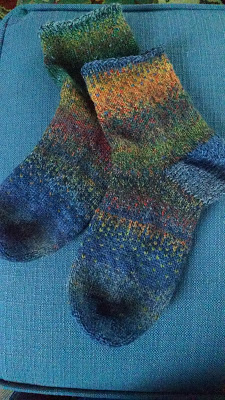
I wanted to make some reversible slipper socks that were also really warm so I decided to try making these socks using double knitting. It was quite challenging to figure out parts of the sock using double knitting, especially the toe at the very beginning, so I recommend tackling this pattern only if you have sock experience and double knitting experience. This could be a fun pattern to try as your first double knitting project, but it could be a bit frustrating, so beware! There’s a great photo tutorial on double knitting available here. I tried my best to explain my process as a helpful guide.

Finished Measurements:
Pattern written for women’s size 8 (US) socks, but it’s easily adaptable to fit other sizes. If you want to make the foot wider or narrower, then increase or decrease until you get your size and follow the pattern chart to keep the quatrefoil looking the same.

These socks are meant to be slipper socks, so they won’t fit snug on your foot like normal socks. They’re a bit looser for around-the-house comfort.

Materials:
Size 1 double pointed needles
1 skein Lion Brand Sock-Ease in Marshmallow
1 skein Lion Brand Sock-Ease in Snow Cone

Yarn Substitute: Stroll

This post contains affiliate links. If you do decide to purchase though the links in this post, a small portion of the sale may go to support this site, at no additional cost to you.


Abbreviations:
K – knit
P – purl
Sl – slip unworked stitch from left needle to right needle
SSK – slip unworked stitch from left needle to right needle knitwise. Slip a second unworked stitch from the left needle to the right needle knitwise. Slip those two unworked stitches separately back to the left needle purlwise. Knit those two stitches together in the back of the stitches (decrease).
K2tog – knit two stitches together (decrease). Be sure to use double knitting decrease method, available here.
P2tog – purl two stitches together (decrease). Be sure to use double knitting decrease method, available here.
K Inc – knit into the front and back of the same stitch (increase).
P Inc – purl into the front and back of the same stitch (increase).
W – white
B – blue

Instructions:
Toe Shaping
Using provisional cast on method, cast on 12 stitches of each color, making 24 stitches total on your needle. This part is really tricky and will probably require a lot of trial and error until you get the hang of it.

To have a white toe on the outside and a blue toe on the inside, start with a blue on the needle, but don’t make one blue around the string. Then, continue as normal under the provisional cast on method with the white, then the blue. Continue alternating colors and end with one white on the needle, but don’t make one white around the string. This keeps the alternating colors as you pick up the live stitches from the string.

Remove live stitches from scrap yarn and split them across two double pointed needles. Split the stitches on the other needle across two needles, having four needles in total with 6 stitches of each color per needle (12 stitches total per needle). Begin knitting in the round.

Round 1: Needle 1 – K1 W, P1 B, K1 W, P1 B, K Inc W, P Inc B, *K1 W, P1 B,* repeat from * to * until end of needle.
          Needle 2 – *K1 W, P1 B,* repeat from * to * until last 4 sts, K Inc W, P Inc B, K1 W, P1 B, K1 W, P1 B.
          Needle 3 – K1 W, P1 B, K1 W, P1 B, K Inc W, P Inc B, *K1 W, P1 B,* repeat from * to * until end of needle.
          Needle 4 – *K1 W, P1 B,* repeat from * to * until last 4 sts, K Inc W, P Inc B, K1 W, P1 B, K1 W, P1 B.

Rounds 2-5: Repeat Round 1.

Round 6: *K1 W, P1 B,* repeat from * to * until end.
Round 7: Repeat Round 1.
Round 8: Repeat Round 6.
Round 9: Repeat Round 1.
Round 10: Repeat Round 6.
Round 11: Repeat Round 1.
Rounds 12-13: Repeat Round 6.
Round 14: Repeat Round 1.
Rounds 15-16: Repeat Round 6.
Round 17: Repeat Round 1.
Rounds 18-20: Repeat Round 6.
Round 21: Repeat Round 1.
Rounds 22-25: Repeat Round 6. (136 stitches total, 68 sts in each color)

Foot:
Change your yarn so the main color on the outside is blue with white as a contrast color, making the inside with a white main color and blue contrast color. Work the pattern based on the quatrefoil chart below:

Work until you have three quatrefoil rows on the foot, or until the sock is the length from the toe to the bend of your ankle at the top of your foot.

Heel Flap:
Turn so WS is facing and Work Needles 3 and 4 ONLY
Leave Needles 1 and 2 unworked 

Row 26: Holding yarn to the front, sl1, holding yarn to the back, sl1, *P1 W, K1 B,* repeat from * to * until end. 
Row 27: Holding yarn to the back, sl1, holding yarn to the front, sl1, *K1 B, P1 W* repeat from * to * until end. 
Repeat Rows 26 and 27, 11 more times (12 repeats total, 24 rows total).

Heel Shaping:
There are really great instructions on how to decrease while double knitting here.

Row 28: Holding yarn to the front, sl1, holding yarn to the back, sl1, *P1 W, K1 B* repeat 17 more times (18 times total), P2tog (of white using double knitting decrease method), K2tog (of blue using double knitting decrease method), P1 W, K1 B, turn. Leave remaining sts unworked. Continue in this manner.
Row 29: Holding yarn to the back, sl1, holding yarn to the front, sl1, *K1 B, P1 W* repeat 2 more times (3 times total), K2tog, P2tog, K1 B, P1 W, turn. 
Row 30: Holding yarn to the front, sl1, holding yarn to the back, sl1, *P1 W, K1 B* repeat 3 more times (4 times total), P2tog, K2tog, P1 W, K1 B, turn. 
Row 31: Holding yarn to the back, sl1, holding yarn to the front, sl1, *K1 B, P1 W* repeat 4 more times (5 times total), K2tog, P2tog, K1 B, P1 W, turn. 
Row 32: Holding yarn to the front, sl1, holding yarn to the back, sl1, *P1 W, K1 B* repeat 5 more times (6 times total), P2tog, K2tog, P1 W, K1 B, turn. 
Row 33: Holding yarn to the back, sl1, holding yarn to the front, sl1, *K1 B, P1 W* repeat 6 more times (7 times total), K2tog, P2tog, K1 B, P1 W, turn. 
Row 34: Holding yarn to the front, sl1, holding yarn to the back, sl1, *P1 W, K1 B* repeat 7 more times (8 times total), P2tog, K2tog, P1 W, K1 B, turn. 
Row 35: Holding yarn to the back, sl1, holding yarn to the front, sl1, *K1 B, P1 W* repeat 8 more times (9 times total), K2tog, P2tog, K1 B, P1 W, turn. 
Row 36: Holding yarn to the front, sl1, holding yarn to the back, sl1, *P1 W, K1 B* repeat 9 more times (10 times total), P2tog, K2tog, P1 W, K1 B, turn. 
Row 37: Holding yarn to the back, sl1, holding yarn to the front, sl1, *K1 B, P1 W* repeat 10 more times (11 times total), K2tog, P2tog, K1 B, P1 W, turn. 
Row 38: Holding yarn to the front, sl1, holding yarn to the back, sl1, *P1 W, K1 B* repeat 11 more times (12 times total), P2tog, K2tog, P1 W, K1 B, turn. 
Row 39: Holding yarn to the back, sl1, holding yarn to the front, sl1, *K1 B, P1 W* repeat 12 more times (13 times total), K2tog, P2tog, K1 B, P1 W, turn. 
Row 40: Holding yarn to the front, sl1, holding yarn to the back, sl1, *P1 W, K1 B* repeat 13 more times (14 times total), P2tog, K2tog, P1 W, K1 B, turn. 
Row 41: Holding yarn to the back, sl1, holding yarn to the front, sl1, *K1 B, P1 W* repeat 14 more times (15 times total), K2tog, P2tog, K1 B, P1 W, turn. 
Row 42: Holding yarn to the front, sl1, holding yarn to the back, sl1, *P1 W, K1 B* repeat 15 more times (16 times total), P2tog, K2tog, turn. 
Row 43: Holding yarn to the back, sl1, holding yarn to the front, sl1, *K1 B, P1 W* repeat 15 more times (16 times total), K2tog, P2tog, turn. 
Row 44: Holding yarn to the front, sl1, holding yarn to the back, sl1, *P1 W, K1 B* repeat 15 more times (16 times total), P2tog, K2tog, P1 W, K1 B, turn. 

Begin working in the round again. 

Row 45: work across heel flap, pick up 12 white stitches from the outside (blue) and 12 stitches from the inside (white), alternating in the same manner as you have been, and K the blue sts and P the white sts. Work in the quatrefoil pattern across the next 2 needles. Pick up and work 12 white stitches and 12 blue stitches in the same manner across the other side of the heel flap. On the same needle, split the heel flap sts evenly between the needles with the picked up heel flap sts, working 18 sts on one needle and 18 sts on the other.

Gusset Shaping:

Round 46: Needle 1 – Work in Quatrefoil pattern.
       Needle 2 – Work in Quatrefoil pattern.
       Needle 3 – K1 B, P1 W, SSK (keeping with double knitting decrease method), P2tog, *K1 B, P1 W,* repeat from * to * until end.
       Needle 4 – *K1 B, P1 W,* repeat from * to * until last 6 sts, K2tog (keeping with double knitting decrease method), P2tog, K1 B, P1 W.
 
Round 47: Needle 1 – Work in Quatrefoil pattern.
       Needle 2 – Work in Quatrefoil pattern.
       Needle 3 – *K1 B, P1 W,* repeat from * to * until end.
       Needle 4 – *K1 B, P1 W,* repeat from * to * until end.

Repeat Round 46 and Round 47 until there are 34 sts per needle.

Ankle:
Continue working the Quatrefoil pattern across all needles until you reach approximately an inch less than your desired length. I worked two quatrefoil rows above the heel.

Ribbing:
Ribbing with double knitting can be tricky because you need to change where you hold the yarn for each stitch differently than you have been doing. Work these same repeating four sts across the round for as many rounds until you reach your desired length, approximately one inch:
With both yarns at the back, K1 W
With W yarn at the front and B yarn at the back, K1 B
With W yarn at the front and B yarn at the back, P1 W
With both yarns at the front, P1 B

Bind off using the Icelandic Bind-Off for a stretchy finish. Video tutorial available here.

Posted on

Pattern: Wavy Cable Rib Toe Up Socks

Jazz up your basic ribbed socks by adding a bit of cabling.

Finished Measurements:
Pattern written for women’s size 8 (US) socks, but it’s easily adaptable to fit other sizes. If you want to make the foot wider or narrower, then increase until you have a multiple of 3 sts plus 2.

Materials:
Size 1 double pointed needles
2 skeins Sensations Soles & More in Green/Blue
Cable hook, or if you’re feeling adventurous, I recommend watching this video to learn how to cable without the hook. It’s really convenient for knitting on the go with limited supplies, especially with this pattern where you’re only holding one stitch to the front or back.

Yarn Substitute: Stroll

This post contains affiliate links. If you do decide to purchase though the links in this post, a small portion of the sale may go to support this site, at no additional cost to you.


Abbreviations:
K – knit
P – purl
Sl – slip unworked stitch from left needle to right needle
SSK – slip unworked stitch from left needle to right needle knitwise. Slip a second unworked stitch from the left needle to the right needle knitwise. Slip those two unworked stitches separately back to the left needle purlwise. Knit those two stitches together in the back of the stitches (decrease).
K2tog – knit two stitches together (decrease).
P2tog – purl two stitches together (decrease).
Inc – knit into the front and back of the same stitch (increase).
Cn – cable needle
C2F – slip one stitch onto cn and hold to the front, K1, K1 from cn
C2B – slip one stitch onto cn and hold to the back, K1, K1 from cn

Wavy Cable Rib Pattern:
This pattern repeats throughout the sock, working it around the entire sock at the ankle and above, but only the top of the foot. (Stepping on cable bumps can be quite uncomfortable!)

Row 1: P2, *K2, P1.* Repeat from * to * until end.
Row 2: P2, *C2F, P1.* Repeat from * to * until end.
Row 3: P2, *K2, P1.* Repeat from * to * until end.
Row 4: P2, *C2B, P1.* Repeat from * to * until end.


Instructions:
Toe Shaping
Using provisional cast on method, cast on 8 stitches
Round 1: P across
Round 2: K across
Round 3: P across
Round 4: K across

Remove live stitches from scrap yarn and place them on a double pointed needle. You should have 16 sts on two needles (8 sts per needle). Begin knitting in the round.

Round 5: *K2, Inc, K1 (add a needle) K1, Inc, K2.* Repeat from * to * (12 sts)

Round 6: Needle 1 – K2, Inc, K across needle
          Needle 2 – K across needle to last 3 sts, Inc, K2
          Needle 3 – K2, Inc, K across needle
          Needle 4 – K across needle to last 3 sts, Inc, K2

Repeat Round 6 until you have 32 sts total (8 sts per needle)


Round 7: K across
Round 8: Needle 1 – K2, Inc, K across needle
        Needle 2 – K across needle to last 3 sts, Inc, K2
Needle 3 – K2, Inc, K across needle
Needle 4 – K across needle to last 3 sts, Inc, K2

Repeat Round 7 and Round 8 until you have 64 sts total (16 sts per needle)

Foot:
For all foot rounds, work the Wavy Cable Rib Pattern across Needles 1 and 2 and work the stockinette stitch across Needles 3 and 4. In other words, you will work the cable pattern over the top of the foot and stockinette stitch over the bottom of the foot.

Work until the sock is the length from the toe to the bend of your ankle at the top of your foot.

Heel Flap:
Turn so WS is facing and Work Needles 3 and 4 ONLY (31 sts)
Leave Needles 1 and 2 unworked 

Row 9: Sl1, P across.

Row 10: Sl1, K across.
Repeat Rows 9 and 10, 11 more times (12 repeats total, 24 rows total).

Heel Shaping:
Row 11: Sl1, P16, P2tog, P1, turn. Leave remaining sts unworked. Continue in this manner.
Row 12: Sl1, K3, K2tog, K1, turn. 
Row 13: Sl1, P4, P2tog, P1, turn. 
Row 14: Sl1, K5, K2tog, K1, turn. 
Row 15: Sl1, P6, P2tog, P1, turn. 
Row 16: Sl1, K7, K2tog, K1, turn. 
Row 17: Sl1, P8, P2tog, P1, turn. 
Row 18: Sl1, K9, K2tog, K1, turn. 
Row 19: Sl1, P10, P2tog, P1, turn. 
Row 20: Sl1, K11, K2tog, K1, turn. 
Row 21: Sl1, P12, P2tog, P1, turn. 
Row 22: Sl1, K13, K2tog, K1, turn. 
Row 23: Sl1, P14, P2tog, P1, turn. 
Row 24: Sl1, K15, K2tog, turn.
Row 25: Sl 1, P15, P2tog, turn.

Begin working in the round again. 
Row 26: K across heel flap, pick up and K 12 sts along first side of the heel. Work in Wavy Cable Rib Pattern across the two needles left unworked during the heel flap. Pick up and K 12 sts along second side of the heel. On the same needle, K 8 sts from the heel flap, leaving 9 heel flap stitches, splitting the sts from the heel flap between the two needles with the picked up sts. The needle starting with the 9 heel flap stitches is now the start of the round.

Gusset Shaping (decrease)

Round 27: Needle 1 – K across until last 3 sts, K2tog, K1.
       Needle 2 – Work in Wavy Cable Rib Pattern.
       Needle 3 – Work in Wavy Cable Rib Pattern.
       Needle 4 – K1, SSK, K across.
 
Round 28: Needle 1 – K across.
       Needle 2 – Work in Wavy Cable Rib Pattern.
       Needle 3 – Work in Wavy Cable Rib Pattern.
       Needle 4 – K across.

Repeat Round 27 and Round 28 until there are 64 sts total (16 sts per needle).
 
Ankle
Continue working the Wavy Cable Rib Pattern across all needles until you reach approximately an inch less than your desired length.
 
Ribbing
K1, P1 across for about an inch.

Bind off using the Icelandic Bind-Off for a stretchy finish. Video tutorial available here.

Posted on

Pattern: Trailing Flowers Beach Cover Up

This crochet beach cover up is perfect for your next trip to the beach. Think of this as a pattern recipe to make a cover up that fits your body as snug or loose as you want.

The bottom of the cover up has alternating green and orange flowers with these colored flowers trailing up the spine. The piece is worked from the bottom up.


Note: when counting the flower petals in this pattern, work clockwise.


Materials:

6 skeins Aunt Lydia’s Crochet Thread, Fashion 3, in Natural
1 skein Aunt Lydia’s Crochet Thread, Fashion 3, in Copper Mist
1 skein Aunt Lydia’s Crochet Thread, Fashion 3, in Sage
Size D crochet hook

Yarn Substitute: Curio #10

This post contains affiliate links. If you do decide to purchase though the links in this post, a small portion of the sale may go to support this site, at no additional cost to you.

Finished Measurements:

34″ long
Snugly fits a women’s size small

Instructions:

Spine
Work the flowers for the spine first. 

Using magic loop method, 8 sc.
Round 1: Ch 3 (counts as 1 dc), 1 dc in first st, 2 dc in each st across the next 6 sts, turn (14 sts total).
Round 2: Ch 4, *1 dc in next st, 1 ch.* Repeat from * to * until end, turn.
Round 3: Ch 3, *1 dc in next st from Round 2, ch 3, 6 dc down the 1 dc from this Round, sl st in next st from Round 2.* Repeat from * to * until 4 more times (5 petals total), ch 8, sl st in starting ch from previous Round.

Rounds 1-3 completes one half flower. The final ch 8 from Round 3 makes up the magic loop starting round for the rest of the half flowers so they are attached.

Work one half flower in green, then work the next half flower in orange. The finished product has all orange flowers on one side and all green flowers on the other side. Continue working the flowers until you reach your desired length. Mine uses 20 spine flowers total. 

The top of the flowers will rest between your shoulder blades and the bottom will rest approximately 2.5″ from the end of the piece. There will be an additional edge on the bottom.

Bottom Edging
The bottom edge flowers alternate green and orange, but make a full circle with the petals, as opposed to a half circle of petals with the flowers trailing up the spine. Written instructions are below:

Round 1: Using magic loop method, 8 sc

Round 2: Ch 3 (counts as first dc), 1 dc in next st, 2 dc in next st and in each st until the end, sl st to join. (16 sts total)
Round 3: Ch 4, dc in next st, *ch 1, dc in next st,* repeat from * to * until end, ch 1, sl st to join.
Round 4: Make petal the same as in the spine flowers and continue until you have 8 petals total.

For my size, I made 13 flower motifs. To join, attach the first petal of one flower to the sixth petal of a second flower, and attach the second petal of that same one flower to the fifth petal of the second flower. This leaves two petals unattached on the top and two petals unattached on the bottom of each flower.


To join the bottom edge to the trailing spine of flowers, join the third petal of one bottom edge flower to the bottom petal of the first flower in the spine.

Body Flower Motifs
The flowers on the body are white and are one round larger than the bottom edging flowers.

Round 1: Using magic loop method, 8 sc
Round 2: Ch 3 (counts as first dc), 1 dc in next st, 2 dc in next st and in each st until the end, sl st to join. (16 sts total)
Round 3: Ch 3 (counts as first dc), 1 dc in first st, *1 dc in next st, 2 dc in next st,* repeat from * to * until end, 1 dc in last st, sl st to join. (24 sts total)
Round 4: Ch 4 (counts as first dc and first ch), dc in next st, *ch 1, dc in next st,* repeat until end, ch 1, sl st to join.
Round 5: Make petal the same as in the spine flowers and continue until you have 12 petals total.

Body Motif Joining

To attach the flowers on the body, work 5 ch between a petal of one flower and a petal of a second flower.

Starting with the bottom edging flowers, sl st in third petal of edging flower (also the same flower with joined spine flowers), ch 5, sl st in fourth petal of edging flower, ch 5, sl st in joined petals of two flowers, ch 5, sl st in third petal of next flower, ch 5, join to first petal of white body flower, ch 5, sl st in fourth petal of edge flower.


Continue joining body flowers to edge flowers in this manner by working 3 sections of 5chs and sl st in next petal before attaching another body flower. For the 13 edge flowers, I attached 9 body flowers.

To join one row of body flowers to another row of body flowers, sl st in fifth petal of bottom row body flower, ch 5, sl st in eleventh petal of body flower in top row, ch 5, sl st in sixth petal of bottom row body flower, ch 5, sl st in tenth petal of top row body flower, ch 5, sl st in seventh petal of bottom row body flower, ch 5, sl st in third petal of next top row body flower, ch 5, sl st in eighth petal of bottom row body flower, ch 5, sl st in second petal of top row body flower, ch 5, sl st in ninth petal of bottom row body flower, ch 5, sl st in first petal of top row body flower, ch 5.

Continue attaching the body flowers in the same manner. Attach the body flower rows to the spine flowers as you go. The height of one row of body flowers is equal to the height of one green spine flower and one orange spine flower.


To add a little shape, decrease by one body flower motif as you go up the rows. 

Row 1 of body flowers: 9 motifs
Row 2 of body flowers: 8 motifs
Row 3 of body flowers: 7 motifs
Row 4 of body flowers: 6 motifs
Row 5 of body flowers: 6 motifs
Row 6 of body flowers: 6 motifs – this row will make up the bottom of the armholes. 

Row 7: attach one body flower motif on either side of the spine flowers. Attach three body flower motifs in the same row to the four front body motifs of the sixth row. Do not attach the motifs on either side of the spine to the front three motifs.

Row 8 (back shoulder): working in the back only, attach one motif on either side of the spine. Work a half flower for either side of the shoulder in the same manner as the spine motifs, but with an additional row like the body motifs to they are larger (6 petals total).


Row 9 (front shoulder): working in the front only, work one body flower motif on either shoulder and attach to Row 8.


Notice how there is a gap between the flower motifs in a row between the fourth petal of one flower and the tenth petal of another flower. You can either leave this gap open or you can close it by doing the following:


Ch 4 between the tenth petal of the first flower and the fourth petal of the second flower. Sl st in ninth petal of first flower, ch 5, sl st in ch 4 space, ch 5, sl st in fifth petal of second flower. Sl st in eleventh petal of first flower, ch 5, sl st in ch 4 space, ch 5, sl st in third petal of second flower.


I left the gap on the third row of body flowers, around where the stomach is, but filled in the gap on all other rows.


Good luck and enjoy! Please let me know if you have any questions. I may try to make a chart to make it easier to explain.

Posted on

Pattern: Braided Cable Trail Toe Up Socks

Finished Measurements:
Pattern written for women’s size 8 socks, but it is easily customizable to fit any foot size. 

Materials:
Size 1 double pointed needles
(MC) 1 skein Lion Brand Sock-Ease in Toffee – this yarn is great and has aloe infused in it!
(CC) 1 skein Premier yarns, Deborah Norville Collection, Serenity Sock Weight in soft white
Cable hook, or if you’re feeling adventurous, I recommend watching this video to learn how to cable without the hook. It’s really convenient for knitting on the go with limited supplies.

Yarn Substitute: Stroll

This post contains affiliate links. If you do decide to purchase though the links in this post, a small portion of the sale may go to support this site, at no additional cost to you.

Abbreviations:
K – knit
P – purl
Sl – slip unworked stitch from left needle to right needle
SSK – slip unworked stitch from left needle to right needle knitwise. Slip a second unworked stitch from the left needle to the right needle knitwise. Slip those two unworked stitches separately back to the left needle purlwise. Knit those two stitches together in the back of the stitches (decrease).
K2tog – knit two stitches together (decrease).
P2tog – purl two stitches together (decrease).
Inc – knit into the front and back of the same stitch (increase).
Cn – cable needle
MC – main color
CC – contrast color

Braided Cable Knit Pattern:
This pattern repeats throughout the top of the sock, with the bottom of the heel and back of the ankle worked in stockinette stitch. Use the MC unless specifically noted to use the CC.

Row 1: P2, K6, P3, K3, K3 in CC, K3, P3, K6, P2.
Row 2: Repeat Row 1.
Row 3: P2, sl 2 front, K2, K2 from cn, K2, P3, sl 3 front, K3 in CC, K3 from cn, K3, P3, sl 2 front, K2, K2 from cn, K2, P2.
Row 4: P2, K6, P3, K3 in CC, K6, P3, K6, P2.
Rows 5-6: Repeat Row 4.
Row 7: P2, K2, sl 2 back, K2, K2 from cn, P3, K3 in CC, sl 3 back, K3, K3 from cn, P3, K2, sl 2 back, K2, K2 from cn, P2.
Row 8: P2, K6, P3, K3 in CC, K6, P3, K6, P3.

Row 9-10: Repeat Row 8.
Row 11: P2, sl 2 front, K2, K2 from cn, K2, P3, sl 3 front, K3, K3 in CC from cn, K3, P3, sl 2 front, K2, K2 from cn, K2, P2.
Rows 12-14: Repeat Row 1.
Row 15: P2, K2, sl 2 back, K2, K2 from cn, P3, K3, sl 3 back, K3, K3 in CC from cn, P3, K2, sl 2 back, K2, K2 from cn, P2.
Row 16: P2, K6, P3, K6, K3 in CC, P3, K6, P3.

Rows 17-18: Repeat Row 16.
Row 19: P2, sl 2 front, K2, K2 from cn, K2, P3, sl 3 front, K3, K3 from cn, K3 in CC, P3, sl 2 front, K2, K2 from cn, K2, P2.
Rows 20-22: Repeat Row 16.
Row 23: P2, K2, sl 2 back, K2, K2 from cn, P3, K3, sl 3 back, K3 in CC, K3 from cn, P3, K2, sl 2 back, K2, K2 from cn, P2.
Row 24: Repeat Row 1.

Instructions:
Toe Shaping
Using provisional cast on method, cast on 8 stitches
Round 1: P across
Round 2: K across
Round 3: P across
Round 4: K across

Remove live stitches from scrap yarn and place them on a double pointed needle. You should have 16 sts on two needles (8 sts per needle). Begin knitting in the round.

Round 5: *K2, Inc, K1 (add a needle) K1, Inc, K2.* Repeat from * to * (12 sts)

Round 6: Needle 1 – K2, Inc, K across needle
          Needle 2 – K across needle to last 3 sts, Inc, K2
          Needle 3 – K2, Inc, K across needle
          Needle 4 – K across needle to last 3 sts, Inc, K2

Repeat Round 6 until you have 32 sts total (8 sts per needle)


Round 7: K across
Round 8: Needle 1 – K2, Inc, K across needle
        Needle 2 – K across needle to last 3 sts, Inc, K2
Needle 3 – K2, Inc, K across needle
Needle 4 – K across needle to last 3 sts, Inc, K2

Repeat Round 7 and Round 8 until you have 60 sts total (15 sts per needle)

Round 9: K across
Round 10: Needle 1 – K2, Inc, K across needle
        Needle 2 – K across
Needle 3 – K2, Inc, K across needle
Needle 4 – K across 


At this point, you should have 62 sts total, with 16 sts on Needles 1 and 3, and 15 sts on Needles 2 and 4.

Foot:
For all foot rounds, work the Braided Cable Knit Pattern across Needles 1 and 2 and work the stockinette stitch across Needles 3 and 4. In other words, you will work the cable pattern over the top of the foot and stockinette stitch over the bottom of the foot.

Work the Braided Cable Knit Pattern 3 times for a size 8 woman’s foot. For other sizes, work until the sock is the length from the toe to the bend of your ankle at the top of your foot.

Heel Flap:
Turn so WS is facing and Work Needles 3 and 4 ONLY (31 sts)
Leave Needles 1 and 2 unworked 
Use CC only

Row 11: Sl1, P across.

Row 12: Sl1, K3, P2, *K4, P2.* Repeat from * to * to end.
Repeat Rows 11 and 12, 11 more times (12 repeats total, 24 rows total).

Heel Shaping:
Row 13: Sl1, P15, P2tog, P1, turn. Leave remaining sts unworked. Continue in this manner.
Row 14: Sl1, K3, K2tog, K1, turn. 
Row 15: Sl1, P4, P2tog, P1, turn. 
Row 16: Sl1, K5, K2tog, K1, turn. 
Row 17: Sl1, P6, P2tog, P1, turn. 
Row 18: Sl1, K7, K2tog, K1, turn. 
Row 19: Sl1, P8, P2tog, P1, turn. 
Row 20: Sl1, K9, K2tog, K1, turn. 
Row 21: Sl1, P10, P2tog, P1, turn. 
Row 22: Sl1, K11, K2tog, K1, turn. 
Row 23: Sl1, P12, P2tog, P1, turn. 
Row 24: Sl1, K13, K2tog, K1, turn. 
Row 25: Sl1, P14, P2tog, P1, turn. 
Row 26: Sl1, K15, K2tog. Do not turn.

Begin working in the round again.

Round 27: Still using CC, pick up and K 12 sts along first side of the heel. Switch to MC and work in pattern across the two needles left unworked during the heel flap. Pick up and K 12 sts along second side of the heel. On the same needle, K 8 sts from the heel flap, splitting the sts from the heel flap between the two needles with the picked up sts. This is now the start of the round.

Gusset Shaping (decrease)
Round 28: Needle 1 – K across until last 3 sts, K2tog, K1.
       Needle 2 – Work in Braided Cable Knit Pattern.
       Needle 3 – Work in Braided Cable Knit Pattern.
       Needle 4 – K1, SSK, K across.
 
Round 29: Needle 1 – K across.
       Needle 2 – Work in Braided Cable Knit Pattern.
       Needle 3 – Work in Braided Cable Knit Pattern.
       Needle 4 – K across.

Repeat Round 28 and Round 29 until there are 62 sts total. Two needles should have 15 sts and two needles should have 16 sts.
 
Ankle
Continue working the Braided Cable Knit Pattern across the front of the ankle and stockinette stitch across the back of the ankle until you reach your desired length.
 
Ribbing
In CC, K1, P1 across for about an inch.
Bind off using the Icelandic Bind-Off for a stretchy finish. Video tutorial available here.
Posted on

Pattern: Entrelac Seed Stitch Toe Up Socks

These entrelac toe up socks alternate using stockinette stitch and seed stitch. This pattern assumes you have a basic knowledge of how knitting entrelac works. I do not recommend you try this as your first attempt at entrelac because the heel especially can be a bit fiddly and confusing. Here is a helpful article that explains entrelac knitting with pictures.

Finished Measurements:
Comfortably fits a Size 8 women’s foot, though it can easily be adapted to fit other sizes.

Materials:
2 skeins Patons Kroy Sock Yarn in Rusty Stripes
Size 1 double pointed needles
Scrap yarn

Yarn Substitute: Stroll

This post contains affiliate links. If you do decide to purchase though the links in this post, a small portion of the sale may go to support this site, at no additional cost to you.

Stitches:
K – knit
P – purl
Sl – slip unworked stitch from left needle to right needle
SSK – slip unworked stitch from left needle to right needle knitwise. Slip a second unworked stitch from the left needle to the right needle knitwise. Slip those two unworked stitches separately back to the left needle purlwise. Knit those two stitches together in the back of the stitches (decrease).
K2tog – knit two stitches together (decrease).
Inc – knit into the front and back of the same stitch (increase).
St – stitch
RS – right side
WS – wrong side

Instructions:
Toe Shaping
Using provisional cast on method, cast on 16 stitches
Row 1: P across
Row 2: K across
Row 3: P across
Row 4: K across

Remove live stitches from scrap yarn and place them on a double pointed needle. K across 16 sts from the scrap yarn. Distribute 32 sts evenly along four needles, with 8 sts on each needle. Begin knitting in the round.

Rounds 5-6: K across
Round 7: Needle 1 – K2, Inc, K across needle
          Needle 2 – K across needle to last 3 sts, Inc, K2
          Needle 3 – K2, Inc, K across needle
          Needle 4 – K across needle to last 3 sts, Inc, K2

Rounds 8-9: K across
Round 10: Repeat Round 7 (40 sts total)

Entrelac
Begin working entrelac. Each triangle section is made out of 8 sts and there are 5 triangle sections in total per row (8 sts X 5 triangles = 40 sts. Yay math).

To make the foundation triangles:
Row 1: K2, turn.
Row 2: P2, turn.
Row 3: K3, turn.
Row 4: P3, turn.

Continue in this manner, adding a stitch on each K row, until you have K 8 sts total. Do not P across the 8 sts and do not turn. Rather, start with Row 1 again. Continue across until all 40 sts have been worked to make 5 triangle sections.

To make the next row of seed stitch triangles, with RS facing, pick up 8 sts along the section immediately to the left of the section just worked and work the following:
Row 5: *K1, P1.* Repeat from * to * until end, turn.
Row 6: *P1, K1.* Repeat from * to * until last st, SSK (using the last st in the row and the next st of the prior section, combining the triangles).
Repeat Rows 5-6 until all of the sts have been worked on the triangle. To make a new triangle, pick up sts from the previous row triangle to the right.
Continue in this manner until all triangles are worked.

To make the next row of stockinette stitch triangles, with WS facing, pick up and P 8 sts along the section immediately to the left of the section just worked.
Row 7: K across until the last st, SSK (using the last st in the row and the next st of the prior section, combining the triangles).
Row 8: P across.
Repeat Rows 7-8 until all of the sts have been worked on the triangle, being sure to end on a Row 7.
Continue in this manner until all triangles are worked.

Continue making rows, alternating between a garter stitch row and a stockinette stitch row. For a size 8 women’s foot, work 7 rows of triangles total, not including the foundation triangles. You can adjust the rows based on your foot size.

Heel
To make the heel, work only two triangles in each row before turning and starting a new row. Be sure to end the row with either Row 6 or Row 8 (depending on whether you are working the seed stitch or stockinette stitch triangle). Also, when starting a new row, you are attaching to the triangle from a few rows ago to make the heel turn. This means you’ll have a seed stitch triangle attaching to another seed stitch triangle on the turning row.

Work 4 rows of the heel.

Ankle
Once you finished the heel, continue working in the round as normal.
Work 6 rows of triangle, or until you reach approximately 2 inches less than your desired length.

To make the end foundation triangles, pick up 9 sts when starting a new triangle.
Row 9: K2tog, K across until last st, SSK (using the last st in the row and the next st of the prior section, combining the triangles).
Row 10: P across.

Repeat Rows 9 and 10 until you have 2 sts left on the current triangle and 1 st left on the triangle you’re combining it with. K2tog, pass the stitch just worked back onto the left needle, SSK (using the last st in the row and the next st of the prior section, combining the triangles).

This leaves one st remaining. Use this st as the additional st and pick up 8 sts along the next triangle. 
Continue in this manner until you have worked all triangles and only have one st remaining.

Edging
Pick up 60 sts evenly across the edge of the sock to make the brim.
Round 1: *K3, P1.* Repeat from * to * until end.
Repeat Round 1 for 1 1/2 inches, or until you reach your desired length.

Bind off using the Icelandic Bind-Off for a stretchy finish. Video tutorial available here.

Posted on

Pattern: Color Changing Ladder Cowl

Finished Measurements:
9 inches long
13 inches diameter

Stitches:
Ch – chain
Sl st – slip stitch
Sc – single crochet

Materials:
1 skein Shibui Heichi in grey
1 skein Shibui Heichi in pink
1 skein Blue Sky Alpaca Silk in lime green
Size G crochet hook

Instructions:
When changing colors through the piece, always be sure to leave the unworked loop behind the work so it doesn’t show. You can either cut the string when changing colors or work the color up behind the piece when you need that color again. I prefer the later to avoid wasting yarn and generally ch a few in the back to start the new color again.

In black, ch 120. Sl st in the first ch. Be careful not to twist! Leave unworked loop behind.

Round 1: In pink, join with sl st in beginning. Ch 1, *2 sc in next ch, ch 1, skip 2 ch.* Repeat from * to * until end, ch 1, sl st in first ch in beginning.
Round 2: In grey, join with sl st in beginning. Ch 2, *sc in first skipped ch from the foundation row, ch 2.* Repeat from * to * until end, sl st in first ch in beginning.

Round 3: In pink, join with sl st in beginning. Ch 1, *2 sc in next ch 2 space, ch 1.* Repeat from * to * until end, ch 1, sl st in first ch in beginning.
Round 4: In grey, join with sl st in beginning. Ch 2, *sc in sc from the previous even numbered row, ch 2.* Repeat from * to * until end, sl st in first ch in beginning.

Round 5: In pink, repeat Round 3. 
Round 6: In grey, repeat Round 4.
Round 7: In green, repeat Round 3.
Round 8: In grey, repeat Round 4.
Round 9: In green, repeat Round 3.
Round 10: In grey, repeat Round 4.

Round 11: In green, repeat Round 3.
Round 12: In pink, repeat Round 4.
Round 13: In green, repeat Round 3.
Round 14: In pink, repeat Round 4.
Round 15: In green, repeat Round 3.
Round 16: In pink, repeat Round 4.
Round 17: In grey, repeat Round 3.
Round 18: In pink, repeat Round 4.

Repeat the color changes in this manner. Each color is worked five times before switching to another color. The color sequence is pink, green, grey. The picture below hopefully explains it:

Posted on

Pattern: Honeycomb Infinity Scarf

This cozy infinity scarf is really easy to make and has a nice border to edge the honeycomb pattern.

Materials:
Crochet hook Size J
2 skeins Vanna’s Choice in Taupe

Stitches:
Ch – chain
Hdc – half double crochet
Sl st – slip stitch

Instructions:
Ch 225, sl st in first ch to join in the round (careful not to twist!), ch 1 (do not turn).
Row 1: 1 hdc in each ch across, sl st in turning ch, ch 1, turn.
Row 2: 1 hdc in each st across, sl st in turning ch, ch 1, turn.
Row 3: 1 hdc in each st across, sl st in turning ch, ch 2, turn.
Row 4: skip first st, 1 hdc in next st, *ch 1, skip st, 1 hdc in next st.* Repeat from * to * until end, ch 1, sl st in second starting ch, ch 2, turn.

Row 5: 1 hdc in ch 1 space, ch 1, *1 hdc in next ch 1 space, ch 1.* Repeat from * to * until end, sl st in second starting ch, ch 2, turn.

Repeat Row 5 15 more times (16 times total), or until you reach the desired width before the edging.

Row 6: *1 hdc in ch 1 space, 1 hdc in next st.* Repeat from * to * until end, 1 hdc in last ch 1 space, sl st in turning ch, ch 1, turn.
Row 7: 1 hdc in each st across, sl st in turning ch. Cut and weave in ends.

Posted on

Pattern: Cozy Shrug

Materials:
2 skeins Loops & Threads Impeccable in Aran
Size 10 1/2 needles
Sewing needle

Stitches:
CO – cast on
K – knit
P – purl
M1 – make stitch by pulling up then knitting a loop from the horizontal yarn between the two stitches
Sl – slip stitch
Psso – pass the slipped stitch over the last stitch made
Yo – yarn over needle
K2tog – knit two stitches together
P2tog – purl two stitches together

Instructions:
Cuff
CO 42 sts
Row 1: *K2, P2.* Repeat from * to * to last 2 sts, K2.
Row 2: *P2, K2.* Repeat from * to * to last 2 sts, P2.
Repeat Rows 1 and 2 until the cuff measures approximately 7 inches.

Back
Row 3 (increase row): *K1, M1.* Repeat from * to * to end. 84 stitches total.

Row 4 (RS): *Sl 1, K1, psso, yo, K2, yo, K2tog.* Repeat from * to * until end.
Row 5 (WS): P across.

Repeat Rows 4 and 5 until the entire piece, including the cuff, measures approximately 36 inches.

Row 6 (decrease row): *K2tog, K2tog, P2tog, P2tog.* Repeat from * to * until last 4 sts, K2tog, K2tog. 42 stitches total.

Cuff
Repeat Rows 1 and 2 for approximately 7 inches. Make sure the cuffs have the same amount of rows worked to keep them even.

Finishing
With the wrong side facing, sew the sides of the first cuff together for the 7 inches of the cuff to make the first sleeve. Repeat the same with the second cuff for the other sleeve.

Posted on

Pattern: Checkered Hunting Hat

Materials:
Size H crochet hook
1 skein Loops & Threads Impeccable Solids in Navy (MC)
1 skein Loops & Threads Impeccable Solids in Grey (CC)

Stitches:
Dc – double crochet
Sl st – slip stitch
MC – main color
CC – contrast color
Sc2tog – single crochet two together

Instructions:
Hat Body
The colors switch after three rounds. Once you are done increasing, each color section has 7 stitches in it.

Round 1: Using magic circle, *1 dc in MC, 1 dc in CC.* Repeat from * to * four more times (five color sections total). Sl st to 1st dc made. (10 dc)
Round 2: Using MC, ch2, dc in first st. In CC, 2dc in next st.  *In MC, 2dc in next st. In CC, 2dc in next st.* Repeat from * to * three more times (five color sections total). Sl st in first dc. (20 dc)

Round 3: Using MC, ch2, 2dc in next st. Using CC, dc in next st, 2 dc in next st. *Using MC, dc in next st, 2dc in next st. Using CC, dc in next st, 2dc in next st.* Repeat from * to * three more times (five color sections total). Sl st in first dc. (30 dc)

Round 4: Using CC, ch2, dc in next st, 2dc in next st. Using MC, dc in next 2 sts, 2dc in next st. *Using CC, dc in next 2 sts, 2dc in next st. Using MC, dc in next 2 sts, 2dc in next st.* Repeat from* to * three more times (five color sections total). Sl st in first dc. (40 dc)

Round 5: Using CC, ch2, dc in next 2 sts, 2dc in next st. Using MC, dc in next 3 sts, 2dc in next st. *Using CC, dc in next 3 sts, 2dc in next st. Using MC, dc in next 3 sts, 2dc in next st.* Repeat from* to * three more times (five color sections total). Sl st in first dc. (50 dc) 
Round 6: Using CC, ch2, dc in next 3 sts, 2 dc in next st. Using MC, dc in next 4 sts, 2dc in next st. *Using CC, dc in next 4 sts, 2dc in next st. Using MC, dc in next 4 sts, 2dc in next st.* Repeat from* to * three more times (five color sections total). Sl st in first dc. (60 dc) 

Round 7: Using MC, ch2, dc in next 4 sts, 2 dc in next st. Using CC, dc in next 5 sts, 2dc in next st. *Using MC, dc in next 5 sts, 2dc in next st. Using CC, dc in next 5 sts, 2dc in next st.* Repeat from* to * three more times (five color sections total). Sl st in first dc. (70 dc)
Rounds 8-9: Using MC, ch2, dc in next 7 sts. Using CC, dc in next 7 sts. *Using MC, dc in next 7 sts. Using CC, dc in next 7 sts.* Repeat from * to * until end.

Rounds 10-12: Using CC, ch2, dc in next 7 sts. Using MC, dc in next 7 sts. *Using CC, dc in next 7 sts. Using MC, dc in next 7 sts.* Repeat from * to * until end. Sl st in first dc.

Rounds 13-15: Using MC, ch2, dc in next 7 sts. Using CC, dc in next 7 sts. *Using MC, dc in next 7 sts. Using CC, dc in next 7 sts.* Repeat from * to * until end.

Rounds 16-18: Using CC, ch2, dc in next 7 sts. Using MC, dc in next 7 sts. *Using CC, dc in next 7 sts. Using MC, dc in next 7 sts.* Repeat from * to * until end. Sl st in first dc.

Left Ear Flap:
Flip the hat inside out. With the RS facing, look for the join (the beginning/end point) and count 10 sts to the right from there. With the RS facing, sl st in that 10th st from join. 

Row 1: In MC, ch1, sc in next 14 sts. Ch1, turn. (15 sc)
Row 2: Sc across, ch1, turn.
Row 3: Sc2tog, sc across, ch1, turn.
Row 4: Repeat row 3.
Rows 5-7: Repeat Rows 2-4 one more time.


Right Ear Flap:
With the hat still flipped inside out and with the WS facing, count 19 sts to the right from the join. Sl st in that 19th st from join.
Work rows 1-7 of the left ear flap.

Front Flap:
With the hat still flipped inside out and with the WS facing, count 36 sts to the left from the join. Sl st in that 36th st from join. Note: if the counting is getting confusing, just work the front flap in all of the unworked sts in the larger of the two spaces between the left and right ear flaps. 

Row 8: Working in back loops only and in MC, ch 1, sc in next 25 sts, ch1, turn. (26 sc)
Row 9-14: Sc across, ch1, turn.

Edging:
With the hat still flipped inside out, with the RS facing, and using MC, sl st in each st across.

Posted on

Pattern: Vintage Ribbed Toe Up Socks


These vintage inspired socks are built for comfort with no ribbing on the bottom of the foot but ribbing that stretches on the rest of the sock.

Finished Measurements:
Pattern written for men’s size 13 socks, shown in the blue sock, but it is easily customizable to fit any foot size. The red/grey socks are for men’s size 9 socks.

Materials:
Size 0 double pointed needles
2 skeins Sensations Truly Pattern in Turq Pattern (fort the blue socks)
or 2 skeins Patons Kroy Socks, Ragg Shades in Grey Brown Marl (for the red/grey socks)
Scrap yarn

Yarn Substitute: Stroll

This post contains affiliate links. If you do decide to purchase though the links in this post, a small portion of the sale may go to support this site, at no additional cost to you.


Stitches:
K – knit
P – purl
Sl – slip unworked stitch from left needle to right needle
SSK – slip unworked stitch from left needle to right needle knitwise. Slip a second unworked stitch from the left needle to the right needle knitwise. Slip those two unworked stitches separately back to the left needle purlwise. Knit those two stitches together in the back of the stitches (decrease).
K2tog – knit two stitches together (decrease).
P2tog – purl two stitches together (decrease).
Inc – knit into the front and back of the same stitch (increase).


Instructions:

Toe Shaping
Using provisional cast on method, cast on 12 stitches
Round 1: P across
Round 2: K across
Round 3: P across
Round 4: K across

Remove live stitches from scrap yarn and place them on a double pointed needle. You should have 24 sts on two needles. Begin knitting in the round.

Round 5: *K2, Inc, K1 (add a needle) K1, Inc, K2.* Repeat from * to * (28 sts)

Rounds 6-8: Needle 1 – K2, Inc, K across needle
          Needle 2 – K across needle to last 3 sts, Inc, K2
          Needle 3 – K2, Inc, K across needle
          Needle 4 – K across needle to last 3 sts, Inc, K2

Increase until you have 40 sts total (10 sts per needle)


Round 9: K across
Round 10: Needle 1 – K2, Inc, K across needle
        Needle 2 – K across needle to last 3 sts, Inc, K2
Needle 3 – K2, Inc, K across needle
Needle 4 – K across needle to last 3 sts, Inc, K2

Repeat Round 9 and Round 10 until you have 72 sts total (18 sts per needle)


Foot:
Round 11: Needles 1 and 2 – *K4, P2.* Repeat from * to * across.
        Needles 3 and 4 – K across

Repeat Round 11 until sock is the length from the toe to the bend of your ankle at the top of your foot.


Heel Flap:
Turn so WS is facing and Work Needles 3 and 4 ONLY (36 sts)
Leave Needles 1 and 2 unworked for the heel flap

Row 12: Sl1, P across.

Row 13: Sl1, K3, P2, *K4, P2.* Repeat from * to * to end.
Repeat Rows 12 and 13, 14 more times (15 repeats total, 30 rows total).

Note: If you want to make the size smaller or larger than a men’s size 13 sock, then just measure it against your heel as you work. The heel flap should be the same length as your heel.

Heel Shaping:
Row 14: Sl1, P17, P2tog, P1, turn. Leave remaining sts unworked. Continue in this manner.
Row 15: Sl1, P1, K2, K2tog, K1, turn. 
Row 16: Sl1, P4, P2tog, P1, turn. 
Row 17: Sl1, P2, K3, K2tog, K1, turn. 
Row 18: Sl1, P6, P2tog, P1, turn. 
Row 19: Sl1, K1, P2, K4, K2tog, K1, turn. 
Row 20: Sl1, P8, P2tog, P1, turn. 
Row 21: Sl1, K2, P2, K4, P1, K2tog, K1, turn. 
Row 22: Sl1, P10, P2tog, P1, turn. 
Row 23: Sl1, K3, P2, K4, P2, K2tog, K1, turn. 
Row 24: Sl1, P12, P2tog, P1, turn. 
Row 25: Sl1, K4, P2, K4, P2, K1, K2tog, K1, turn. 
Row 26: Sl1, P14, P2tog, P1, turn. 
Row 27: Sl1, P1, K4, P2, K4, P2, K2, K2tog, K1, turn.
Row 28: Sl1, P16, P2tog, P1, turn.
Row 29: Sl1, P2, K4, P2, K4, P2, K3, K2tog, K1, turn.
Row 30: Sl1, P17, P2tog, P1, turn.

Begin working in the round again.

Round 31: K1, P2, K4, P2, K4, P2, K4. Using the same needle (called Needle 4), pick up 16 sts and work *K4, P2* pattern. Work *K4, P2* pattern along Needles 1 and 2. Using the last spare needle (called Needle 3), pick up 16 sts and work in the following: P1, K4, P2, K4, P2, K3. Using the same needle, work the following heel flap sts from Needle 4: K1, P2, K4, P2.


The stitches should be distributed along your needles in the following way:
Needle 1: 18 sts
Needle 2: 18 sts 
Needle 3: 25 sts (with the heel flap sts split down the middle)
Needle 4: 26 sts (with the heel flap sts split down the middle)

Gusset Shaping (decrease)
Round 32: Needle 1 – *K4, P2.* Repeat from * to * to end.
       Needle 2 – *K4, P2.* Repeat from * to * to end.
       Needle 3 – Knit if the first st is a knit st, purl if the first st is a purl st, SSK, knit the knit sts and purl the purl sts across
       Needle 4 – Knit the knit sts and purl the purl sts until the last 3 sts, K2tog, knit if the last st is a knit st, purl if the last st is a purl st.

Round 33: Needle 1 – *K4, P2.* Repeat from * to * to end.
       Needle 2 – *K4, P2.* Repeat from * to * to end.
       Needle 3 – Knit the knit sts and purl the purl sts across.
       Needle 4 – Knit the knit sts and purl the purl sts across.

Repeat Round 32 and Round 33 until there are 18 sts on each needle (72 sts total).

Leg
Continue working *K4, P2* pattern until you reach 1 inch below your desired leg length.

Ribbing:

*K1, P1* across all needles for 1 inch.

Bind off using the Icelandic Bind-Off for a stretchy finish. Video tutorial available here.