Posted on

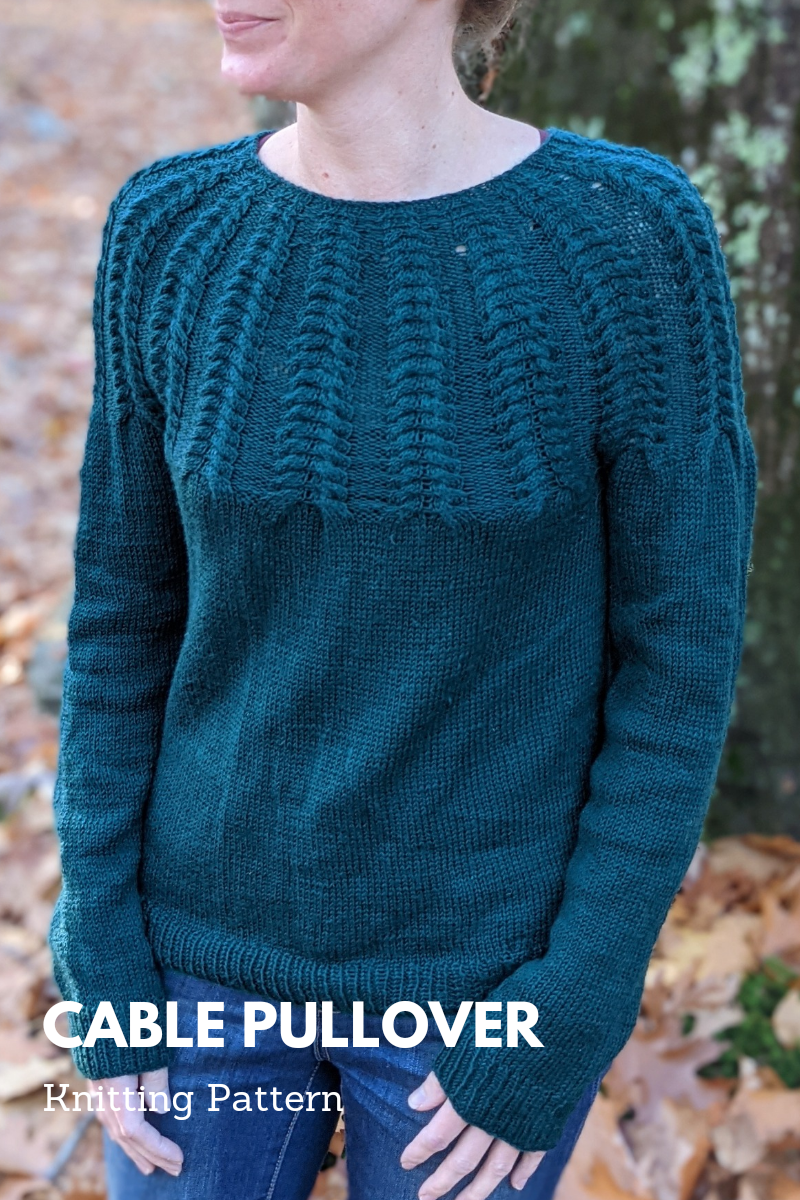
Pattern: Cable Pullover

A circular yoke sweater with collar cabling

Skill Level: Intermediate


Find a printer-friendly, PDF version of the Cable Pullover below!

SIZING

The pattern is designed to have 3 inches of positive ease. Select a size based on your actual bust width plus the 3 inches of positive ease, totaling the bust width in (A).

(A) Bust Width: 32 (36, 40, 44, 48) (52, 56, 60, 64) inches or 81.5 (91.5, 101.5, 112, 122) (132, 142, 152.5, 162.5) cm

(B) Sleeve Length: 19 (20.5, 20, 20, 19) (19.5, 18.5, 19.5, 21) inches or 48.5 (52, 51, 51, 48.5) (49.5, 47, 49.5, 53.5) cm

(C) Total Length: 22.75 (23.25, 24, 24.25, 25) (25.25, 25.25, 26.25, 26.25) inches or 58 (59, 61, 61.5, 63.5) (64, 64, 66.5, 66.5) cm

(D) Yoke Length: 11.5 (12, 13, 13.5, 14.5) (15, 15.5, 16.5, 17) inches or 29 (30.5, 33, 34.5, 37) (38, 39.5, 42, 43) cm

(E) Waist Length: 11.25 (11.25, 11, 10.75, 10.5) (10.25, 9.75, 9.75, 9.25) inches or 28.5 (28.5, 28, 27.5, 26.5) (26, 25, 25, 23.5) cm

(F) Upper Sleeve Width: 13 (13, 14, 15, 16.5) (18.5, 20, 21.5, 22.5) inches or 33 (33, 35.5, 38, 42) (47, 51, 54.5, 57) cm

GAUGE

23 sts x 32 rows = 4 inches (10 cm) in stockinette stitch

SUGGESTED NEEDLES

Size 4 (US), 3.50 mm circular needles

Size 4 (US), 3.50 mm double pointed needles or small circular needles

NOTIONS

Stitch markers

Scrap yarn

Cable needle

Tapestry needle

SUGGESTED YARN

3 (3, 4, 4, 5) (5, 6, 6, 7) skeins Hobbii Unicorn Solid in Teal or 1188 (1311, 1438, 1620, 1803) (2071, 2292, 2536, 2724) yards or 1086 (1199, 1315, 1481, 1649) (1894, 2096, 2319, 2491) metersof fingering weight yarn

STITCH ABBREVIATIONS

K– knit

P– purl

CO– cast on

K2tog– knit two stitches together (decrease)

SM– slip marker

PM– place marker

BO– bind off

BOR– beginning of round

Rd(s)– round(s)

RS– right side

WS– wrong side

St(s)– stitch(es)

M1L – pick up the bar between the stitch you knit and the one you’re about to knit, bringing the needle from front to back, and knit into the back of the stitch

M1R– pick up the bar between the last stitch you knit and the one you’re about to knit, bringing the needle from the back to the front, and knit into the front of the stitch

M1P– pick up the bar between the last stitch you knit and the one you’re about to knit, bringing the needle from the front to the back, and purl into the front of the stitch

SSK– slip unworked stitch from left needle to right needle knitwise. Slip a second unworked stitch from the left needle to the right needle knitwise. Slip those two unworked stitches separately back to the left needle purlwise. Knit those two stitches together in the back of the stitches (decrease)

K1F– place 1 st on the cable needle and hold them in the front, K1, K1 from cable needle

K1B– place 1 st on the cable needle and hold them in the back, K1, K1 from cable needle

K2F– place 2 sts on the cable needle and hold them in the front, K2, K2 from cable needle

K2B– place 2 sts on the cable needle and hold them in the back, K2, K2 from cable needle

K3F– place 3 sts on the cable needle and hold them in the front, K3, K3 from cable needle

K3B– place 3 sts on the cable needle and hold them in the back, K3, K3 from cable needle

K4F– place 4 sts on the cable needle and hold them in the front, K4, K4 from cable needle

K4B– place 4 sts on the cable needle and hold them in the back, K4, K4 from cable needle

K5F– place 5 sts on the cable needle and hold them in the front, K5, K5 from cable needle

K5B– place 5 sts on the cable needle and hold them in the back, K5, K5 from cable needle

PATTERN NOTES

This circular yoke sweater is knit in the round and from the top down, beginning with a collar that fits close to the neck. You first work the yoke, which includes a front and a back body panel and the beginning of two sleeve panels. When your yoke is long enough to reach your armpits, you separate the sleeve panels from the body panels, holding the sleeve stitches on scrap yarn and joining the body panels to finish the body of the sweater down to the waist. The pattern includes optional bust darts, including suggested spacing for each size and a description to customize bust darts based on your own measurements. (Note: the sweater in the modeled picture does not feature bust darts.) You end by working each sleeve individually.

Stitch counts and round counts are indicated for each size based on the following size order: XS (S, M, L, XL) (2XL, 3XL, 4XL, 5XL). It is recommended that you highlight the stitch and round counts for your size before beginning to knit.

Stitches that appear between * and * should be worked until the end, unless otherwise indicated.

It is recommended you check your gauge on both the circular needles and double pointed needles (or small circular needles) to ensure your tension is the same. Adjust your needle size as necessary to obtain gauge.

INSTRUCTIONS

Collar:

Using long tail cast on and circular needles, loosely cast on CO 80 (84, 90, 94, 100) (104, 110, 120, 124) sts. PM for BOR and begin working in the round, being careful not to twist the first round.

Rd1-6: *K1, P1* For Sizes S (L, 2XL, 5XL) ONLY: work one M1R at the end of Rd 6

Yoke Increases:

Rd 7-11: *K4, P1*

Rd 12: *K1B, K1F, P1*

Rd 13-15: Repeat Rd 7

Rd 16: Repeat Rd 12

Rd 17: Repeat Rd 7

Rd 18: *K1, M1L, K1, M1L, K1, M1R, K1, M1R, P1, M1P.* You will now have 160 (170, 180, 190, 200) (210, 220, 240, 250) sts.

Rd 19: *K8, P2*

Rd 20: *K2B, K2F, P2*

Rd 21-23: Repeat Rd 19

Rd 24: Repeat Rd 20

Rd 25: Repeat Rd 19

Rd 26: *K2, M1L, K2, M1L, K2, M1R, K2, M1R, P2, M1P.* You will now have 240 (255, 270, 285, 300) (315, 330, 360, 375) sts.

Rd 27: *K12, P3*

Rd 28: *K3B, K3F, P3*

Rd 29-31: Repeat Rd 27

Rd 32: Repeat Rd 28

Rd 33: Repeat Rd 27

Rd 34: *M1L, K3, M1L, K6, M1R, K3, M1R, P3.* You will now have 304 (323, 342, 361, 380) (399, 418, 456, 475) sts.

Rd 35: *K16, P3*

Rd 36: *K4B, K4F, P3*

Rd 37-39: Repeat Rd 35

Rd 40: Repeat Rd 36

Rd 41: Repeat Rd 35

For Size XS ONLY:

Rd 42: *M1L, K4, M1L, K8, M1R, K4, M1R, P3, K16, P3* until the end. You will now have 336 (-, -, -, -) (-, -, -, –) sts.

Rd 43: *K20, P3, K16, P3*

Rd 44: *K5B, K5F, P3, K4B, K4F, P3*

Rd 45-51: Repeat Rd 43

Repeat Rds 44-51 an additional 2 (-, -, -, -) (-, -, -, –) times.

For Size S ONLY:

Rd 42: *M1L, K4, M1L, K8, M1R, K4, M1R, P3, K16, P3* until the last 19 sts, then M1L, K4, M1L, K8, M1R, K4, M1R, P3. You will now have – (359, -, -, -) (-, -, -, –) sts.

Rd 43: *K20, P3, K16, P3* until last 23 sts, K20, P3.

Rd 44: *K5B, K5F, P3, K4B, K4F, P3* until last 23 sts, K5B, K5F, P3

Rd 45-51: Repeat Rd 43

Repeat Rds 44-51 an additional – (3, -, -, -) (-, -, -, –) times.

For Size M ONLY:

Rd 42: *M1L, K4, M1L, K8, M1R, K4, M1R, P3, K16, P3* until the end. You will now have – (-, 378, -, -) (-, -, -, –) sts.

Rd 43: *K20, P3, K16, P3*

Rd 44: *K5B, K5F, P3, K4B, K4F, P3*

Rd 45-47: Repeat Rd 43

Rd 48: Repeat Rd 44

Rd 49: Repeat Rd 43

Rd 50: *K20, P3, M1L, K4, M1L, K12, P3* until the end. You will now have – (-, 396, -, -) (-, -, -, –) sts.

Rd 51: *K20, P3, K18, P3*

Rd 52: *K5B, K5F, P3, K5B, K4F, P3*

Rd 53-59: Repeat Rd 51

Repeat Rds 52-59 an additional – (-, 2, -, -) (-, -, -, –) times.

For Size L ONLY:

Rd 42: *M1L, K4, M1L, K8, M1R, K4, M1R, P3, K16, P3* until the last 19 sts, then M1L, K4, M1L, K8, M1R, K4, M1R, P3. You will now have – (-, -, 401, -) (-, -, -, –) sts.

Rd 43: *K20, P3, K16, P3* until last 23 sts, K20, P3.

Rd 44: *K5B, K5F, P3, K4B, K4F, P3* until last 23 sts, K5B, K5F, P3

Rd 45-47: Repeat Rd 43

Rd 48: Repeat Rd 44

Rd 49: Repeat Rd 43

Rd 50: *K20, P3, M1L, K4, M1L, K12, P3* until the last 23 sts, K20, P3. You will now have – (-, -, 420, -) (-, -, -, –) sts.

Rd 51: *K20, P3, K18, P3* until the last 23 sts, K20, P3.

Rd 52: *K5B, K5F, P3, K5B, K4F, P3* until the last 23 sts, K20, P3.

Rd 53-59: Repeat Rd 51

Repeat Rds 52-59 an additional – (-, -, 3, -) (-, -, -, –) times.

For Size XL ONLY:

Rd 42: *M1L, K4, M1L, K8, M1R, K4, M1R, P3* until the end. You will now have – (-, -, -, 460) (-, -, -, –) sts.

Rd 43: *K20, P3*

Rd 44: *K5B, K5F, P3*

Rd 45-51: Repeat Rd 43

Repeat Rds 44-51 an additional – (-, -, -, 4) (-, -, -, –) times.

For Sizes 2XL ONLY:

Rd 42: *M1L, K4, M1L, K8, M1R, K4, M1R, P3* until the end.   You will now have – (-, -, -, -) (483, -, -, –) sts.

Rd 43: *K20, P3*

Rd 44: *K5B, K5F, P3*

Rd 45-47: Repeat Rd 43

Rd 48: Repeat Rd 44

Rd 49: Repeat Rd 43

Rd 50: *K20, M1P, P3.* You will now have – (-, -, -, -) (504, -, -, –) sts.

Rd 51: *K20, P4*

Rd 52: *K5B, K5F, P4*

Rd 53-59: Repeat Rd 51

Repeat Rds 52-59 an additional – (-, -, -, -) (4, -, -, –) times.

For Sizes 3XL-5XL ONLY:

Rd 42: *M1L, K4, M1L, K8, M1R, K4, M1R, P3* until the end. You will now have – (-, -, -, -) (-, 506, 552, 575) sts.

Rd 43: *K20, P3*

Rd 44: *K5B, K5F, P3*

Rd 45-47: Repeat Rd 43

Rd 48: Repeat Rd 44

Rd 49: Repeat Rd 43

Rd 50: *K20, M1P, P3, M1P.* You will now have – (-, -, -, -) (-, 550, 600, 625) sts.

Rd 51: *K20, P5*

Rd 52: *K5B, K5F, P5*

Rd 53-59: Repeat Rd 51

Repeat Rds 52-59 an additional – (-, -, -, -) (-, 4, 5, 5) times.

For ALL Sizes:

Try on your piece. The length should fall just below your armpits, where you can comfortably pinch together either side of a sleeve panel under your arms. If it is too short, continue repeating the cable repeats for your size until you reach the described length.

Separate Sleeves from Body:

Rd 60 (Set up Round): Place 70 (72, 76, 82, 90) (100, 110, 118, 124) sts on scrap yarn or stitch holder to save for later, CO 2 (2, 2, 2, 2) (3, 3, 3, 3) sts, place marker for the new BOR, CO 2 (2, 2, 2, 2) (3, 3, 3, 3), K across 98 (108, 122, 128, 140) (152, 165, 182, 189) sts, place 70 (72, 76, 82, 90) (100, 110, 118, 124) sts on scrap yarn or stitch holder to save for later, CO 2 (2, 2, 2, 2) (3, 3, 3, 3) sts, PM, CO 2 (2, 2, 2, 2) (3, 3, 3, 3), K across 98 (108, 122, 128, 140) (152, 165, 182, 189) sts. You will now have 204 (223, 234, 245, 288) (295, 298, 328, 339) sts on your needles, not counting the sleeve sts on the scrap yarn.

Body with Bust Darts: (Optional)

Use this section if you would like to add bust darts to your sweater and make it more form fitting at the waist. For instructions on how to calculate and customize the bust darts to your particular size, please see the Pattern Notes aboutAdding Bust Darts.

Rd 61: (setup round) K21 (24, 29, 31, 35) (39, 43, 49, 51), PM for bust dart marker, K56 (60, 64, 66, 70) (74, 79, 84, 87), PM for bust dart marker, K across to next underarm marker, SM, K across

Rd 62: K1, K2tog, K until 3 sts before bust dart marker, SSK, K1, K until next bust dart marker, SM, K1, K2tog, K until 3 sts before underarm marker, SSK, K1, SM, K across.

Rd 63: K across

Repeat Rds 62-63 an additional 7 (9, 11, 11, 11) (11, 11, 14, 16) times for a total of 8 (10, 12, 12, 12) (12, 12, 15, 17) repeats. You will now have 172 (183, 186, 197, 240) (247, 250, 268, 271) sts.

Rd 64: K across

Repeat Rd 64 a total of 74 (70, 64, 62, 60) (58, 54, 48, 40) times, or until you reach 1 inch less than your desired length.

Rd 65-70: *K1, P1*

Bind off in ribbing pattern.

Body without Bust Darts:

Rd 71: K across

Repeat Rd 71 a total of 90 (90, 88, 86, 84) (82, 78, 78, 74) times, or until you reach 1 inch less than your desired length.

Rd 72-77: *K1, P1*

Bind off in ribbing pattern.

Sleeves:

(Set up Round): Remove 70 (72, 76, 82, 90) (100, 110, 118, 124) sts from scrap yarn and distribute evenly along double pointed needles or small circular needles. Find the bottom of the armpit (where you bound off sts at the sleeve separation), and pick up 4 (4, 4, 4, 4) (6, 6, 6, 6) sts. PM in the middle of the picked up sts at the bottom of the armpit to mark the BOR.

Rd1-8 (8, 7, 6, 5)(4, 3, 3, 3): K across

Rd9 (9, 8, 7, 6) (5, 4, 4, 4): K1, K2tog, K until 3 sts before end, SSK, K1

Repeat Rds 1-9 (9, 8, 7, 6)(5, 4, 4, 4) for a total of 17 (18, 20, 23, 26) (32, 37, 39, 42) repeats. You will now have 40 (40, 40, 40, 42) (42, 42, 46, 46) sts.

Repeat Rd1 for a total of 3 (0, 0, 3, 8) (8, 20, 16, 4) repeats, or until you reach 1 inch less than your desired length.

Rd10-15: *K1, P1*

Bind off and weave in ends using a tapestry needle. Block your garment.

THANK YOU!

I hope you enjoyed making the Cable Pullover as much as I did! Tag me on Instagram @knitabitcrochetaway and use #knitabitcrochetaway and #CablePullover– I’d love to see your progress and finished product!

Posted on

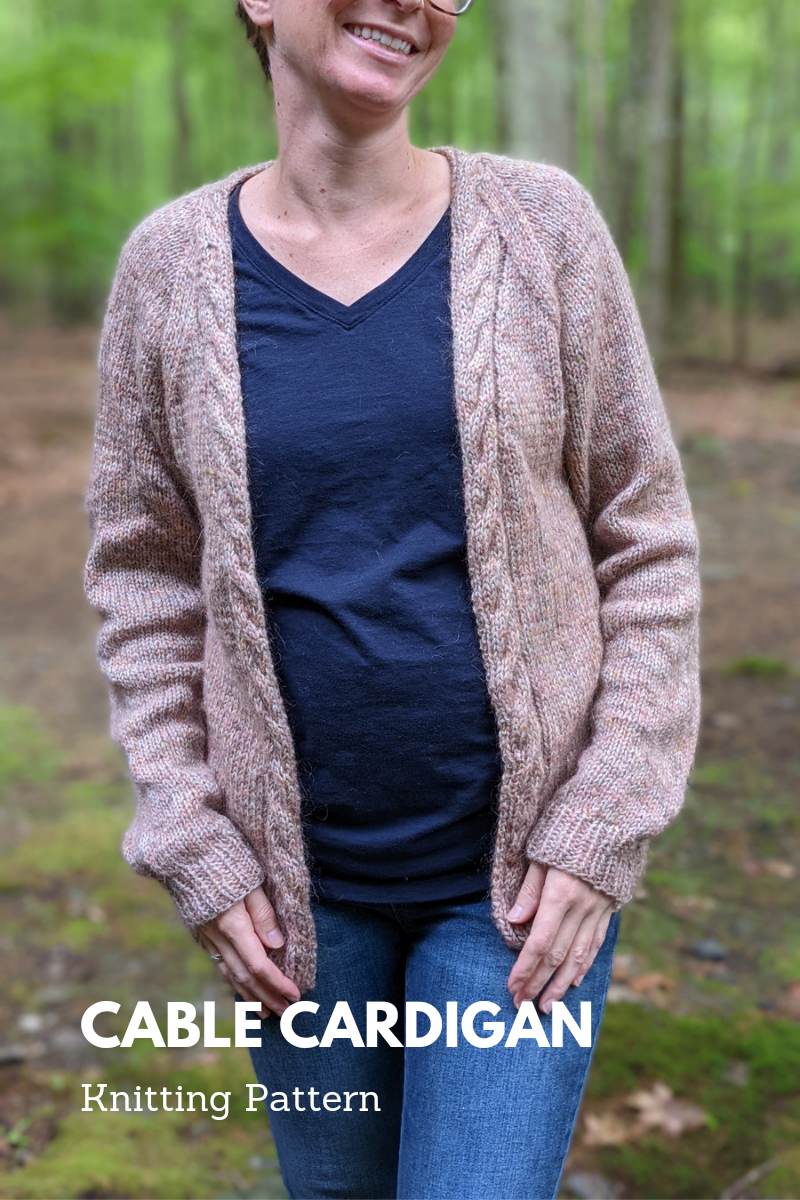
Pattern: Cable Cardigan

A cardigan featuring cable edging that continues through the collar

Skill Level: Advanced


Find a printer-friendly, PDF version of the Cable Cardigan below!

SIZING

The pattern is designed to have 4 inches of positive ease. Select a size based on your actual bust width plus the 4 inches of positive ease, totaling the bust width in (A).

(A) Bust Width: 33 (37, 41, 45, 49) (53, 57, 61, 65) inches or 84 (94, 104, 114, 124) (135, 145, 155, 165) cm

(B) Sleeve Length: 21 (22, 22, 22, 22) (22, 22, 22, 22) inches or 53 (56, 56, 56, 56) (56, 56, 56, 56) cm

(C) Total Length: 22 (23.5, 22.5, 23, 23.5) (23, 23, 23.5, 23.5) inches or 56 (60, 57, 58, 60) (58, 58, 60, 60) cm

(D) Yoke Length: 8 (8.5, 10.5, 11.5, 13) (12, 13, 14, 14.5) inches or 20 (22, 27, 29, 33) (30, 33, 36, 37) cm

(E) Waist Length: 14 (15, 12, 11.5, 10.5) (11, 10, 9.5, 9) inches or 36 (38, 30, 29, 27) (28, 25, 24, 23) cm

(F) Upper Sleeve Width: 13.75 (14.25, 15, 16, 17.5) (19.5, 21, 22.5, 23.5) inches or 35 (36, 38, 41, 44) (50, 53, 57, 60) cm

GAUGE

18 sts x 22 rows = 4” (10 cm) in stockinette stitch

SUGGESTED NEEDLES

Size 6 (US), 4.00 mm circular needles

Size 6 (US), 4.00 mm double pointed needles or small circular needles

NOTIONS

Stitch markers

Scrap yarn

Cable needle

18-30 inch (46-51 cm) zipper (optional)

Sewing needle and thread (optional)

SUGGESTED YARN

3 (4, 4, 4, 5) (5, 6, 6, 6) skeins Hobbii Evergreen in Oat or 741 (823, 901, 986, 1082) (1207, 1295, 1427, 1505) yardsor 678 (753, 824, 902, 989) (1104, 1184, 1305, 1376) metersof fingering weight yarn

3 (4, 4, 4, 5) (5, 5, 6, 6) skeins Hobbii Diablo in Powder Rose or 741 (823, 901, 986, 1082) (1207, 1295, 1427, 1505) yards or 678 (753, 824, 902, 989) (1104, 1184, 1305, 1376)  metersof lace weight yarn

3 (4, 4, 4, 5) (5, 5, 6, 6) skeins Hobbii Diablo Wild Prints in Desert Fox or 741 (823, 901, 986, 1082) (1207, 1295, 1427, 1505) yards or 678 (753, 824, 902, 989) (1104, 1184, 1305, 1376) meters of lace weight yarn

STITCH ABBREVIATIONS

K– knit

P– purl

CO– cast on

K2tog– knit two stitches together (decrease)

SM– slip marker

PM– place marker

BOR– beginning of round

R(d)– row (round)

RS– right side

WS– wrong side

PCO– provisional cast on

St(s)– stitch(es)

BO– bind off

SSK– slip unworked stitch from left needle to right needle knitwise. Slip a second unworked stitch from the left needle to the right needle knitwise. Slip those two unworked stitches separately back to the left needle purlwise. Knit those two stitches together in the back of the stitches (decrease).

K3F– place 3 sts on the cable needle and hold them in the front, K3, K3 from cable needle

K3B– place 3 sts on the cable needle and hold them in the back, K3, K3 from cable needle

K2F– place 2 sts on the cable needle and hold them in the front, K2, K2 from cable needle

K2B– place 2 sts on the cable needle and hold them in the back, K2, K2 from cable needle

RIGHT CABLE EDGE PATTERN

R1: (RS) P2, K8, P2

R2: (WS) K2, P8, K2

R3: P2, K1, K3F, K1, P2

R4: Repeat R2

R5-8: Repeat R1-2

LEFT CABLE EDGE PATTERN

R1: (RS) P2, K8, P2

R2: (WS) K2, P8, K2

R3: P2, K1, K3B, K1, P2

R4: Repeat R2

R5-8: Repeat R1-2

RIGHT CABLE COLLAR PATTERN

R1: (RS) P2, K6

R2: (WS) P6, K2

R3: P2, K1, K2F, K1

R4: Repeat R2

R5-8: Repeat R1-2

LEFT CABLE COLLAR PATTERN

R1: (RS) K6, P2

R2: (WS) K2, P6

R3: K1, K2B, K1, P2

R4: Repeat R2

R5-8: Repeat R1-2

PATTERN NOTES

This raglan sweater is worked flat with the three listed yarns held together and from the bottom up, beginning with the body first. When you get to the sleeve separation point, you work the provisional cast on to create the sleeve sts and hold those live sleeve stitches on scrap yarn for later. Then, you work the yoke decreases until you reach the neck. The collar is worked by continuing the cable edging from the body of the sweater and turning your work back and forth to join the collar to the neckline using decreases. You end by working each sleeve individually, starting by picking up the live stitches from the provisional cast on.

Stitch counts and round counts are indicated for each size based on the following size order: XS (S, M, L, XL) (2XL, 3XL, 4XL, 5XL). It is recommended that you highlight the stitch and round counts for your size before beginning to knit.

Stitches that appear between * and * should be worked until the end, unless otherwise indicated.

It is recommended you check your gauge on both the circular needles and double pointed needles (or small circular needles) to ensure your tension is the same. Adjust your needle size as necessary to obtain gauge.

A Note About Sleeves and the Provisional Cast On

When you are working the provisional cast on to create the sleeve stitches at the sleeve separation, it is recommended that you work the sleeve panel stitches on separate needles, either double pointed needles or small circular needles, for the first 5-6 rows, or until you have enough length that the sts can be worked comfortably on the same needle as the remainder of the body sts without being pulled.

A Note About Yoke Decreases and Maintaining the Cable Pattern

When you are working the yoke decreases and as you get closer to the neckline, your cable edges will no longer have enough stitches to work the entire Right Cable Edge Pattern and Left Cable Edge Pattern. As you decrease sts, eliminate the stitch from the pattern in the Right Cable Edge Pattern or Left Cable Edge Pattern that appears closest to the marker first.

INSTRUCTIONS

Edging:

Using long tail cast on, CO 152 (164, 188, 204, 220) (236, 256, 276, 292) sts.

R1-10: *K1, P1*

Body:

R11: Right Cable Edge Pattern, K across until last 12 sts, Left Cable Edge Pattern

R12: Left Cable Edge Pattern, P across until last 12 sts, Right Cable Edge Pattern

Repeat R11-12 for a total of 66 (62, 56, 51, 45) (50, 44, 43, 42) rows, or until you reach your desired body length before the sleeve separation.

Separate Sleeve and Body Sections:

Please see Pattern Notes for A Note About Sleeves and the Provisional Cast On

R13: Work across 36 (39, 45, 49, 53) (57, 62, 66, 70) sts, beginning with the Right Cable Edge Pattern then K across, BO 4 (4, 4, 4, 4) (4, 4, 6, 6) sts, K72 (78, 90, 98, 106) (114, 124, 132, 140), BO 4 (4, 4, 4, 4) (4, 4, 6, 6) sts, work across 36 (39, 45, 49, 53) (57, 62, 66, 70) sts, beginning with K until the last 12 sts, then Left Cable Edge Pattern.

R14: Work across 36 (39, 45, 49, 53) (57, 62, 66, 70) sts, beginning with the Left Cable Edge Pattern then P across, PM, PCO 58 (60, 64, 68, 74) (84, 90, 96, 100) sts onto scrap yarn, PM, P72 (78, 90, 98, 106) (114, 124, 132, 140), PM, PCO 58 (60, 64, 68, 74) (84, 90, 96, 100) sts onto scrap yarn, PM, work across 36 (39, 45, 49, 53) (57, 62, 66, 70) sts, beginning with P until the last 12 sts, then Right Cable Edge Pattern. You will now have 260 (276, 308, 332, 360) (396, 428, 456, 480) live sts on your needles, distributed as follows:

Right Front Panel: 36 (39, 45, 49, 53) (57, 62, 66, 70) sts

Sleeve A: 58 (60, 64, 68, 74) (84, 90, 96, 100) sts

Back Panel: 72 (78, 90, 98, 106) (114, 124, 132, 140) sts

Sleeve B: 58 (60, 64, 68, 74) (84, 90, 96, 100) sts

Left Front Panel: 36 (39, 45, 49, 53) (57, 62, 66, 70) sts

Yoke Decrease:

Please see Pattern Notes for A Note About Yoke Decreases and Maintaining the Cable Pattern

For Sizes M, L, XL ONLY:

R15: Right Cable Edge Pattern, SSK, K until 3 sts before marker, K2tog, K1, SM, K across to marker, SM, K1, SSK, K until 3 sts before marker, K2tog, K1, SM, K across to marker, SM, K1, SSK, K until 2 sts before Left Cable Edge Pattern, K2tog, Left Cable Edge Pattern. (6 decreases total).

R16: Left Cable Edge Pattern, P across until last 12 sts, Right Cable Edge Pattern.

R17: Right Cable Edge Pattern, K until 3 sts before marker, K2tog, K1, SM, K across to marker, SM, K1, SSK, K until 3 sts before marker, K2tog, K1, SM, K across to marker, SM, K1, SSK, K until last 12 sts, Left Cable Edge Pattern. (4 decreases total).

R18: Repeat R16

Repeat R15-18 an additional – (-, 0, 1, 2) (-, -, -, -) times for a total of – (-, 1, 2, 3) (-, -, -, -) repeats. Repeat R17-18 one time. You will now have – (-, 294, 308, 326) (-, -, -, -,) sts total distributed as follows:

Right Front Panel: – (-, 41, 42, 43) (-, -, -, -) sts

Sleeve A: – (-, 64, 68, 74) (-, -, -, -) sts

Back Panel: – (-, 84, 88, 92) (-, -, -, -) sts

Sleeve B: – (-, 64, 68, 74) (-, -, -, -) sts

Left Front Panel: – (-, 41, 42, 43) (-, -, -, -) sts

For ALL Sizes:

R19: Right Cable Edge Pattern, SSK, K to 3 sts before marker, K2tog, K1, SM, *K1, SSK, K until 3 sts before marker, K2tog, K1, SM* until last marker section, K1, SSK, K to 2 to before Left Cable Edge Pattern, K2tog, Left Cable Edge Pattern (10 decreases total).

R20: Left Cable Edge Pattern, P across until last 12 sts, Right Cable Edge Pattern.

R21: Right Cable Edge Pattern, K to 3 sts before marker, K2tog, K1, SM, *K1, SSK, K until 3 sts before marker, K2tog, K1, SM* until last marker section, K1, SSK, K until last 12 sts, Left Cable Edge Pattern (8 decreases total).

R22: Repeat R20

Repeat R19-22 an additional 6 (7, 6, 6, 6) (9, 9, 9, 9) times for a total of 7 (8, 7, 7, 7) (10, 10, 10, 10)

repeats.

For Sizes M, L ONLY:

Repeat R19-20 one time.

For ALL Sizes:

R23: Right Cable Edge Pattern, K to 3 sts before marker, K2tog, K1, SM, *K1, SSK, K until 3 sts before marker, K2tog, K1, SM* until last marker section, K1, SSK, K to Left Cable Edge Pattern, Left Cable Edge Pattern (8 decreases total).

R24: Left Cable Edge Pattern, P across until last 12 sts, Right Cable Edge Pattern.

Repeat R23-24 an additional 6 (6, 9, 10, 13) (6, 7, 7, 7) times for a total of 7 (7, 10, 11, 14) (7, 8, 8, 8) repeats.

You will now have 78 (76, 78, 84, 88) (160, 184, 212, 236) sts total distributed as follows:

Right Front Panel: 8 (8, 8, 8, 8) (20, 24, 28, 32) sts

Sleeve A: 16 (14, 14, 16, 18) (30, 34, 40, 44) sts

Back Panel: 30 (32, 34, 36, 36) (60, 68, 76, 84) sts

Sleeve B: 16 (14, 14, 16, 18) (30, 34, 40, 44) sts

Left Front Panel: 8 (8, 8, 8, 8) (20, 24, 28, 32) sts

For Sizes 2XL, 3XL, 4XL, 5XL ONLY:

R25: Right Cable Edge Pattern, K to 5 sts before marker, K2tog, K2tog, K1, SM, K1, SSK, K until 3 sts before marker, K2tog, K1, SM, K1, SSK, SSK, K until 5 sts before marker, K2tog, K2tog, K1, SM, K1, SSK, K until 3 sts before marker, K2tog, K1, SM, K1, SSK, SSK, K to Left Cable Edge Pattern, Left Cable Edge Pattern (12 decreases total).

R26: Left Cable Edge Pattern, P across until last 12 sts, Right Cable Edge Pattern.

Repeat R25-26 an additional – (-, -, -, -) (5, 7, 9, 11) times for a total of – (-, -, -, -) (6, 8, 10, 12) repeats. You will now have – (-, -, -, -) (88, 88, 92, 92) sts total distributed as follows:

Right Front Panel: – (-, -, -, -) (8, 8, 8, 8) sts

Sleeve A: – (-, -, -, -) (18, 18, 20, 20) sts

Back Panel: – (-, -, -, -) (36, 36, 36, 36) sts

Sleeve B: – (-, -, -, -) (18, 18, 20, 20) sts

Left Front Panel: – (-, -, -, -) (8, 8, 8, 8) sts

Collar:

Begin working the collar on the Right Cable Edge first. With each row, you will be pulling in a new stitch from around the collar to work a decrease with an existing stitch of the collar edge.

R27: (RS) Right Cable Collar Pattern across 7 sts, K2tog, Sl 1, turn

R28: (WS) P2tog, Right Cable Collar Pattern until end, turn

Repeat R27-28 until you have 31 (32, 33, 34, 34) (34, 34, 34, 34) live sts remaining, inclusive of both the Right Cable Edge sts you just worked and the Left Cable Edge and surrounding sts left unworked.

Cut yarn. Join yarn at the Left Cable Edge, with the wrong side facing.

Note: you will begin with R2 of the Left Cable Collar Pattern

R29: (WS) Left Cable Collar Pattern across 7 sts, P2tog, Sl 1, turn

R30: (RS) SSK, Left Cable Collar Pattern until end, turn

Repeat R29-30 until you have 16 sts remaining, with 8 sts on the Right Cable Edge you left unworked after cutting the yarn, and 8 sts on the Left Cable Edge you just finished working. Cut yarn, leaving a long tail. With the RS of the work facing and using a tapestry needle, use the kitchener stitch to attach the Right Cable Edge to the Left Cable Edge.

Sleeves:

(Set up Round): Unzip 58 (60, 64, 68, 74) (84, 90, 96, 100) PCO sts from scrap yarn and distribute evenly along double pointed needles or small circular needles. Find the bottom of the armpit (where you bound off sts at the sleeve separation), and pick up 4 (4, 4, 4, 4) (4, 4, 6, 6) sts. PM in the middle of the picked up sts at the bottom of the armpit to mark the BOR.

Rd1-6 (6, 5, 4, 4)(3, 2, 2, 2): K across

Rd7 (7, 6, 5, 5) (4, 3, 3, 3): K1, K2tog, K until 3 sts before end, SSK, K1

Repeat Rd1-7 (7, 6, 5, 5) (4, 3, 3, 3)for a total of 15 (16, 18, 20, 22) (27, 30, 33, 35) repeats. You will now have 32 (32, 32, 32, 34) (34, 34, 36, 36) sts.

Rd8 (8, 7, 6, 6) (5, 4, 4, 4)-17 (17, 16, 15, 15) (14, 13, 13, 13): *K1, P1*

Bind off and weave in ends using a tapestry needle. Block your garment.

Zipper: (Optional)

Helpful video tutorial from Yarnspirations linked here.

Before measuring for and attaching your zipper, is it important to block your garment to its finished measurements first.

Measure the length from the bottom of the cardigan to the start of the collar edge decreases and select a zipper that is the same length.

Lay your garment flat. Starting from the bottom of the garment and with the zipper tab closed and at the top of the garment, line up the zipper along the edges of the garment. Pin the edge of the garment so it lines up with the edge of the zipper. Be sure the edges of the garment line up to touch each other, but do not overlap because you do not want the garment to get caught in the zipper.

Using a needle and thread, sew the zipper to the WS edge of the last K stitch on the garment edge.

THANK YOU!

I hope you enjoyed making the Cable Cardigan as much as I did! Tag me on Instagram @knitabitcrochetaway and use #knitabitcrochetaway and #CableCardigan– I’d love to see your progress and finished product!
Posted on

Pattern: Petal Skirt

A flowing, pleated skirt

Skill Level: Advanced


Find a printer-friendly, PDF version of the Petal Skirt below!

SIZING

The sizing table lists finished garment measurements. The top of this skirt is designed to fit loosely between the hips and the waist and fit snugly with no ease at the hips. The pleats sit just below the hips. Select your size based on your hip width.

Size Hip Width Length Yardage per Color Total Yardage
XS 33” 23.5” 272 yards 1088 yards
S 35” 24” 293 yards 1172 yards
M 38” 24” 335 yards 1340 yards
L 42” 24.5” 394 yards 1576 yards
XL 46” 24.5” 457 yards 1828 yards
2XL 52” 25” 535 yards 2140 yards
3XL 54” 25” 566 yards 2264 yards
4XL 56” 25.5” 620 yards 2480 yards
5XL 61” 25.5” 686 yards 2744 yards

COMPONENTS

Gauge:          22 sts x 24 rows = 4 inches in stockinette

Suggested Needles:          Size 3.5mm (US 4) circular knitting needles and double pointed                                         needles, or a size that achieves gauge

Notions:      1” elastic band

                    Tapestry needle

                    Sewing needle

Thread

Yarn:          272 (293, 335, 394, 457) (535, 566, 620, 686) yards of fingering weight yarn in                               each of the four coordinating colors of your choice, or

1088 (1172, 1340, 1576, 1828) (2140, 2264, 24802744) yards of fingering weight yarn total.

STITCH ABBREVIATIONS

K– knit

P– purl

RS– right side

WS– wrong side

CO– cast on

Sl– slip

K2tog– knit two stitches together (decrease)

SSK– slip unworked stitch from left needle to right needle knitwise. Slip a second unworked stitch from the left needle to the right needle purlwise. Slip those two unworked stitches separately back to the left needle purlwise. Knit those two stitches together in the back of the stitches (decrease).

St(s)– stitch(es)

PATTERN NOTES

This skirt is knit flat and from the bottom up, then seamed at the end. It includes an elastic waistband sewn in to fit securely just below the waist. Select your size based on your hip width. Instructions for optional waist shaping are included.

Stitches that appear between * and * should be worked until the end, unless otherwise indicated.

After working the cast on row, and for every row after that, be sure to catch the working yarn of the previous color with the strand of the next color you are working by wrapping the working yarn of the current color 180 degrees around the working yarn of the previous color. A helpful tutorial is available here.

This skirt can be worked in a single solid color, or less than the four colors indicated by the pattern. If you do so, place a stitch marker at the points where the pattern indicates to work a new color.

INSTRUCTIONS

Skirt Shaping

In Color A and using long tail cast on, CO 176 (178, 188, 194, 204) (208, 214, 218, 224) sts. In Color B, CO 176 (178, 188, 194, 204) (208, 214, 218, 224) sts. In Color C, CO 176 (178, 188, 194, 204) (208, 214, 218, 224) sts. In Color D, CO 176 (178, 188, 194, 204) (208, 214, 218, 224) sts.

Row 1(WS): Sl 1, P across. Be sure not to twist the CO edge on this first row. See pattern notes about catching the working yarn as you change colors.

Row 2(RS): Across Color A, Sl 1, *K1, SSK, K across until last 3 sts, K2tog, K1.* Across Color B, *K1, SSK, K across until last 3 sts, K2tog, K1.* Across Color C, *K1, SSK, K across until last 3 sts, K2tog, K1.* Across Color D, *K1, SSK, K across until last 3 sts, K2tog, K1.*

Row 3: Sl 1, P across.

Repeat Rows 2-3 an additional 53 (53, 56, 56, 58) (56, 58, 58, 58) times, or a total of 54 (54, 57, 57, 59) (57, 59, 59, 59) repeats. You will now have 272 (280, 296, 320, 344) (376, 3844, 400, 424) sts total.

Pleats

Row 4:

Right Facing Pleat

In Color A, place 6 sts on one double pointed needle (Needle 1), place next 6 sts on a second double pointed needle (Needle 2), and leave remaining sts on your left needle (Needle 3). See Fig. 1. Fold Needle 2 on top of Needle 1 so the right sides are facing, and fold Needle 3 on top of Needle 2 so the wrong sides are facing. See Fig. 2. Knit the first st from each needle together until you have knit 6 sts (12 sts decreased).

Fig. 1                                                                Fig. 2

Left Facing Pleat

Continue working across Color A until you have 18 sts remaining in Color A. Place 6 sts on one double pointed needle (Needle 1), place next 6 sts on a second double pointed needle (Needle 2), and leave remaining sts on your left needle (Needle 3). See Fig. 3. Fold Needle 2 on top of Needle 3 so the right sides are facing, and fold Needle 1 on top of Needle 2 so the wrong sides are facing. See Fig. 4. Knit the first st from each needle together until you have knit 6 sts (12 sts decreased).

                                    Fig. 3                                                                     Fig. 4

Repeat the Right Facing Pleat and Left Facing Pleat Across Colors B, C, and D.

Waist

Row 5: Sl 1, P across

Row 6: Sl 1, K across

Repeat Rows 5-6 for a total of 34 (36, 30, 34, 30) (36, 32, 36, 36) repeats. Repeat Row 5 once.

Optional Waist Shaping

Wrap your piece around your waist. If you would like to reduce the width by 4” for a tighter fit, you can work one box pleat along the back of the skirt.

Row 7: Sl 1, K5 (6, 8, 11, 14) (18, 19, 21, 24), work Right Facing Pleat with 6 sts per needle, work Left Facing Pleat with 6 sts per needle, K across (12 sts decreased).

Row 8: P across

Bind off using the I-Cord Bind Off (video tutorial available here).

Seaming and Waistband

With the wrong sides facing and using Color A, sew the slipped stitches along the edges of the skirt together. Weave in ends and block to measurements.

Measure the width of your waist and cut a length of elastic that is the same width as your waist. Using a sewing needle and thread that is the same color as the elastic, attach the elastic around the inside waist of the skirt. It is recommended you attach the top of the elastic to the lower edge of the I-cord bind off for ideal placement.

THANK YOU!

I hope you enjoyed making the Petal Skirt as much as I did! Tag me on Instagram @knitabitcrochetaway and use #knitabitcrochetaway and #PetalSkirt– I’d love to see your progress and finished product!

Posted on

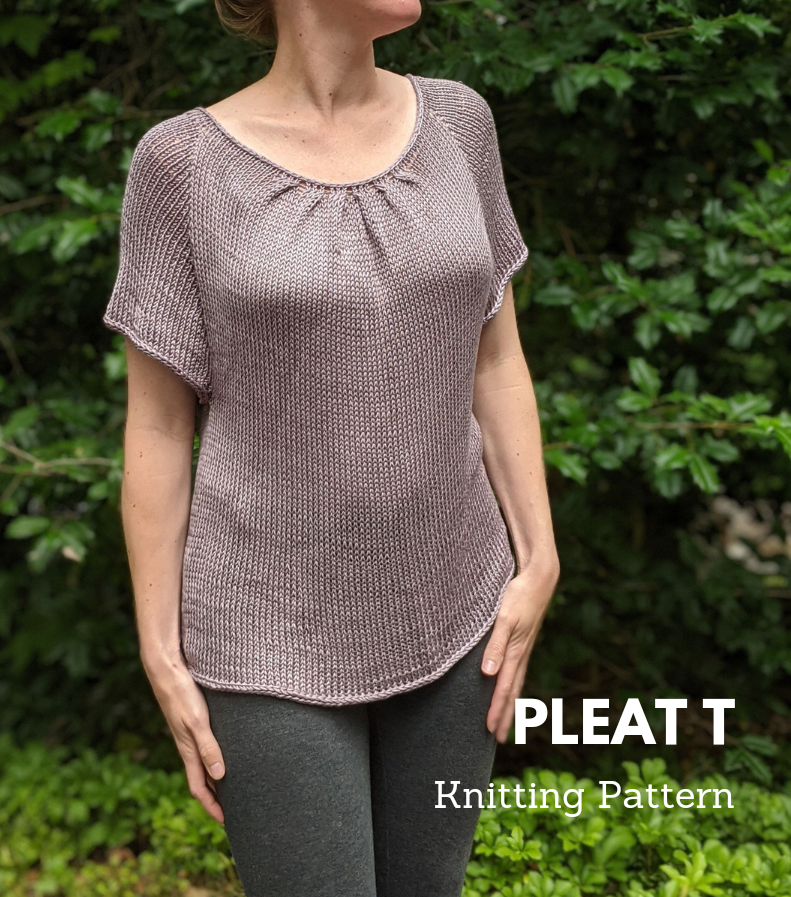
Pattern: Pleat T

A flowy tee with pleats at the neckline

Skill Level: Advanced


Find a printer-friendly, PDF version of the Pleat T below!
 

SIZING

The sizing table lists finished garment measurements based on the sweater diagram. The pattern is designed to have 3 inches of positive ease. Select a size in the chart below based on your actual bust width plus the 3 inches of positive ease, totaling the bust width in (A).

A: Bust width

B: Yoke length

C: Back length from waist to neck base

Size

A

B

C

Yardage

XS

32”

7.5”

19.5”

423 yards

S

36”

7.5”

20”

499 yards

M

40”

10”

20.25”

582 yards

L

44”

11”

20.5”

672 yards

XL

48”

12.5”

20.75”

768 yards

2XL

52”

11.5”

21”

872 yards

3XL

56”

12.5”

21”

980 yards

4XL

60”

13.5”

21.5”

1093 yards

5XL

64”

14.5”

21.5”

1213 yards

COMPONENTS

Gauge:         18 sts x 24 rows = 4 inches in stockinette stitch         

Yarn:             3 (4, 4, 5, 5) (6, 7, 7, 8) skeins of Lion Brand Nuboo in Walnut              

Suggested Needles:          Size 4.5mm (US 7) circular knitting needles
                    Size 4.5mm (US 7) double pointed needles, or small circular needles

Notions:     Stitch markers

                   Tapestry needle

                   Scrap yarn

STITCH ABBREVIATIONS

K– knit

P– purl

CO– cast on

SM– slip marker

PM– place marker

BOR– beginning of round

M1L– pick up the bar between the stitch you knit and the one you’re about to knit, bringing theneedle from front to back, and knit into the back of the stitch (increase)

M1R– pick up the bar between the last stitch you knit and the one you’re about to knit, bringing the needle from the back to the front, and knit into the front of the stitch (increase)

St(s)– stitch(es)

PATTERN NOTES

This raglan tee is knit in the round, with the initial few collar rows worked from the bottom up, then the remainder of the tee knit from the top down. The collar is cast on using the provisional cast on method, then the pleats up top are worked, followed by an i-cord bind off. The provisional cast on stitches are then picked up and you work the remainder of the yoke from the top down. The yoke includes a front and a back body panel and the beginning of two sleeve panels. When your yoke is long enough to reach your armpits, you separate the sleeve panels from the body panels, holding the sleeve stitches on scrap yarn and joining the body panels to finish the body of the tee down to the waist. You end by working each sleeve individually.

Stitch counts and round counts are indicated for each size based on the following size order, unless otherwise noted in the heading: XS (S, M, L, XL) (2XL, 3XL, 4XL, 5XL). It is recommended that you highlight the stitch and round counts for your size before beginning to knit.

Stitches that appear between * and * should be worked until the end, unless otherwise indicated.

It is recommended you check your gauge on both the circular needles and double pointed needles to ensure your tension is the same. Adjust your needle size as necessary to obtain gauge.

INSTRUCTIONS

Collar

Using the provisional cast on method and your circular needles, CO 120 (138, 144, 154, 166) (174, 182, 192, 200) sts. Place marker to mark the BOR. Join to begin working in the round, being careful not to twist.

Round 1: K12 (14, 14, 14, 14) (12, 12, 12, 12) sts, PM, K to end.

Round 2: (a video tutorial for working a box pleat is available here)

K to marker, SM, K8 (11, 7, 2, 7) (2, 6, 2, 6).

Right Facing Pleat

Place 3 (3, 4, 5, 5) (6, 6, 7, 7) sts on one double pointed needle (Needle 1), place next 3 (3, 4, 5, 5) (6, 6, 7, 7) sts on a second double pointed needle (Needle 2), and leave remaining sts on your left needle (Needle 3). See Fig. 1. Fold Needle 2 on top of Needle 3 so the right sides are facing, and fold Needle 1 on top of Needle 2 so the wrong sides are facing. See Fig. 2. Knit the first st from each needle together until you have knit 3 (3, 4, 5, 5) (6, 6, 7, 7) sts. 6 (6, 8, 10, 10) (12, 12, 14, 14) sts decreased.

                             Fig. 1                                                                                     Fig. 2

Repeat the Right Facing Pleat two more times.

Left Facing Pleat

Place 3 (3, 4, 5, 5) (6, 6, 7, 7) sts on one double pointed needle (Needle 1), place next 3 (3, 4, 5, 5) (6, 6, 7, 7) sts on a second double pointed needle (Needle 2), and leave remaining sts on your left needle (Needle 3). See Fig. 3. Fold Needle 2 on top of Needle 3 so the wrong sides are facing, and fold Needle 1 on top of Needle 2 so the right sides are facing. See Fig. 4. Knit the first st from each needle together until you have knit 3 (3, 4, 5, 5) (6, 6, 7, 7) sts. 6 (6, 8, 10, 10) (12, 12, 14, 14) sts decreased.

                                    Fig.3                                                                        Fig. 4

Repeat the Left Facing Pleat two more times.

K to the end of the round.

Bind off using the I-Cord Bind Off (video tutorial available here).

Yoke

Pick up live sts from the provisional cast on edge and place them on your needles to continue working in the round.

Round 3: K26 (34, 29, 31, 33) (37, 37, 38, 38), PM, K12 (14, 14, 14, 14) (12, 12, 12, 12) sts, PM, K70 (76, 87, 95, 105) (113, 121, 130, 138) sts, PM, K12 (14, 14, 14, 14) (12, 12, 12, 12) sts, PM for BOR. Your stitches will be distributed as follows:

Body Panel B: 26 (34, 29, 31, 33) (37, 37, 38, 38)

Sleeve B: 12 (14, 14, 14, 14) (12, 12, 12, 12)

Body Panel A: 70 (76, 87, 95, 105) (113, 121, 130, 138)

Sleeve A: 12 (14, 14, 14, 14) (12, 12, 12, 12)

For Sizes 2XL (3XL, 4XL, 5XL) ONLY:

Round 4: K1, M1L, K1, M1L, until 2 sts before marker, M1R, K1, M1R, K1, SM, K1, M1L, K until 1 st before marker, M1R, K1, SM, K to next marker, SM, K1, M1L, K until 1 st before marker, M1R, K1, SM (8 increases total)

Round 5: K across

Repeat Rounds 4-5 an additional 3 (4, 5, 6) times for a total of 4 (5, 6, 7) repeats. You will now have 146 (158, 172, 184) sts total distributed as follows:

Body Panel B: 53 (57, 62, 66) sts

Sleeve B: 20 (22, 24, 26) sts

Body Panel A: 113 (121, 130, 138)sts

Sleeve A: 20 (22, 24, 26) sts

For ALL Sizes:

Round 6: *K1, M1L, K to 1 st before marker, M1R, K1, SM, K1, M1L, K to 1 st before marker, M1R, K1, SM, K to next marker, SM, K1, M1L, K to 1 st before marker, M1R, K1, SM* (6 increases)

Round 7: K across

Repeat Rounds 6-7 an additional 21 (20, 22, 24, 27) (29, 31, 33, 35) times for a total of 22 (21, 23, 25, 28) (30, 32, 34, 36) repeats. You will now have 252 (264, 282, 304, 334) (386, 414, 444, 472) sts total distributed as follows:

Body Panel B: 70 (76, 75, 81, 89) (113, 121, 130, 138) sts

Sleeve B: 56 (56, 60, 64, 70) (80, 86, 92, 98) sts

Body Panel A: 70 (76, 87, 95, 105) (113, 121, 130, 138) sts

Sleeve A: 56 (56, 60, 64, 70) (80, 86, 92, 98) sts

For Sizes M (L, XL) ONLY:

Round 8: K1, M1L, K to 1 st before marker, M1R, K1, SM, K to BOR (2 increases)

Round 9: K across

Repeat Rounds 8-9 an additional 5 (6, 7) times for a total of 6 (7, 8) repeats. You will now have 294 (318, 350) sts total distributed as follows:

Body Panel B: 87 (95, 105) sts

Sleeve B: 60 (64, 70) sts

Body Panel A: 87 (95, 105) sts

Sleeve A: 60 (64, 70) sts

For Sizes XS (S, 2XL, 3XL, 4XL, 5XL) ONLY:

Round 10: K across

Repeat Round 10 for an additional 5 (10, 4, 3, 2, 1) repeats.

For ALL Sizes:

Try on your piece. The length should fall just below your armpits, where you can comfortably pinch together either side of a sleeve panel under your arms. If it is too short, continue repeating Round 10 until you reach the described length.

Separate Sleeves from Body:

Round 11: Remove all markers as you go, except the BOR. (RS) K across 70 (76, 87, 95, 105) (113, 121, 130, 138) sts, place 56 (56, 60, 64, 70) (80, 86, 92, 98) sts on scrap yarn or stitch holder to save for later, CO 2 (4, 4, 4, 4) (4, 4, 4, 6) sts, K across 70 (76, 87, 95, 105) (113, 121, 130, 138), place 56 (56, 60, 64, 70) (80, 86, 92, 98) sts on scrap yarn or stitch holder to save for later, CO 2 (4, 4, 4, 4) (4, 4, 4, 6) sts. You will now have 144 (160, 182, 198, 218) (234, 250, 268, 288) sts on your needles, not counting the sts on the scrap yarn.

Body:

Round 12: K across

Repeat Round 12 for an additional 70 (75, 61, 56, 50) (55, 49, 46, 40) repeats, or until your piece measures 19.5” (20, 20.25, 20.5, 20.75) (21, 21, 21.5, 21.5”) from top collar.

Bind off using the I-Cord Bind Off (video tutorial available here).

Cut yarn and weave in ends using tapestry needle.

Sleeves:

(Set up Round): Remove 56 (56, 60, 64, 70) (80, 86, 92, 98) sts from scrap yarn and distribute evenly along double pointed needles. Find the bottom of the armpit (where you CO 2 (4, 4, 4, 4) (4, 4, 4, 6) sts for the body), and pick up 2 (4, 4, 4, 4) (4, 4, 4, 6) sts using double pointed needles or small circular needles. PM in the middle of the picked up sts at the bottom of the armpit.

Rounds 1-5: K across

Bind off using the I-Cord Bind Off (video tutorial available here).

Cut yarn and weave in ends using tapestry needle.

Repeat for second sleeve. Block to measurements.

Posted on

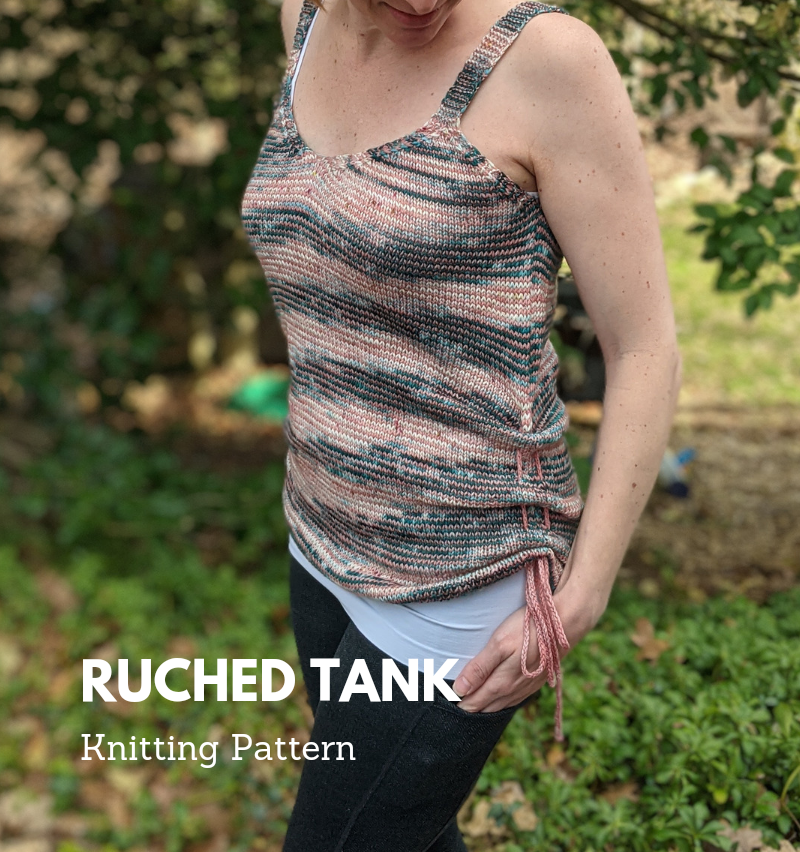
Pattern: Ruched Tank

A bottom-up tank featuring simple side ruching

Skill Level: Intermediate


Find a printer-friendly, PDF version of the Ruched Tank below!

SIZING

The sizing table lists finished garment measurements based on the tank diagram. The pattern is designed to have 3 inches of positive ease. Select a size in the chart below based on your actual bust width plus the 3 inches of positive ease, totaling the bust width in (A).

The sizing table lists finished garment measurements based on the tank diagram. The pattern is designed to have 3 inches of positive ease. Select a size in the chart below based on your actual bust width plus the 3 inches of positive ease, totaling the bust width in (A).

Size A B C Yardage (MC) Yardage (CC)
XS 32” 27” 6.25” 213 yards 209 yards
S 36” 27” 6.75” 254 yards 250 yards
M 40” 27” 7.25” 298 yards 293 yards
L 44” 27” 7.75” 346 yards 339 yards
XL 48” 27” 8.25” 396 yards 389 yards
2XL 52” 29” 8.75” 450 yards 442 yards
3XL 56” 29” 9.25” 507 yards 498 yards
4XL 60” 29” 9.75” 567 yards 557 yards
5XL 64” 29” 10.25” 631 yards 619 yards

COMPONENTS

Gauge:          20 sts x 24 rows = 4 inches in stockinette stitch

Yarn:          213 (254, 298, 346, 396) (450, 507, 567, 631) yards of fingering weight yarn in pink (MC), and

209 (250, 293, 339, 389) (442, 498, 557, 619) yards of fingering weight yarn in blue (CC)

Suggested Needles:          Size 3.5mm (US 4) circular knitting needles
Size 3.5mm (US 4) double pointed needles, or small circular needles

Notions:          Stitch markers

                    Tapestry needle

Scrap yarn

Yarn Substitute: link to a helpful tutorial.

Repeat for the Front Right Panel and Front Back Panel.

Ruching String:

Using MC, CO 3 sts. K an i-cord until it measures 25” (25, 25, 26, 26) (27, 27, 28, 28”).  Here is a helpful linkto an i-cord tutorial.

Weave the string in and out of the YO holes up the front panel on one side. When you reach the top YO hole, weave it into the top YO hole on the back panel, then in and out of the remaining YO holes down the back panel.

Repeat for the other side.

THANK YOU!

I hope you enjoyed making the Ruched Tank as much as I did! Tag me on Instagram @knitabitcrochetaway and use #knitabitcrochetaway and #RuchedTank– I’d love to see your progress and finished product!
Posted on

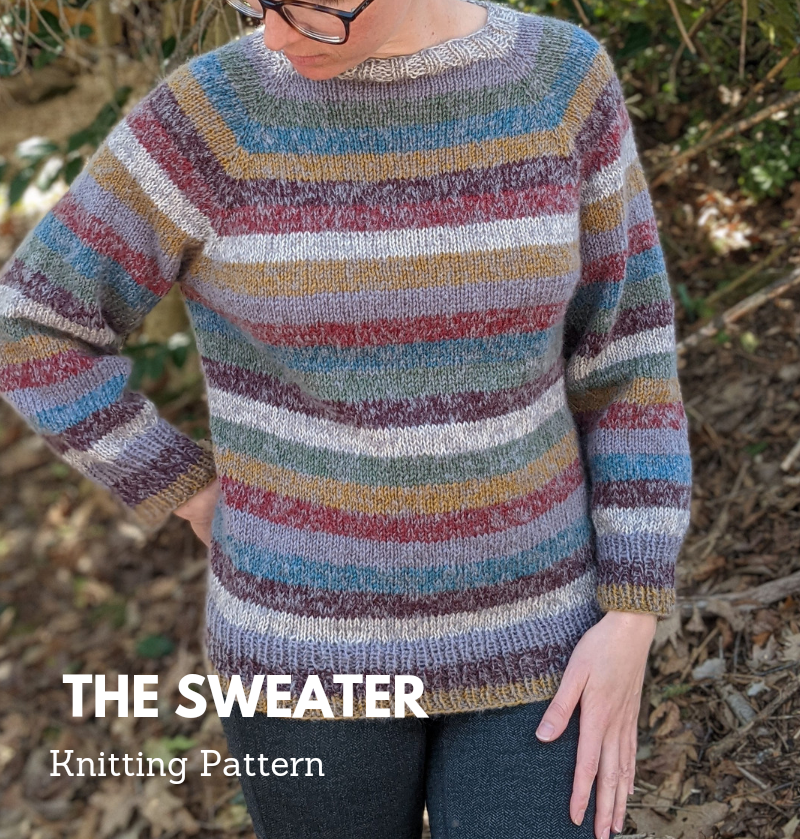
Pattern: The Sweater

A classic striped sweater that will soon be your favorite

Skill Level: Intermediate


Find a printer-friendly, PDF version of The Sweater below!
 

SIZING

The sizing table lists finished garment measurements based on the sweater diagram. The pattern is designed to have 4 inches of positive ease. Select a size in the chart below based on your actual bust width plus the 4 inches of positive ease, totaling the bust width in (A).

A: Bust width

B: Sleeve length from underarm

C: Back length from waist to neck base

D: Upper sleeve width

Size

A

B

C

D

Mohair Yardage

Fingering Yardage in each color

XS

33”

16.5”

27”

13.75”

848 yards

82 yards

S

37”

16.5”

27”

14.25”

911 yards

88 yards

M

41”

16.5”

27”

15”

999 yards

97 yards

L

45”

16.5”

27”

16”

1091 yards

106 yards

XL

49”

16.5”

27”

17.5”

1198 yards

116 yards

2XL

53”

18.5”

29”

19.5”

1427 yards

138 yards

3XL

57”

18.5”

29”

21”

1554 yards

151 yards

4XL

61”

18.5”

29”

22.5”

1706 yards

165 yards

5XL

65”

18.5”

29”

23.5”

1808 yards

175 yards

COMPONENTS

Yarn:          4 (4, 5, 5, 5) (6, 7, 7, 8) skeins Hobbii Diablo in Grey         

                    1 (1, 1, 1, 1) (1, 1, 1, 1) skein Mayflower Class 1 Sock Yarn in each of the following colors:

                    Purple

                    White

                    Maroon

                    Green

                    Red

                    Blue

                    Yellow

Gauge:          18 sts x 22 rows = 4 inches in stockinette with mohair and fingering weight yarn held together         

 Suggested Needles:          Size 5 (US), 3.75 mm double pointed needles

                    Size 5 (US), 3.75 mm circular needles (16 in)

Notions:          Stitch markers

                    Tapestry needle

                    Scrap yarn

STITCH ABBREVIATIONS

K– knit

P– purl

KFB– knit into the front and the back of the next stitch (increase)

CO– cast on

K2tog– knit two stitches together (decrease)

SM– slip marker

PM– place marker

BOR– beginning of round

SSK– slip unworked stitch from left needle to right needle knitwise. Slip a second unworked stitch from the left needle to the right needle knitwise. Slip those two unworked stitches separately back to the left needle purlwise. Knit those two stitches together in the back of the stitches (decrease).

St(s)– stitch(es)

PATTERN NOTES

This raglan sweater is knit in the round and from the top down, beginning with a collar that fits close to the neck. You first work the yoke, which includes a front and a back body panel and the beginning of two sleeve panels. When your yoke is long enough to reach your armpits, you separate the sleeve panels from the body panels, holding the sleeve stitches on scrap yarn and joining the body panels to finish the body of the sweater down to the waist. You end by working each sleeve individually.

Stitch counts and round counts are indicated for each size based on the following size order, unless otherwise noted in the heading: XS (S, M, L, XL) (2XL, 3XL, 4XL, 5XL). It is recommended that you highlight the stitch and round counts for your size before beginning to knit.

Stitches that appear between * and * should be worked until the end, unless otherwise indicated.

Begin using double pointed needles on the collar, and switch to circular needles when the yoke is wide enough to fit on circulars. Switch back to using double pointed needles when you work the sleeves.

It is recommended you check your gauge on both the circular needles and double pointed needles to ensure your tension is the same. Adjust your needle size as necessary to obtain gauge.

Stripe Rounds

The mohair is held together with the fingering weight yarn throughout the entire sweater. The Stripe Rounds are worked in the following order, listed from top to bottom of the sweater, with additional rows for sizes 2XL, 3XL, 4XL, 5XL only, as indicated below. Each Stripe Round is worked for 6 rounds before switching to the next color.

  1. White
  2. Purple
  3. Green
  4. Blue
  5. Yellow
  6. Maroon
  7. Red
  8. White
  9. Yellow
  10. Purple
  11. Red
  12. Blue
  13. Green
  14. Maroon
  15. White
  16. Green
  17. Yellow
  18. Red
  19. Purple
  20. Blue
  21. Maroon
  22. White
  23. Purple
  24. Maroon
  25. Yellow

For Sizes 2XL (3XL, 4XL, 5XL) ONLY:

  1. Green
  2. Red

INSTRUCTIONS

Using long tail cast on, CO 64 (68, 72, 76, 80) (80, 80, 84, 84) sts.

Collar:

Rounds 1-6: *K2, P2*

Yoke:

Round 7 (Set Up Round): K for 8 (8, 8, 8, 10) (12, 12, 12, 12) sts, PM, K for 24 (26, 28, 30, 30) (28, 28, 30, 30) sts, PM, K for 8 (8, 8, 8, 10) (12, 12, 12, 12) sts, PM, K for 24 (26, 28, 30, 30) (28, 28, 30, 30) sts, PM. This last marker marks the BOR. After this Set Up Round, your yoke sts should look like this:

Sleeve A: 8 (8, 8, 8, 10) (12, 12, 12, 12) sts

Body Panel A: 24 (26, 28, 30, 30) (28, 28, 30, 30) sts

Sleeve B: 8 (8, 8, 8, 10) (12, 12, 12, 12) sts

Body Panel B: 24 (26, 28, 30, 30) (28, 28, 30, 30) sts

For Sizes 2XL (3XL, 4XL, 5XL) ONLY:

Round 2: *K1, KFB, K until 2 sts before marker, KFB, K1, SM, K1, KFB, K1, KFB, K until 4 sts before marker, KFB, K1, KFB, K1, SM* (12 increases total)

Round 3: K across

Repeat Rounds 2-3 an additional 7 (8, 9, 10) times for a total of 8 (9, 10, 11) repeats. You will now have 176 (188, 204, 216) sts total distributed as follows:

Sleeve A: 28 (30, 32, 34) sts

Body Panel A: 60 (64, 70, 74) sts

Sleeve B: 28 (30, 32, 34) sts

Body Panel B: 60 (64, 70, 74) sts

For ALL Sizes:

Round 4: *K1, KFB, K until 2 sts before marker, KFB, K1, SM* (8 increases total)

Round 5: K across

Repeat Rounds 4-5 an additional 24 (25, 27, 29, 31) (27, 29, 30, 32) times for a total of 25 (26, 28, 30, 32) (28, 30, 31, 33) repeats. You will now have 264 (276, 296, 316, 336) (400, 428, 452, 480) sts total distributed as follows:

Sleeve A: 58 (60, 64, 68, 74) (84, 90, 94, 100) sts

Body Panel A: 74 (78, 84, 90, 94) (116, 124, 132, 140) sts

Sleeve B: 58 (60, 64, 68, 74) (84, 90, 94, 100) sts

Body Panel B: 74 (78, 84, 90, 94) (116, 124, 132, 140) sts

For Sizes S (M, L, XL) ONLY:

Round 6: *K across, SM, K1, KFB, K until 2 sts before marker, KFB, K1, SM* (4 increases total)

Round 7: K across

Repeat Rounds 6-7 an additional 0 (1, 3, 5) times for a total of 1 (2, 4, 6) repeats. You will now have 264 (280, 304, 332, 360) sts total distributed as follows:

Sleeve A: 60 (64, 68, 74) sts

Body Panel A: 80 (88, 98, 106) sts

Sleeve B: 60 (64, 68, 74) sts

Body Panel B: 80 (88, 98, 106) sts

For ALL Sizes:

Try on your piece. The length should fall just below your armpits, where you can comfortably pinch together either side of a sleeve panel under your arms. If it is too short, continue repeating Round 7 until you reach the described length.

Separate Sleeves from Body:

Round 8 (Set up Round): Remove markers when you get to them, unless indicated otherwise. Place 58 (60, 64, 68, 74) (84, 90, 94, 100) sts on scrap yarn or stitch holder to save for later, CO 4 (4, 4, 4, 4) (4, 4, 6, 6) sts, place marker for the new BOR, K across 74 (80, 88, 98, 106) (116, 124, 132, 140) sts, place 58 (60, 64, 68, 74) (84, 90, 94, 100) sts on scrap yarn or stitch holder to save for later, CO 4 (4, 4, 4, 4) (4, 4, 6, 6) sts, PM, K across 74 (80, 88, 98, 106) (116, 124, 132, 140) sts. You will now have 156 (168, 184, 204, 220) (240, 256, 276, 292) sts on your needles, not counting the sts on the scrap yarn.

Body:

Round 9: K across

Repeat Round 9 until you have worked all of the Stripe Rounds until the last 3 stripe colors.

Round 10: *K13 (14, 16, 18, 20) (22, 23, 25, 27), K2tog* until you don’t have enough sts to complete the repeat, K to end (10 decreases total).

Round 11: *K1, P1*

Repeat Round 11 until you have worked all of the Stripe Round colors.

BO loosely in K1, P1 pattern. Cut yarn and weave in ends using tapestry needle.

Sleeves:

(Set up Round): Remove 58 (60, 64, 68, 74) (84, 90, 94, 100) sts from scrap yarn and distribute evenly along double pointed needles. Find the bottom of the armpit (where you CO 4 (4, 4, 4, 4) (4, 4, 6, 6) sts for the body), and pick up CO 4 (4, 4, 4, 4) (4, 4, 6, 6) sts. PM in the middle of the picked up sts at the bottom of the armpit.

For Sizes XS (S, M, L, XL) ONLY:

Round 1: K across

Repeat Round 1 for two colors in the Stripe Rounds on the arm.

Round 2: K1, K2tog, K until 3 sts before end, SSK, K1

Rounds 3-7: K across

Repeat rounds 2-7 an additional 3 (4, 6, 4, 5) times for a total of 4 (5, 7, 5, 6) repeats. You will now have 54 (54, 54, 62, 66) sleeve sts total.

Repeat Round 1, if needed, until you have worked all of the Stripe Rounds until the last 3 stripe colors.

Round 8: *K4 (4, 4, 5, 6), K2tog* until you don’t have enough sts to complete the repeat, K to end (8 decreases total).

Round 9: *K1, P1*

Repeat Round 9 until you have worked all of the Stripe Round colors.

BO loosely in K1, P1 pattern. Cut yarn and weave in ends using tapestry needle. Repeat for second sleeve.

For Sizes 2XL (3XL, 4XL, 5XL) ONLY:

Round 1: K across

Repeat Round 1 for two colors in the Stripe Rounds on the arm.

Round 2: K1, K2tog, K2tog, K until 5 sts before end, SSK, SSK, K1

Rounds 3-7: K across

Repeat rounds 2-7 an additional 5 (5, 6, 6) times for a total of 6 (6, 7, 7) repeats. You will now have 64 (70, 72, 78) sleeve sts total.

Repeat Round 1, if needed, until you have worked all of the Stripe Rounds until the last 3 stripe colors.

Round 8: *K6 (7, 7, 7), K2tog* until you don’t have enough sts to complete the repeat, K to end (10 decreases total).

Round 9: *K1, P1*

Repeat Round 9 until you have worked all of the Stripe Round colors.

BO loosely in K1, P1 pattern. Cut yarn and weave in ends using tapestry needle. Repeat for second sleeve.

THANK YOU!

I hope you enjoyed making The Sweater as much as I did! Tag me on Instagram @knitabitcrochetaway and use #knitabitcrochetaway and #TheSweater– I’d love to see your progress and finished product!

Posted on

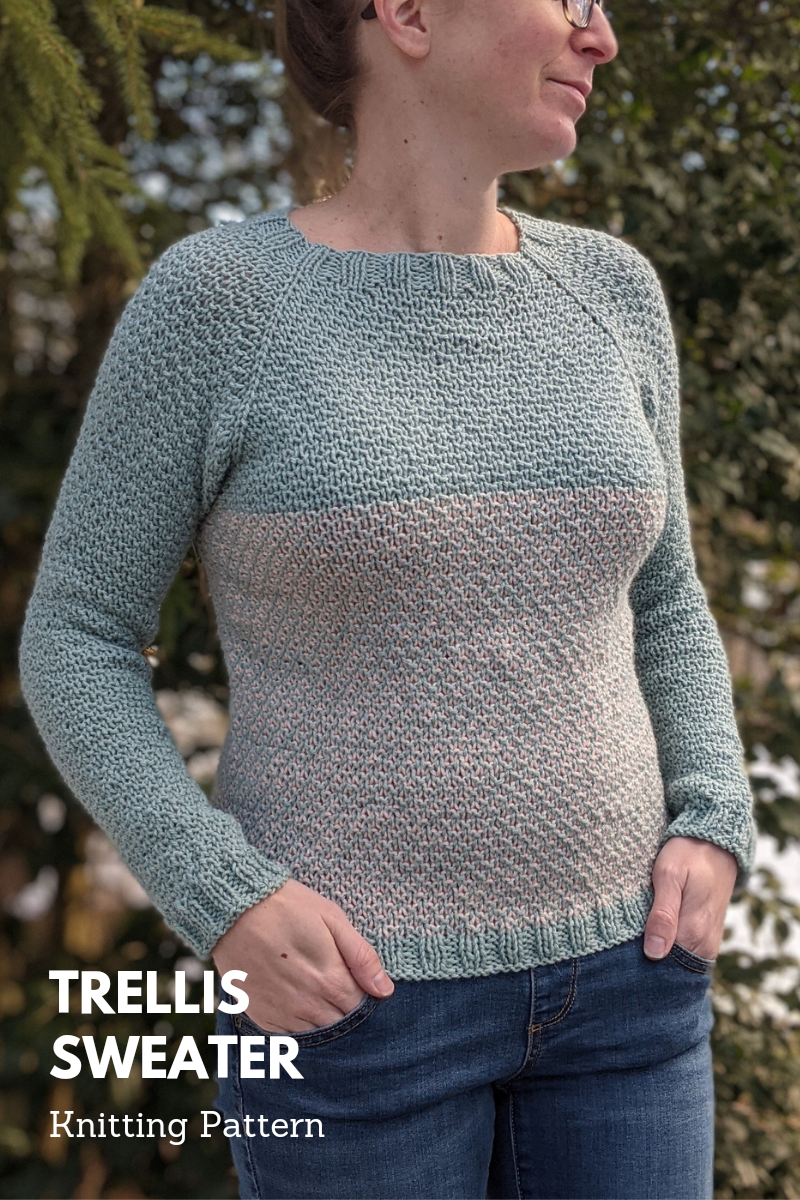
Pattern: Trellis Sweater

A textured raglan sweater using simple colorwork.

Skill Level: Intermediate


Find a printer-friendly, PDF version of the Trellis Sweater below!

SIZING

The sizing table lists finished garment measurements based on the sweater diagram. Select a size based on your bust (A) width. The pattern is designed to have 2 inches of positive ease.

A: Bust width

B: Sleeve length from underarm

C: Back length from waist to neck base

D: Upper sleeve width

Size A B C D Yardage (MC) Yardage (CC)
XS 31” 18.5” 19.5” 11.75” 569 yards 132 yards
S 35” 19” 20” 12.25” 637 yards 148 yards
M 39” 19” 20” 13” 714 yards 166 yards
L 43” 19.5” 20.5” 14” 810 yards 188 yards
XL 47” 19.5” 20.5” 15.5” 916 yards 213 yards
2XL 51” 20” 21” 17.5” 1058 yards 246 yards
3XL 55” 20” 21” 19” 1173 yards 273 yards
4XL 59” 20.5” 21.5” 20.5” 1308 yards 304 yards
5XL 63” 20.5” 21.5” 21.5” 1413 yards 329 yards

COMPONENTS

Gauge:         16 sts x 25 rows = 4 inches in Broken Seed Stitch Pattern

Yarn:         3 (3, 4, 4, 5, 5, 6, 6, 7) skeins of Cascade Yarns, Alpaca Lana D’Oro in Light Blue (MC)

                  2 (2, 2, 2, 2, 3, 3, 3, 4) skeins of Classic Elite Yarns, Legend in Light Pink (CC)

Yarn Substitute:      569 (637, 714, 810, 916, 1058, 1173, 1308, 1413) yards of Swish Worsted in MC

132 (148, 166, 188, 213, 246, 273, 304, 329) yards of Swish Worsted in CC

Suggested Needles:      Size 5 (US), 3.75 mm double pointed needles

Size 5 (US), 3.75 mm circular needle (16 in)

 Notions:          Stitch markers

                    Tapestry needle

Scrap yarn

This post contains affiliate links. If you do decide to purchase though the links in this post, a small portion of the sale may go to support this site, at no additional cost to you.

STITCH ABBREVIATIONS

K– knit

P– purl

KFB– knit into the front and the back of the next stitch (increase)

CO– cast on

K2tog– knit two stitches together (decrease)

SM– slip marker

PM– place marker

BOR– beginning of round

SSK– slip unworked stitch from left needle to right needle knitwise. Slip a second unworked stitch from the left needle to the right needle knitwise. Slip those two unworked stitches separately back to the left needle purlwise. Knit those two stitches together in the back of the stitches (decrease).

St(s)– stitch(es)

MC – main color

CC – contrast color

BROKEN SEED STITCH PATTERN

When working across an even number of stitches in the round:

Round 1: K across

Round 2: *K1, P1*

Round 3: K across

Round 4: *P1, K1*

TWO-COLOR BROKEN SEED STITCH PATTERN

When working across an even number of stitches in the round:

Round 1: (in MC) K across

Round 2: (in CC) *K1, P1*

Round 3: (in MC) K across

Round 4: (in CC) *P1, K1*

PATTERN NOTES

This raglan sweater is knit in the round and from the top down, beginning with a collar that fits close to the neck. You first work the yoke, which includes a front and a back body panel and the beginning of two sleeve panels. When your yoke is long enough to reach your armpits, you separate the sleeve panels from the body panels, holding the sleeve stitches on scrap yarn and joining the body panels to finish the body of the sweater down to the waist. You end by working each sleeve individually.

Stitch counts and round counts are indicated for each size based on the following size order, unless otherwise noted in the heading: XS (S, M, L, XL, 2XL, 3XL, 4XL, 5XL). It is recommended that you highlight the stitch and round counts for your size before beginning to knit.

Stitches that appear between * and * should be worked until the end, unless otherwise indicated.

Begin using double pointed needles on the collar, and switch to circular needles when the yoke is wide enough to fit on circulars. Switch back to using double pointed needles when you work the sleeves.

It is recommended you check your gauge on both the circular needles and double pointed needles to ensure your tension is the same. Adjust your needle size as necessary to obtain gauge.

When beginning the Broken Seed Stitch Pattern on Round 8 or Round 10, depending on your size, be sure to start with a K round. All yoke increases occur on the K round of the Broken Seed Stitch Pattern.

A Note on Yoke Increases

This pattern uses the Broken Seed Stitch Pattern throughout. Be sure to keep this pattern consistent during the Yoke increases between the markers. In other words, you will always K on top of a P stitch from two rounds before, and P on top of a K stitch from two rounds before. Thus, when you are increasing one stitch at the beginning and end of a marker section, you will always begin with a K during the increases to keep the Broken Seed Stitch pattern.

There are times when you work increases on the bust panels only and not the sleeve panels. Be sure to keep the Broken Seed Stitch pattern consistent in each marker section, which may mean you are working the same stitch before and after a marker during the increases.

INSTRUCTIONS

For ALL Sizes:

Using the long-tail cast on and MC only, CO 68 (68, 72, 76, 80, 80, 80, 84, 84) sts. Begin working in the round and place a marker for the BOR.

Collar:

Rounds 1-6: *K2, P2*

Yoke:

Be sure to read the Pattern Notes about keeping the Broken Seed Stitch pattern

Round 7 (Set Up Round): K for 10 (10, 10, 10, 12, 12, 10, 10, 10) sts, PM, K for 24 (24, 26, 28, 28, 28, 30, 32, 32) sts, PM, K for 10 (10, 10, 10, 12, 12, 10, 10, 10) sts, PM, K for 24 (24, 26, 28, 28, 28, 30, 32, 32) sts, PM. This last marker marks the BOR. After this Set Up Round, your yoke should look like this:

Sleeve A: 10 (10, 10, 10, 12, 12, 10, 10, 10) sts

Body Panel A: 24 (24, 26, 28, 28, 28, 30, 32, 32) sts

Sleeve B: 10 (10, 10, 10, 12, 12, 10, 10, 10) sts

Body Panel B: 24 (24, 26, 28, 28, 28, 30, 32, 32) sts

For Sizes 2XL (3XL, 4XL, 5XL) ONLY:

Round 8: *KFB, Broken Seed Stitch Pattern until 1 st before marker, KFB, SM, KFB, KFB, Broken Seed Stitch Pattern until 2 sts before marker, KFB, KFB, SM* (12 increases per round)

Round 9: Broken Seed Stitch Pattern across

Repeat Rounds 8-9 for an additional 9 (9, 10, 11) repeats, or 10 (10, 11, 12) repeats total. You will now have 200 (200, 216, 228) sts total.

For ALL Sizes:

Round 10: *KFB, Broken Seed Stitch Pattern until 1 st before marker, KFB, SM* (8 increases per round)

Round 11: Broken Seed Stitch Pattern across

Repeat Rounds 10-11 for an additional 15 (16, 17, 18, 20, 14, 16, 18, 19) repeats, or 16 (17, 18, 19, 21, 15, 17, 19, 20) repeats total. You will now have 196 (204, 216, 228, 248, 320, 336, 368, 388) sts total.

For Sizes XS (S, M, L, XL) ONLY:

Round 12: *Broken Seed Stitch Pattern until marker, SM, KFB, Broken Seed Stitch Pattern until 1 st before marker, KFB, SM* (4 increases per round)

Round 13: Broken Seed Stitch Pattern across

Repeat Rounds 12-13 for an additional 1 (4, 6, 7, 9) repeats, or 2 (5, 7, 8, 10) repeats total. You will now have 204 (224, 244, 260, 288) sts total.

For ALL Sizes:

Repeat Round 13 for 2 (0, 0, 0, 0, 6, 6, 2, 2) repeats total.

Try on your piece. The length should fall just below your armpits, where you can comfortably pinch together either side of a sleeve panel under your arms. If it is too short, continue repeating Round 13 until you reach the described length.

Before the sleeve separation, the stitches on your yoke should be distributed like this:

Sleeve A: 42 (44, 46, 48, 54, 62, 64, 70, 74) sts

Body Panel A: 60 (68, 76, 82, 90, 98, 104, 114, 120) sts

Sleeve B: 42 (44, 46, 48, 54, 62, 64, 70, 74) sts

Body Panel B: 60 (68, 76, 82, 90, 98, 104, 114, 120) sts

Separate Sleeves from Body:

Round 14 (Set up Round): Remove markers when you get to them, unless indicated otherwise. Place 42 (44, 46, 48, 54, 62, 64, 70, 74) sts on scrap yarn or stitch holder to save for later, CO 2 (2, 2, 4, 4, 4, 6, 6, 6) sts, place marker for the new BOR, Broken Seed Stitch Pattern across 60 (68, 76, 82, 90, 98, 104, 114, 120) sts, place 42 (44, 46, 48, 54, 62, 64, 70, 74) sts on scrap yarn or stitch holder to save for later, CO 2 (2, 2, 4, 4, 4, 6, 6, 6) sts, Broken Seed Stitch Pattern across 60 (68, 76, 82, 90, 98, 104, 114, 120) sts. You will now have 124 (140, 156, 172, 188, 204, 220, 240, 252) sts on your needles, not counting the sts on the scrap yarn.

Body:

Begin working with both the MC and the CC.

Round 15: Two-Color Broken Seed Stitch Pattern across.

Repeat Round 15 for 69 (67, 62, 60, 53, 61, 58, 58, 55) repeats total, or until your piece measures 1 inch less than your desired length. Be sure the last Round you work is a K round.

Rounds 16-21: In MC only, *K2, P2*

Bind off in K only and the MC using the Icelandic Bind Off (video tutorial available here). Cut yarn and weave in ends using tapestry needle.

Sleeves:

Round 1 (Set up Round): Remove 42 (44, 46, 48, 54, 62, 64, 70, 74) sts from first scrap yarn and distribute evenly along double pointed needles. Find the bottom of the armpit (where you CO 2 (2, 2, 4, 4, 4, 6, 6, 6) sts for the body), and pick up 2 (2, 2, 4, 4, 4, 6, 6, 6) sts. PM in the middle of the picked up sts at the bottom of the armpit and K across entire round. Note: this counts as a knit round in the Broken Seed Stitch Pattern.

Rounds 2-12 (12, 12, 12, 10, 8, 6, 6, 6): Broken Seed Stitch Pattern across

Round 13 (13, 13, 13, 11, 9, 7, 7, 7): SSK, Broken Seed Stitch Pattern across until last 2 sts, K2tog

Repeat Rounds 2-13 (13, 13, 13, 11, 9, 7, 7, 7) for an additional 5 (4, 5, 5, 6, 10, 10, 13, 13) repeats, or 6 (5, 6, 6, 7, 11, 11, 14, 14) repeats total. You will now have 32 (36, 36, 40, 44, 44, 48, 48, 52) sts total.

Repeat Broken Seed Stitch Pattern for an additional 42 (57, 45, 48, 50, 35, 57, 42, 42) rounds, or until your piece measures 1 inch less than your desired length. Be sure the last Round you work is a K round.

Rounds 14-19: In MC only, *K2, P2*

Bind off in K only and the MC using the Icelandic Bind Off (video tutorial available here). Cut yarn and weave in ends using tapestry needle.

Repeat for second sleeve.

THANK YOU!

I hope you enjoyed making the Trellis Sweater as much as I did! Tag me on Instagram @knitabitcrochetaway and use #knitabitcrochetaway and #TrellisSweater– I’d love to see your progress and finished product!

Posted on

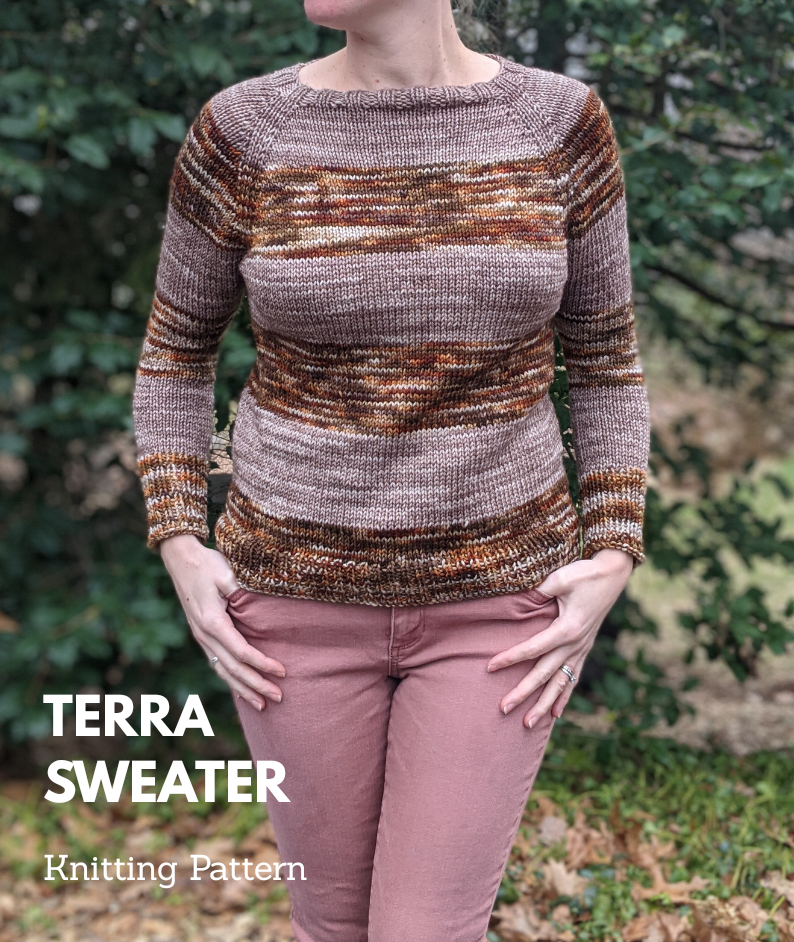
Pattern: Terra Sweater

A simple and form fitting striped sweater.

Skill Level: Intermediate


Find a printer-friendly, PDF version of the Terra Sweater below!

SIZING

The sizing table lists finished garment measurements based on the sweater diagram. Select a size based on your bust (A) width. The pattern is designed to have 1 inch of positive ease.

A: Bust width

B: Sleeve length from underarm

C: Back length from waist to neck base

D: Upper sleeve width

Size A B C D Yardage (MC) Yardage (CC)
XS 30” 22” 22” 10.75” 300 yards 350 yards
S 34” 22” 22” 11.25” 312 yards 367 yards
M 38” 22” 22” 12” 366 yards 429 yards
L 42” 23” 23” 13” 418 yards 490 yards
XL 46” 23” 23” 14.5” 478 yards 561 yards
2XL 50” 23” 23” 16.5” 540 yards 634 yards
3XL 54” 24” 24” 18” 620 yards 728 yards
4XL 58” 24” 24” 19.5” 678 yards 796 yards
5XL 62” 24” 24” 20.5” 729 yards 855 yards

COMPONENTS

Gauge:          18 sts x 24 rows = 4 inches in stockinette

Yarn:          DK weight superwash merino yarn in the yardages listed in the chart above. This pattern uses hand dyed yarn in the colorways Terra and Fauna from Knit A Bit, Crochet Away. Order yours here!

Yarn Substitute: For ALL Sizes:

Using the long-tail cast on and MC, CO 68 (72, 76, 80, 84, 84, 84, 88, 88) sts.

See Pattern Notes for instructions on when to change between MC and CC.

Collar:

Rounds 1-6: *K2, P2*

Round 7 (Set Up Round): K for 8 (8, 8, 8, 10, 10, 10, 10, 10) sts, PM, K for 26 (28, 30, 32, 32, 32, 32, 34, 34) sts, PM, K for 8 (8, 8, 8, 10, 10, 10, 10, 10) sts, PM, K for 26 (28, 30, 32, 32, 32, 32, 34, 34) sts, PM. This last marker marks the BOR. After this Set Up Round, your yoke should look like this:

Sleeve A: 8 (8, 8, 8, 10, 10, 10, 10, 10 sts

Body Panel A: 26 (28, 30, 32, 32, 32, 32, 34, 34) sts

Sleeve B: 8 (8, 8, 8, 10, 10, 10, 10, 10 sts

Body Panel B: 26 (28, 30, 32, 32, 32, 32, 34, 34) sts

For Sizes 2XL (3XL, 4XL, 5XL) ONLY:

Round 8: *K1, KFB, K until 2 sts before marker, KFB, K1, SM, K1, KFB, K1, KFB, K until 4 sts before marker, KFB, K1, KFB, K1, SM* (12 increases per round)

Round 9: K across

Repeat Rounds 8-9 an additional 7 (8, 9, 11) times for a total of 8 (9, 10, 12) repeats. You will now have 180 (192, 208, 232) sts total distributed as follows:

Sleeve A: 26 (28, 30, 34) sts

Body Panel A: 64 (68, 74, 82) sts

Sleeve B: 26 (28, 30, 34) sts

Body Panel B: 64 (68, 74, 82) sts

For ALL Sizes:

Round 10: *K1, KFB, K until 2 sts before marker, KFB, K1, SM* (8 increases per round)

Round 11: K across

Repeat Rounds 10-11 an additional 18 (19, 21, 23, 25, 22, 24, 26, 26) times for a total of 19 (20, 22, 24, 26, 23, 25, 27, 27) repeats. You will now have 220 (232, 252, 272, 292, 364, 392, 424, 448) sts total distributed as follows:

Sleeve A: 46 (48, 52, 56, 62, 72, 78, 84, 88) sts

Body Panel A: 64 (68, 74, 80, 84, 110, 118, 128, 136) sts

Sleeve B: 46 (48, 52, 56, 62, 72, 78, 84, 88) sts

Body Panel B: 64 (68, 74, 80, 84, 110, 118, 128, 136) sts

For Sizes XS (S, M, L, XL) ONLY:

Round 12: *K across to marker, SM, K1, KFB, K until 2 sts before marker, KFB, K1, SM* (4 increases per round)

Round 13: K across

Repeat Rounds 12-13 an additional 0 (3, 4, 6, 7) times for a total of 1 (4, 5, 7, 8) times. You will now have 224 (248, 272, 300, 324) sts total distributed as follows:

Sleeve A: 46 (48, 52, 56, 62) sts

Body Panel A: 66 (76, 84, 94, 100) sts

Sleeve B: 46 (48, 52, 56, 62) sts

Body Panel B: 66 (76, 84, 94, 100) sts

Separate Sleeves from Body:

Round 14 (Set up Round): Place 46 (48, 52, 56, 62, 72, 78, 84, 88) sts on scrap yarn or stitch holder to save for later, CO 2 (2, 2, 2, 4, 4, 4, 4, 4) sts, K across 66 (76, 84, 94, 100, 110, 118, 128, 136) sts, place 46 (48, 52, 56, 62, 72, 78, 84, 88) sts on scrap yarn or stitch holder to save for later, CO 2 (2, 2, 2, 4, 4, 4, 4, 4) sts, K across 66 (76, 84, 94, 100, 110, 118, 128, 136) sts. You will now have 136 (156, 172, 192, 208, 228, 244, 264, 280) sts on your needles, not counting the sts on the scrap yarn.

Body:

Round 15: K across

Repeat Round 15 until you have worked five stripes total, with each stripe being 12 (12, 12, 13, 13, 13, 14, 14, 14) rounds.

Round 16: K across in the last stripe color (CC)

Round 17: *K1, P1*

Repeat Round 17 for a total of 12 (12, 12, 13, 13, 13, 14, 14, 14) rounds.

Bind off in K only using the Icelandic Bind Off (video tutorial available here). Cut yarn and weave in ends using tapestry needle.

Sleeves:

Round 1 (Set up Round): Remove 46 (48, 52, 56, 62, 72, 78, 84, 88) sts from first scrap yarn and distribute evenly along double pointed needles. Find the bottom of the armpit (where you CO 2 (2, 2, 2, 4, 4, 4, 4, 4) sts for the body), and pick up 2 (2, 2, 2, 4, 4, 4, 4, 4) sts. PM in the middle of the picked up sts at the bottom of the armpit and K across entire round.

Round 2: K across

Repeat Round 2 for 6 (5, 5, 10, 5, 3, 3, 2, 2) repeats total.

Round 3: K1, K2tog, K across until last 3 sts, SSK, K1 (2 decreases per round)

Repeat the Round 2 repeats and Round 3 an additional 3 (4, 3, 1, 3, 6, 7, 9, 9) times for a total of 4 (5, 4, 2, 4, 7, 8, 10, 10) repeats. You will now have 40 (40, 46, 54, 58, 62, 66, 68, 72) sleeve sts total.

Round 4: K across

Repeat Round 4 until you have worked five stripes total, with each stripe being 12 (12, 12, 13, 13, 13, 14, 14, 14) rounds.

Round 5: K across in the last stripe color (CC)

Round 6: *K1, P1*

Repeat Round 6 for a total of 12 (12, 12, 13, 13, 13, 14, 14, 14) rounds.

Bind off in K only using the Icelandic Bind Off (video tutorial available here). Cut yarn and weave in ends using tapestry needle.

Repeat for second sleeve.

THANK YOU!

I hope you enjoyed making the Terra Sweater as much as I did! Tag me on Instagram @knitabitcrochetaway and use #knitabitcrochetaway and #TerraSweater– I’d love to see your progress and finished product!

Posted on

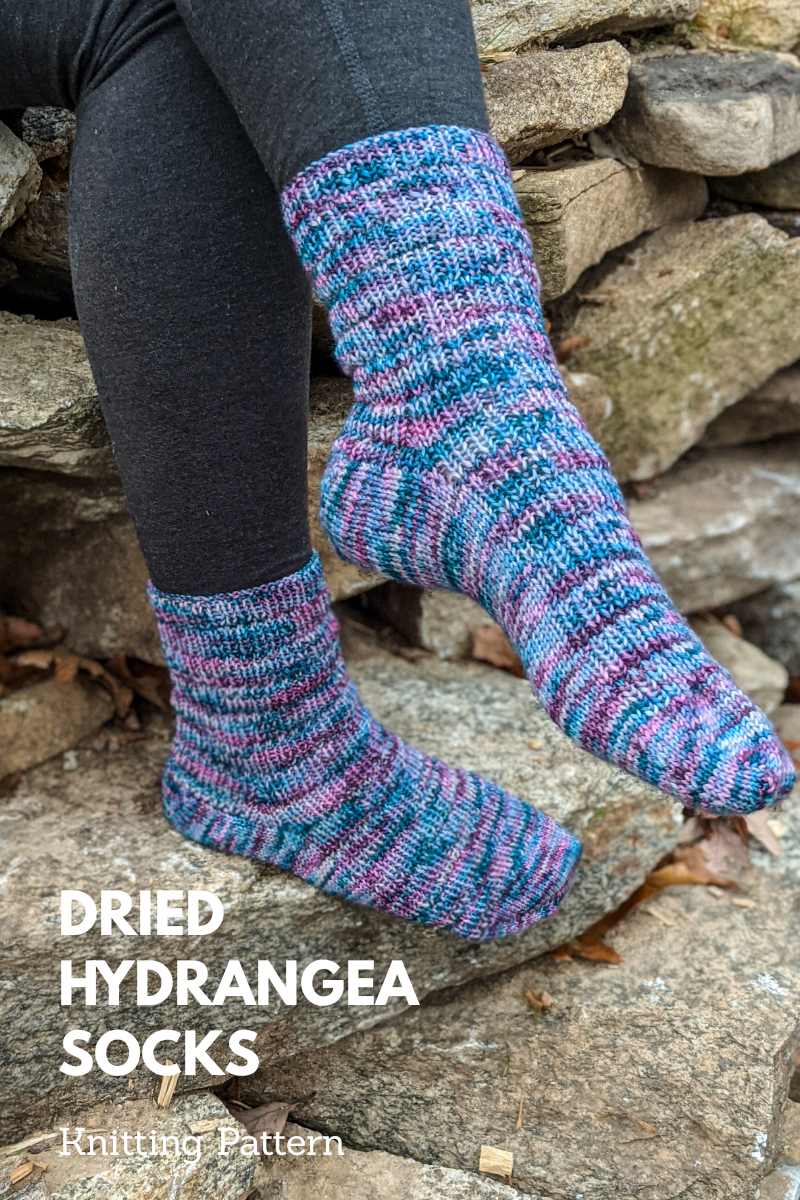
Pattern: Dried Hydrangea Socks


Find a printer-friendly, PDF version of the Dried Hydrangea Socks below!


Toe-up staggered rib socks make any yarn pop

ABOUT

Skill Level:

Intermediate

Pattern Notes:

Stitches that appear between * and * should be worked until the end, unless otherwise indicated.

These socks are worked from the toe-up and the length can be easily adjusted to fit the average woman’s foot.

When working the gusset shaping after finishing the heel flap, be sure to continue the Staggered Pattern from one needle to the next so it matches after the gusset decreases. 

Stitch counts are indicated for each size based on the following size order: Small (Medium, Large). See Size section below for more information about sizing.

COMPONENTS

Materials:

280 (300, 330) yards of fingering weight yarn

The pictured yarn is hand-dyed fingering weight yarn from Knit A Bit Crochet Away in Dried Hydrangea. Order your skein here

Size 0 double pointed needles

Scrap yarn

Yarn Substitute: Stroll

This post contains affiliate links. If you do decide to purchase though the links in this post, a small portion of the sale may go to support this site, at no additional cost to you.

Size:

Size Small (Medium, Large)

Small: Adult Women’s US Size 6 and under

Medium: Adult Women’s US Size 7-9,

Large: Adult Women’s US Size 10 and over

Gauge:

24 sts x 38 rows = 4 inches in stockinette stitch

STITCH ABBREVIATIONS

K – knit

P – purl

Sl – slip stitch as if to purl, unless otherwise indicated

WYIF – with the yarn in the front

WYIB – with the yarn in the back

SSK – slip unworked stitch from left needle to right needle knitwise. Slip a second unworked stitch from the left needle to the right needle knitwise. Slip those two unworked stitches separately back to the left needle purlwise. Knit those two stitches together in the back of the stitches (decrease).

K2tog – knit two stitches together (decrease).

P2tog – purl two stitches together (decrease).

Inc – knit into the front and back of the same stitch (increase).

BOR – beginning of round.

PATTERN REPEAT

Staggered Pattern:

Rounds 1-6: *K1, P1*

Round 7: K across

Rounds 8-13: *P1, K1*

Round 14: K across

INSTRUCTIONS

Toe Shaping:
Use the provisional cast on method to cast on 12 stitches

Row 2: Purl across
Row 3: Knit across
Row 4: Purl across

Remove live stitches from scrap yarn and place them on a double pointed needle. You should have 24 sts on two needles. Begin knitting in the round.

Round 5: *K2, Inc, K4 (add a needle) K4, Inc, K2.* Repeat from * to *
Round 6: Needle 1 – K2, Inc, K across needle
     Needle 2 – K across needle to last 3 sts, Inc, K2
     Needle 3 – K2, Inc, K across needle
     Needle 4 – K across needle to last 3 sts, Inc, K2

Repeat Round 6 until you have 36 (40, 44) sts total, or 9 (10, 11) sts per needle

Round 7: K across
Round 8: Needle 1 – K2, Inc, K across needle
     Needle 2 – K across needle to last 3 sts, Inc, K2
     Needle 3 – K2, Inc, K across needle
     Needle 4 – K across needle to last 3 sts, Inc, K2

Repeat Rounds 7-8 until you have 48 (52, 56) sts total, 12 (13, 14) sts per needle

Rounds 9-10: K across
Round 11: Needle 1 – K2, Inc, K across needle

     Needle 2 – K across needle to last 3 sts, Inc, K2
     Needle 3 – K2, Inc, K across needle
     Needle 4 – K across needle to last 3 sts, Inc, K2

Repeat Rounds 9-11 until you have 60 (64, 68) sts total, 15 (16, 17) sts per needle

Foot:
Round 12: Needle 1 – work Staggered Pattern
    Needle 2 – work Staggered Pattern
    Needle 3 – K across
    Needle 4 – K across

Repeat Round 12 until the sock fits from your toes to the bend in the top of your foot where your ankle starts. 

Heel Flap:
Turn and work only across Needles 3 and 4 only (worked flat), leaving Needles 1 and 2 unworked. 

Row 13: Sl1, P across, turn
Row 14: Sl 1, K1, *Sl1 as if to purl, K1,* turn

Repeat Rows 13 and 14 for a total of 24 rows.

Heel Shaping:
Row 15 (WS): Sl1 WYIF, P15 (16, 17), P2tog, P1, turn (leave remaining sts unworked) 
Row 16 (RS): Sl1 WYIB, K3, SSK, K1, turn (leave remaining sts unworked) 
Row 17 (WS): Sl1 WYIF, P4, P2tog, P1, turn (leave remaining sts unworked)  
Row 18 (RS): Sl1 WYIB, K5, SSK, K1, turn (leave remaining sts unworked) 

Continue working the heel flap in this manner, working an additional stitch before the decrease stitch in each row. In other words, work until 1 st before the “gap” that gets created from the decrease stitch in the previous row before you work the decrease in this row. Continue in this manner until you end working a RS row and you have worked a decrease over all of the gaps. You should have 16 (18, 20) sts on your needle. Note: for the Small and Large sizes, you will not work a P1 at the end of the last WS row or a K1 at the end of the last RS row.

Gusset Shaping: (decrease)

Round 19: Begin working in the round again. Split the heel flap sts across two needles so you have 8 (9, 10) sts per needle. The space between these two heel flap needles now becomes the BOR. With the second heel flap needle (this needle now becomes Needle 1), pick up and K 12 sts along heel flap edge. Work across the next two needles (now Needles 2 and 3) in the Staggered Pattern. Using Needle 4, pick up and K 12 sts along the other heel flap edge, then K across remaining sts on Needle 4 until BOR.

Round 20: Needle 1 – Work Staggered Pattern across 15 (16, 17) sts, K to last 2 sts, K2tog 
    Needles 2-3 – Work Staggered Pattern
    Needle 4 – SSK, K until 15 (16, 17) sts remain, work Staggered Pattern across remaining sts

Round 21: Needle 1 – Work Staggered Pattern across 15 (16, 17) sts, K to end
    Needles 2-3 – Work Staggered Pattern
    Needle 4 – K until 15 (16, 17) sts remain, work Staggered Pattern across remaining sts

Repeat Rounds 20 and 21 until you have 15 (16, 17) sts per needle.

Ankle:
Round 37: Work Staggered Pattern across all needles until you reach desired length, being sure to end on a Round 6 or Round 13 of the Staggered Pattern.

Bind off using Icelandic Bind Off (video tutorial available here).

Repeat pattern for second sock.

THANK YOU!

I hope you enjoyed making the Dried Hydrangea Socks as much as I did! Tag me on Instagram @knitabitcrochetaway and use #knitabitcrochetaway and #DriedHydrangeaSocks– I’d love to see your progress and finished product!
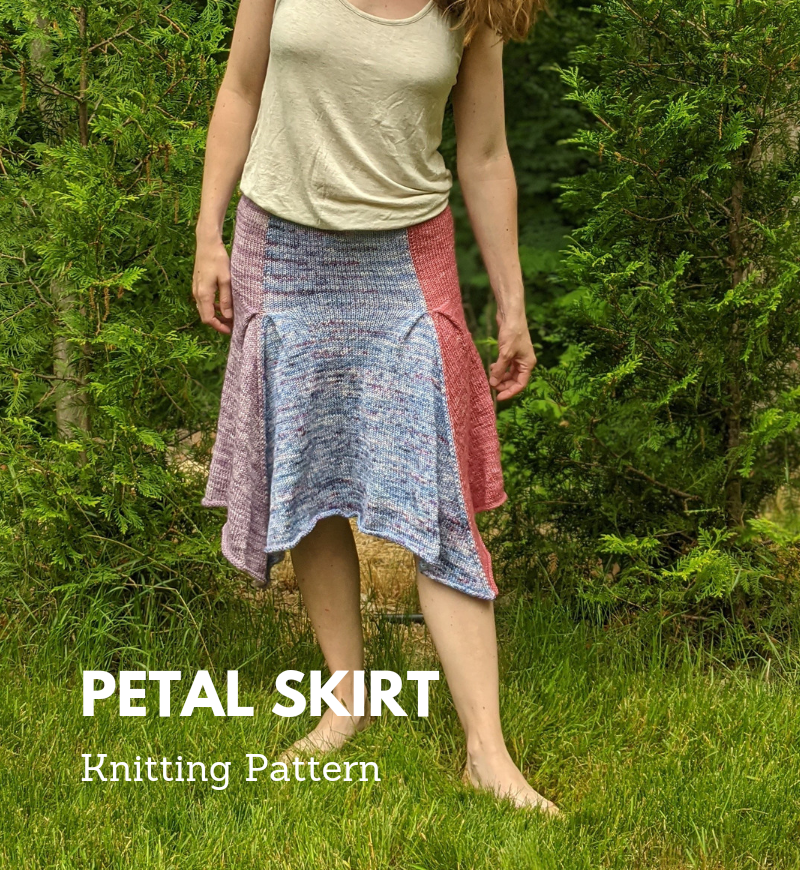
Posted on

Pattern: Firestone Socks


Find a printer-friendly, PDF version of the Firestone Socks below!


Toe-up textured rib socks make any yarn pop

ABOUT

Skill Level:

Intermediate

Pattern Notes:

Stitches that appear between * and * should be worked until the end, unless otherwise indicated.

These socks are worked from the toe-up and the length can be easily adjusted to fit the average woman’s foot.

When working the gusset shaping, be sure to continue the Stripe Pattern from one needle to the next so it matches after the gusset decreases. The sts that will be decreased along the gusset shaping are worked in CC 2 only to make the color work flow nicely with the decreases.

Stitch counts are indicated for each size based on the following size order: Women’s Size 6 and under (7-9, 10 and over)

Each square in the Colorwork Charts represents one stitch, meaning each line represents a new round. Repeat the Colorwork Charts indicated for all stitches on the needle(s), working the chart from the bottom right to the top left. If the stitches on needle end in the middle of working a repeat, then end in the middle of the repeat, but be sure to always start working the Colorwork Chart with the first left cell.

COMPONENTS

Materials:

100 (114, 130) yards of fingering weight yarn in gray (MC)

80 (92, 110)  yards of fingering weight yarn in yellow (CC 1)

80 (92, 110)  yards of fingering weight yarn in purple (CC 2)

The pictured yarn is hand-dyed Knit Picks Bare Hare, which is an 80% merino wool, 20% angora blend

Size 1 double pointed needles

Scrap yarn

Yarn Substitute: Stroll

This post contains affiliate links. If you do decide to purchase though the links in this post, a small portion of the sale may go to support this site, at no additional cost to you.

Size:

Adult Women’s Size 6 and under (7-9, 10 and over)

Gauge:

28 sts x 26 rows = 4 inches

STITCH ABBREVIATIONS

K – knit

P – purl

Sl – slip stitch as if to knit, unless otherwise indicated

SSK – slip unworked stitch from left needle to right needle knitwise. Slip a second unworked stitch from the left needle to the right needle knitwise. Slip those two unworked stitches separately back to the left needle purlwise. Knit those two stitches together in the back of the stitches (decrease).

K2tog – knit two stitches together (decrease).

P2tog – purl two stitches together (decrease).

Inc – knit into the front and back of the same stitch (increase).

MC – main color

CC – contrast color

COLORWORK CHARTS

Key:

Stripe Pattern:

Checkered Pattern:

INSTRUCTIONS

Toe Shaping:
Using MC, use the provisional cast on method to cast on 12 stitches

Row 2: Purl across
Row 3: Knit across
Row 4: Purl across

Remove live stitches from scrap yarn and place them on a double pointed needle. You should have 24 sts on two needles. Begin knitting in the round.

Round 5: *K2, Inc, K4 (add a needle) K4, Inc, K2.* Repeat from * to *
Round 6: Needle 1 – K2, Inc, K across needle
     Needle 2 – K across needle to last 3 sts, Inc, K2
     Needle 3 – K2, Inc, K across needle
     Needle 4 – K across needle to last 3 sts, Inc, K2

Repeat Round 6 until you have 36 (40, 44) sts total, or 9 (10, 11) sts per needle

Round 7: K across
Round 8: Needle 1 – K2, Inc, K across needle
     Needle 2 – K across needle to last 3 sts, Inc, K2
     Needle 3 – K2, Inc, K across needle
     Needle 4 – K across needle to last 3 sts, Inc, K2

Repeat Rounds 7-8 until you have 48 (52, 56) sts total, 12 (13, 14) sts per needle

Rounds 9-10: K across
Round 11: Needle 1 – K2, Inc, K across needle

     Needle 2 – K across needle to last 3 sts, Inc, K2
     Needle 3 – K2, Inc, K across needle
     Needle 4 – K across needle to last 3 sts, Inc, K2

Repeat Rounds 9-11 until you have 56 (60, 64) sts total, 14 (15, 16) sts per needle

Rounds 12-13: K across
Round 14: Needle 1 – K2, Inc, K across needle

     Needle 2 – K across needle to last 3 sts, Inc, K2
     Needle 3 –  K across needle
     Needle 4 – K across needle

You should now have 58 (62, 66) sts total, 15 (16, 17) sts on Needles 1 and 2, 14 (15, 16) sts on Needles 3 and 4

Rounds 15-16: K across
Round 17: Needle 1 – K2, Inc, K across needle

     Needle 2 – K across needle
     Needle 3 –  K across needle
     Needle 4 – K across needle

You should now have 59 (63, 67) sts total, 16 (17, 18) sts on Needle 1, 15 (16, 17) sts on Needle 2, 14 (15, 16) sts on Needles 3 and 4

Foot:
Round 18: Needle 1 – work Stripe Pattern
    Needle 2 – work Stripe Pattern
    Needle 3 – work Checkered Pattern
    Needle 4 – work Checkered Pattern

Repeat Round 18 until the sock fits from your toes to the bend in the top of your foot where your ankle starts. 

Heel Flap:
Turn and work using CC 2 only across Needles 3 and 4 only (worked flat), leaving Needles 1 and 2 unworked. 

Row 19: Sl1, P across, turn
Row 20: Sl 1, K1, *Sl1 as if to purl, K1,* turn

Repeat Rows 19 and 20 for a total of 24 rows total.

Heel Shaping:
Row 21: Sl1, P13 (14, 15), P2tog, P1, turn (leave remaining sts unworked) 
Row 22: Sl1, K1, Sl1 as if to purl, K1, SSK, K1, turn (leave remaining sts unworked) 
Row 23: Sl1, P4, P2tog, P1, turn (leave remaining sts unworked)  
Row 24: Sl1, (K1, Sl1 as if to purl)x2, K1, SSK, K1, turn (leave remaining sts unworked) 
Row 25: Sl1, P6, P2tog, P1, turn (leave remaining sts unworked) 

Continue working the heel flap in this manner, working an additional stitch before the decrease stitch in each row. In other words, work until 1 st before the “gap” that gets created from the decrease stitch in the previous row before you work the decrease in this row. Continue in this manner until you end working the following:
Row 26: Sl1, P13 (14, 15), P2tog, P1, turn

Gusset Shaping: (decrease)

Round 27: Begin working in the round again and continue using CC 2 only. K across 9 sts on one needle (this needle now becomes Needle 4). Using a new needle, K across remaining 8 heel flap sts (this needle now becomes Needle 1). On the same Needle 1, pick up and K 12 sts along heel flap edge. Work across the next two needles (now Needles 2 and 3) in the Stripe Pattern. Using Needle 4, pick up 12 sts and K the first 5 sts in CC 2 only, then work the remaining 7 picked up sts and 9 heel flap sts in the Stripe Pattern.

Round 28: Needle 1 – Work Stripe Pattern to last 5 sts, (K2, K2tog, K1) in CC 2
    Needles 2-3 – Work Stripe Pattern
    Needle 4 – (K1, SSK, K2) in CC2, work Stripe Pattern to end

Round 29: Needle 1 – Work Stripe Pattern to last 4 sts, K4 in CC 2
    Needles 2-3 – Work Stripe Pattern
    Needle 4 – K4 in CC2, work Stripe Pattern to end

Round 30: Needle 1 – Work Stripe Pattern to last 4 sts, (K1, K2tog, K1) in CC 2
    Needles 2-3 – Work Stripe Pattern
    Needle 4 – (K1, SSK, K1) in CC2, work Stripe Pattern to end

Round 31: Needle 1 – Work Stripe Pattern to last 3 sts, K3 in CC 2
    Needles 2-3 – Work Stripe Pattern
    Needle 4 – K3 in CC2, work Stripe Pattern to end

Round 32: Needle 1 – Work Stripe Pattern to last 3 sts, (K2tog, K1) in CC 2
    Needles 2-3 – Work Stripe Pattern
    Needle 4 – (K1, SSK) in CC2, work Stripe Pattern to end

Round 33: Needle 1 – Work Stripe Pattern to last 2 sts, K2 in CC 2
    Needles 2-3 – Work Stripe Pattern
    Needle 4 – K2 in CC2, work Stripe Pattern to end

Round 34: Needle 1 – Work Stripe Pattern to last 2 sts, K2tog in CC 2
    Needles 2-3 – Work Stripe Pattern
    Needle 4 – SSK in CC2, work Stripe Pattern to end

Round 35: Needle 1 – Work Stripe Pattern to last 1 st1, K1 in CC 2
    Needles 2-3 – Work Stripe Pattern
    Needle 4 – K1 in CC2, work Stripe Pattern to end

Round 36: Needle 1 – Work Stripe Pattern to last 2 sts, K2tog in color of Stripe Pattern
    Needles 2-3 – Work Stripe Pattern
    Needle 4 – SSK in color of Stripe Pattern, work Stripe Pattern to end

Ankle:
Round 37: Work Stripe Pattern across all needles until you reach 2 inches below desired length

Rounds 38-49: Using CC 1 only, *K1, P1* 

Bind off using CC 1 and Icelandic Bind Off (video tutorial available here).

Repeat pattern for second sock.

THANK YOU!

I hope you enjoyed making the Firestone Socks as much as I did! Tag me on Instagram @knitabitcrochetaway and use #knitabitcrochetaway and #FirestoneSocks– I’d love to see your progress and finished product!