Posted on

Pattern: Reversible Diamond Cowl


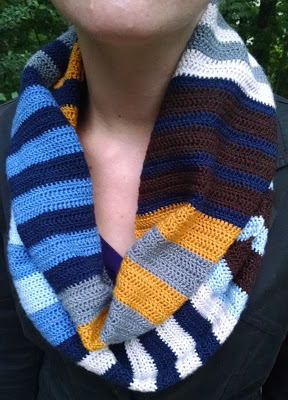
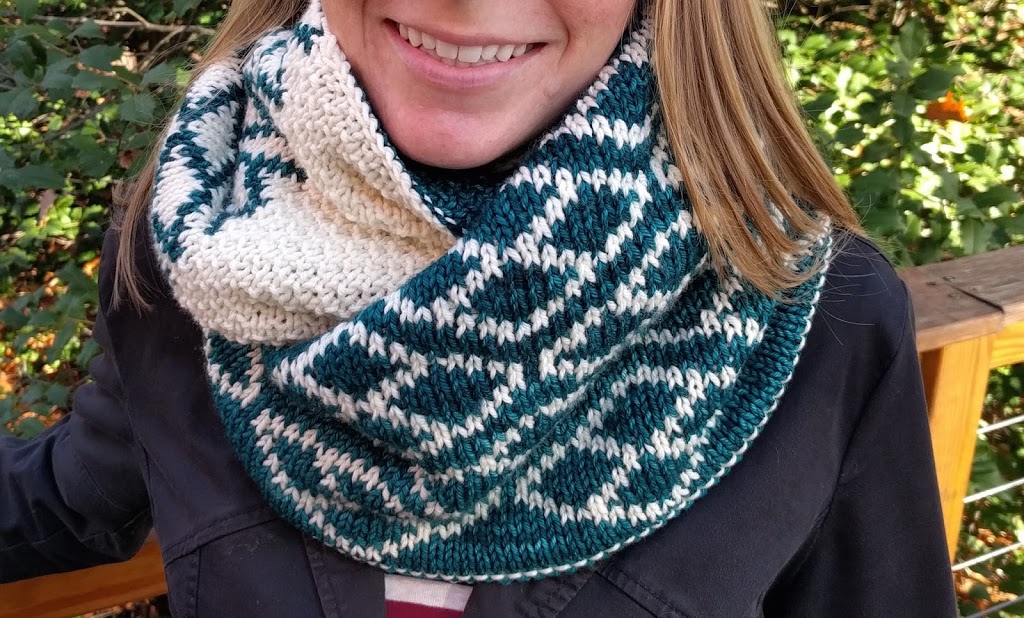
I’m so excited to have this pattern featured by Yarnthology, a wonderful website committed to carefully selecting yarn brands based on how they treat people, animals, and the environment. You can find a more printer friendly version of this pattern on their blog

Materials:

Size 7 (US) circular needles
2 skeins Malabrigo: Rios in Natural
2 skeins Malabrigo: Rios in Teal Feather (you can purchase the beautiful yarn here).
Stitch markers
Gauge:
4 x 4 inches = 26 rows x 17 sts
Finished Measurements:
70 inches (circumference) x 11 inches
Abbreviations:
K – Knit
P – Purl
SSK – slip the first stitch as if to knit, slip the second stitch as if to knit, then slide the left needle into the front of both slipped stitches and knit them together
Overview:
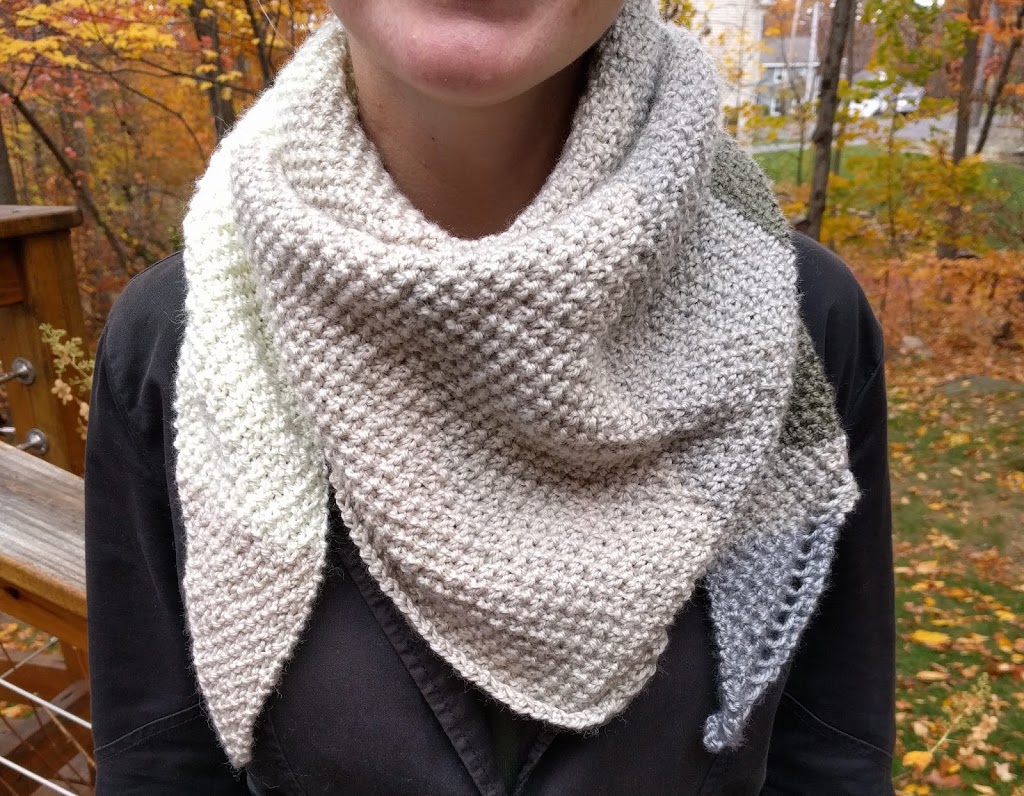
This cowl uses double knitting and has a diamond pattern colorwork on 2/3 of the cowl and solid colored broken seed stitch on the remaining 1/3 of the cowl. The colorwork looks complicated, but it’s quite repetitive and easy to memorize so you don’t have to constantly glance at the chart.
Pattern Notes:
The Main Color (MC) is Natural and the Contrast Color (CC) is Teal Feather. In double knitting, you work using both the MC and CC.
For the written instructions below, you work two consecutive stitches for one stitch in the pattern. For the pattern chart below, each block represents two consecutive stitches. For example, if the pattern calls for you to knit the next stitch, then knit the next stitch in the indicated color while both strands are held to the back, and purl the next consecutive stitch in the opposite color while both strands are held to the front.
The chart is read right to left starting at the bottom right corner.
Chart Key:
 Knit in MC
Knit in CC
Instructions:
CO 199 sts using MC only. Place markers after 140 sts and at the beginning of the round.
Set up row: Begin knitting in the round. In each stitch, K with the MC and P with the CC in the same stitch. This will double the number of stitches on your needles to 398.
Round 1: Work across first 280 sts, until marker, following the colorwork chart. Slip marker, *K1, P1* to last stitch, K1, slip marker.
Round 2: Work following the colorwork chart until marker, slip marker, K across to end marker, slip marker.
Round 3: Work following the colorwork chart until marker, slip marker, *P1, K1* to last stitch, P1, slip marker.
Round 4: Repeat Round 2.
Repeat Rounds 1-4 until you have worked all lines in the colorwork chart and have five rows of diamonds.
Bind off using MC only. *SSK the first two stitches together, SSK the next two stitches together, pass the first SSK stitch over the second SSK stitch on the right needle* until the end.

Posted on

Pattern: Double Seed Shawl

Size:
62 inches long (tip to tip) X 19 inches wide (down longest center point)

Materials:
1 skein Caron Cakes in Cookies & Cream
Size 6 needles

Abbreviations:
K – knit
P – purl
SSK – slip unworked stitch from left needle to right needle knitwise. Slip a second unworked stitch from the left needle to the right needle knitwise. Slip those two unworked stitches separately back to the left needle purlwise. Knit those two stitches together in the back of the  stitches (decrease)

Yo – yarn over

CO – cast on
St(s) – stitch(es)

Instructions:

To prepare your yarn and make sure the colors are distributed evenly throughout the piece, make sure the starting color of the yarn is the same length as the ending color of the yarn. If the starting color is longer than the ending color, then cut the starting color down until it is the same length as the ending color.
 
CO 3
Row 1: P across
Row 2: K2, yo, K across
Row 3: P across
 
Increase Rounds:
Row 4: K2, yo, *K1, P1.* Repeat from * to * until end
Row 5: *K1, P1.* Repeat from * to * until last 3 sts, P across
Row 6: K2, yo, *K1, P1.* Repeat from * to * until last st, K1
Row 7: *P1, K1.* Repeat from * to * until last 3 sts, P across 
 
Repeat Rows 4-7 until piece measures approximately 19 inches wide, or your desired width for the point of the triangle. For the picture, I found the color of the yarn that was in the middle of the skein, then found the middle of that color before I started working it and placed a marker. When I reached the marker, I began the decrease rounds below, which makes the triangle point in the dead center of the center color yarn. Alternatively, if you want to have the triangle point at a color change, then begin the decrease rounds below when the colors change in the yarn.
Decrease Rounds:
Row 8: Ssk, K1, yo, ssk, *P1, K1.* Repeat from * to * until last st, P1
Row 9: *K1, P1.* Repeat from * to * until last 3 sts, P across
Row 10: Ssk, K1, yo, ssk, *P1, K1.* Repeat from * to * to end
Row 11: *P1, K1.* Repeat from * to * until last 4 sts, P across
Repeat Rowa 8-11 until you only have 5 sts remaining
Row 12: Ssk, K1, yo, Ssk
Row 13: P across
Row 14: Ssk, K across
Row 15: P across

Bind off
Posted on

Pattern: Clover Fields Toe Up Socks

Size:
Pattern is written for a size 8 (US) women’s foot.

Materials:
Size 1 double pointed needles
1 skein Patons Kroy Socks in Clover Colors (CC)
1 skein Patons Kroy Socks in Flax (MC)
Scrap yarn

Yarn Substitute: Stroll

This post contains affiliate links. If you do decide to purchase though the links in this post, a small portion of the sale may go to support this site, at no additional cost to you.


Abbreviations:
K – knit
P – purl
Sl – slip unworked stitch from left needle to right needle
SSK – slip unworked stitch from left needle to right needle knitwise. Slip a second unworked stitch from the left needle to the right needle knitwise. Slip those two unworked stitches separately back to the left needle purlwise. Knit those two stitches together in the back of the  stitches (decrease)
K2tog – knit two stitches together (decrease)
P2tog – purl two stitches together (decrease)
Inc – knit into the front and back of the same stitch (increase)

Yo – yarn over

Clover Fields Pattern:
The pattern is written to begin during the toe shaping, then once the toe shaping ends at the first arrow, repeat the pattern between the two arrows. Each square represents one stitch. The MC is in white on the chart and the CC is in black on the chart.


Instructions:
Using the provisional cast on method, cast on 13 stitches
Row 1: P across
Row 2: K across
Row 3: P across


Remove live stitches from scrap yarn and place them on a double pointed needle. You should have 26 sts distributed evenly between four needles, though the first and third needle should have one more stitch each than the second and fourth needle. Begin knitting in the round.

Round 4: *K2, Inc, K until the end of the needle, K across next needle until last 3 sts, Inc, K2.* Repeat from * to * end.

Round 5: Needle 1 – K2, Inc, K across needle
          Needle 2 – K across needle to last 3 sts, Inc, K2
          Needle 3 – K2, Inc, K across needle
          Needle 4 – K across needle to last 3 sts, Inc, K2

Repeat Round 5 until you have 46 sts total.


Round 6: K across
Round 7: Needle 1 – K2, Inc, K across needle
        Needle 2 – K across needle to last 3 sts, Inc, K2
Needle 3 – K2, Inc, K across needle
Needle 4 – K across needle to last 3 sts, Inc, K2

Repeat Rounds 6 and Round 7 until you have 74 sts total

Foot
Work the Clover Fields Pattern across all needles. Work until the sock is the length from the toe to the bend of your ankle at the top of your foot.

Heel Flap:

Turn so WS is facing and work across Needles 3 & 4 only (leave Needles 1 & 2 unworked and to the side). Work using the MC only. 
Row 1: Sl 1, P across
Row 2: Sl 1, K across


Repeat Rows 1 and 2 ten more times (11 repeats total, or 22 rows).


Row 3: P19, P2tog, P1, turn (leave rem sts unworked) 
Row 4: Sl 1, K3, K2tog, K1, turn (leave rem sts unworked) 
Row 5: Sl 1, P4, P2tog, P1, turn (leave rem sts unworked) 
Row 6: Sl1, K5, K2tog, K1, turn (leave rem sts unworked)  
Row 7: Sl1, P6, P2tog, P1, turn (leave rem sts unworked) 
Row 8: Sl1, K7, K2tog, K1, turn (leave rem sts unworked) 
Row 9: Sl1, P8, P2tog, P1, turn (leave rem sts unworked) 
Row 10: Sl1, K9, K2tog, K1, turn (leave rem sts unworked) 
Row 11: Sl1, P10, P2tog, P1, turn (leave rem sts unworked) 
Row 12: Sl1, K11, K2tog, K1, turn (leave rem sts unworked) 
Row 13: Sl1, P12, P2tog, P1, turn (leave rem sts unworked) 
Row 14: Sl1, K13, K2tog, K1, turn (leave rem sts unworked) 
Row 15: Sl1, P14, P2tog, P1, turn (leave rem sts unworked) 
Row 16: Sl1, K15, K2tog, K1, turn (leave rem sts unworked) 
Row 17: Sl1, P16, P2tog, P1, turn (leave rem sts unworked) 
Row 18: Sl1, K17, K2tog, K1, turn (leave rem sts unworked) 
Row 19: Sl1, P18, P2tog, turn 

Row 20: K across. Split the remaining heel flap sts so there’s 10 sts per needle (now Needle 3 and 4). Begin working in the round again.

Round 8: Continue working in Clover Fields Pattern again until the Ribbing at the end. Pick up and K11 sts along heel flap edge on Needle 4; K across Needles 1 & 2; pick up and K11 sts along the other heel flap edge with Needle 3 and K remaining sts on Needle 3. K across Needle 4 to get to the end of the round.

 
Gusset Shaping: (decrease)
Round 9: Needles 1-2 – K across.
       Needle 3 – K1, SSK, K across.
       Needle 4 – K across until last 3 sts, K2tog, K1.
 
Round 10: K across.

Repeat Round 9 and Round 10 until there are 74 sts total. 
 
Continue working in the Clover Fields Pattern until you reach 1/2 inch less than your desired length.
 
Ribbing:
Rounds 11-14: K1, P1 across.
Bind off using the Icelandic Bind-Off for a stretchy finish. Video tutorial available here.

Posted on

Pattern: Striped Cloverleaf Eyelet Socks

These soft cloverleaf eyelet toe up socks are the perfect pair to add to your knit sock collection.

Size:

Pattern is written for a size 8 (US) women’s foot, but it is easily adaptable to other sizes. For sizes 6 and smaller, CO 54 sts. For sizes 10 and larger, CO 66 sts.

Materials:

Size 2 double pointed needles
1 skein Berroco Comfort Sock in Color 1822

Yarn Substitute: Stroll

This post contains affiliate links. If you do decide to purchase though the links in this post, a small portion of the sale may go to support this site, at no additional cost to you.


Gauge

44 sts X 32 rows = 4 inches

Abbreviations:

K – knit
P – purl
Sl – slip unworked stitch from left needle to right needle
SSK – slip unworked stitch from left needle to right needle knitwise. Slip a second unworked stitch from the left needle to the right needle knitwise. Slip those two unworked stitches separately back to the left needle purlwise. Knit those two stitches together in the back of the  stitches (decrease)
K2tog – knit two stitches together (decrease)
P2tog – purl two stitches together (decrease)
Inc – knit into the front and back of the same stitch (increase)

Yo – yarn over
Psso – pass the slipped stitch on the right needle over the stitch just worked on the right needle

Striped Cloverleaf Eyelet Pattern:
Row 1: *K2, yo, sl 1, K2tog, psso, yo, P1.* Repeat from * to * until end
Row 2: *K5, P1.* Repeat from * to * until end
Row 3: *K3, yo, SSK, P1.* Repeat from * to * until end
Rows 4-6: *K5, P1.* Repeat from * to * until end
Row 7: *Yo, sl 1, K2tog, psso, yo K2, P1.* Repeat from * to * until end
Row 8: *K5, P1.* Repeat from * to * until end
Row 9: *K1, yo, SSK, K2, P1.* Repeat from * to * until end
Row 10-12: *K5, P1.* Repeat from * to * until end

Instructions:

Using the provisional cast on method, cast on 12 stitches
Row 1: P across
Row 2: K across
Row 3: P across


Remove live stitches from scrap yarn and place them on a double pointed needle. You should have 24 sts divided evenly on four needles. Begin knitting in the round.

Round 4: *K2, Inc, K until the end of the needle, K across next needle until last 3 sts, Inc, K2.* Repeat from * to * end.

Round 5: Needle 1 – K2, Inc, K across needle
          Needle 2 – K across needle to last 3 sts, Inc, K2
          Needle 3 – K2, Inc, K across needle
          Needle 4 – K across needle to last 3 sts, Inc, K2

Repeat Round 5 until you have 40 sts total (10 sts per needle)


Round 6: K across
Round 7: Needle 1 – K2, Inc, K across needle
        Needle 2 – K across needle to last 3 sts, Inc, K2
Needle 3 – K2, Inc, K across needle
Needle 4 – K across needle to last 3 sts, Inc, K2

Repeat Rounds 6 and Round 7 until you have 52 sts total (13 sts per needle)

Round 8-9: K across
Round 10: Needle 1 – K2, Inc, K across needle
        Needle 2 – K across needle to last 3 sts, Inc, K2
Needle 3 – K2, Inc, K across needle
Needle 4 – K across needle to last 3 sts, Inc, K2

Repeat Rounds 8-10 until you have 60 sts total (15 sts per needle)

Rounds 11-12: K across


Foot

Work the Striped Cloverleaf Eyelet Pattern across Needles 1 and 2. Work stockinette stitch across Needles 3 and 4. Work until the sock is the length from the toe to the bend of your ankle at the top of your foot. End after working Needle 4.

Heel Flap:

Turn so WS is facing and work across Needles 3 & 4 only (leave Needles 1 & 2 unworked and to the side), meaning you do not work in the Striped Cloverleaf Eyelet Pattern for the heel flap. 
 
Row 1: Sl 1, P across
Row 2: Sl 1, K across


Repeat Rows 1 and 2 ten more times (11 repeats total, or 22 rows).
 
Row 3: P15, P2tog, P1, turn (leave rem sts unworked) 
Row 4: Sl 1, K3, K2tog, K1, turn (leave rem sts unworked) 
Row 5: Sl 1, P4, P2tog, P1, turn (leave rem sts unworked) 
Row 6: Sl1, K5, K2tog, K1, turn (leave rem sts unworked)  
Row 7: Sl1, P6, P2tog, P1, turn (leave rem sts unworked) 
Row 8: Sl1, K7, K2tog, K1, turn (leave rem sts unworked) 
Row 9: Sl1, P8, P2tog, P1, turn (leave rem sts unworked) 
Row 10: Sl1, K9, K2tog, K1, turn (leave rem sts unworked) 
Row 11: Sl1, P10, P2tog, P1, turn (leave rem sts unworked) 
Row 12: Sl1, K11, K2tog, K1, turn (leave rem sts unworked) 
Row 13: Sl1, P12, P2tog, P1, turn (leave rem sts unworked) 
Row 14: Sl1, K13, K2tog, K1, turn (leave rem sts unworked) 
Row 15: Sl1, P14, P2tog, P1, turn
 
Split the remaining heel flap sts so there’s 8 sts on Needle 4 and 9 sts on Needle 3. Begin working in the round again.
 
Round 13: Pick up and K11 sts along heel flap edge on same Needle 4; K across Needles 1 & 2 in Striped Cloverleaf Eyelet Pattern; pick up and K11 sts along the other heel flap edge with Needle 3 and K remaining sts on Needle 3. K across Needle 4 to get to the end of the round.
 
Gusset Shaping: (decrease)
For the Gusset Shaping and the rest of the pattern until the end ribbing, work in the Striped Cloverleaf Eyelet Pattern across Needles 1 and 2 and stockinette stitch across Needles 3 and 4.

Round 14: Needles 1-2 – K across in 
Striped Cloverleaf Eyelet Pattern.
       Needle 3 – K1, SSK, K across.
       Needle 4 – K across until last 3 sts, K2tog, K1.
 
Round 15: Work across in the appropriate pattern for the needle.

Repeat Round 14 and Round 15 until there are 61 sts total, with 15 sts on Needles 1, 2 and 4 and 16 sts on Needle 3. 
 
Round 16: Needles 1-2 – K across in Striped Cloverleaf Eyelet Pattern.

       Needle 3 – K1, SSK, K across.
       Needle 4 – K across. (60 sts total)

 
Continue working in Striped Cloverleaf Eyelet Pattern until you reach 1 inch less than your desired length.
 
Ribbing:
Rounds 17-27: K1, P1 across.
Bind off using the Icelandic Bind-Off for a stretchy finish. Video tutorial available here.
Posted on

Pattern: Owl Bit Socks


Finished Measurements:
Pattern is written for women’s size 8 (US)

Materials:

2 skeins Premier Yarns Deborah Norville Collection Serenity Sock Weight in Surf (MC)
1 skein Premier Yarns Deborah Norville Collection Serenity Sock Weight in Deep Brown (CC)
Size 1 double pointed needles

Yarn Substitute: Stroll

This post contains affiliate links. If you do decide to purchase though the links in this post, a small portion of the sale may go to support this site, at no additional cost to you.


Abbreviations:

K – knit
P – purl
Sl – slip unworked stitch from left needle to right needle
SSK – slip unworked stitch from left needle to right needle knitwise. Slip a second unworked stitch from the left needle to the right needle knitwise. Slip those two unworked stitches separately back to the left needle purlwise. Knit those two stitches together in the back of the  stitches (decrease).
K2tog – knit two stitches together (decrease).
P2tog – purl two stitches together (decrease).
Inc – knit into the front and back of the same stitch (increase).

Instructions:
Toe Shaping
Using provisional cast on method and MC, cast on 12 stitches
Round 1: P across
Round 2: K across
Round 3: P across
Round 4: K across

Remove live stitches from scrap yarn and place them on a double pointed needle. You should have 24 sts on two needles (12 sts per needle). Begin knitting in the round.


Round 5: *K2, Inc, K1 (add a needle) K1, Inc, K2.* Repeat from * to *

Round 6: Needle 1 – K2, Inc, K across needle
          Needle 2 – K across needle to last 3 sts, Inc, K2
          Needle 3 – K2, Inc, K across needle
          Needle 4 – K across needle to last 3 sts, Inc, K2

Repeat Round 6 until you have 40 sts total (10 sts per needle)


Round 7: K across

Round 8: Needle 1 – K2, Inc, K across needle
        Needle 2 – K across needle to last 3 sts, Inc, K2
Needle 3 – K2, Inc, K across needle
Needle 4 – K across needle to last 3 sts, Inc, K2

Repeat Round 7 and Round 8 until you have 64 sts total (16 sts per needle)

Round 9: K across
Round 10: Needle 1 – K2, Inc, K across needle
        Needle 2 – K across
Needle 3 – K2, Inc, K across needle
Needle 4 – K across (66 sts total)

Foot:
For all foot rounds, work the Owl Bits Pattern below. The MC appears in white on the chart and the CC appears in black. Work until the sock is the length from the toe to the bend of your ankle at the top of your foot.

Heel Flap:

Turn so WS is facing and work across Needles 3 & 4 only (leave Needles 1 & 2 unworked and to the side) in MC only, meaning you do not work in the Owl Bits Pattern for the heel flap. 
Row 1: Sl 1, P across
Row 2: Sl 1, K across
Repeat Rows 1 and 2 nine more times (10 repeats total, or 20 rows).
 
Row 3: P17, P2tog, P1, turn (leave rem sts unworked) 
Row 4: Sl 1, K3, K2tog, K1, turn (leave rem sts unworked) 
Row 5: Sl 1, P4, P2tog, P1, turn. 
Row 6: Sl1, K5, K2tog, K1, turn. 
Row 7: Sl1, P6, P2tog, P1, turn. 
Row 8: Sl1, K7, K2tog, K1, turn. 
Row 9: Sl1, P8, P2tog, P1, turn. 
Row 10: Sl1, K9, K2tog, K1, turn. 
Row 11: Sl1, P10, P2tog, P1, turn. 
Row 12: Sl1, K11, K2tog, K1, turn. 
Row 13: Sl1, P12, P2tog, P1, turn. 
Row 14: Sl1, K13, K2tog, K1, turn. 
Row 15: Sl1, P14, P2tog, P1, turn. 
Row 16: Sl 1, K15, K2tog.
 
Split the remaining heel flap sts so there’s 8 sts on Needle 4 and 9 sts on Needle 3. Begin working in the round again.

Round 11: Pick up and K 10 sts along heel flap edge on same Needle 4; K across Needles 1 & 2 in Owl Bits Pattern; pick up and K 10 sts along the other heel flap edge with Needle 3 and K remaining sts on Needle 3. (70 sts total). K across Needle 4 to get to the end of the round.
Gusset Shaping: (decrease)
For the Gusset Shaping and the rest of the pattern until the end ribbing, work in the Owl Bits Pattern.

Round 12: Needles 1-2 – K across 

       Needle 3 – K1, SSK, K across.
       Needle 4 – K across until last 3 sts, K2tog, K1.
 
Round 13: K across.

Repeat Round 12 and Round 13 until there are 66 sts total, with 16 sts on Needles 1 & 3 and 17 sts on Needles 2 & 4. 
Continue working in Owl Bits Pattern until you reach 1/4 inch less than your desired length.

Ribbing:

Using MC only, Work K1, P1 for ten rows.
Cast off.

Owl Bits Pattern:
Here is the pattern in its entirety across the 66 sts:

Here is a view of an owl up close:
Posted on

Pattern: Stardust

Finished Measurements:
Pattern is written for women’s size 8 (US)

Materials:

Size 1 double pointed needles
1 skein Patons Kroy Socks FX in Cadet Colors (MC)
1 skein Patons Kroy Socks FX in Clover Colors (CC)

Yarn Substitute: Stroll

This post contains affiliate links. If you do decide to purchase though the links in this post, a small portion of the sale may go to support this site, at no additional cost to you.


Abbreviations:

K – knit
P – purl
Sl – slip unworked stitch from left needle to right needle
SSK – slip unworked stitch from left needle to right needle knitwise. Slip a second unworked stitch from the left needle to the right needle knitwise. Slip those two unworked stitches separately back to the left needle purlwise. Knit those two stitches together in the back of the  stitches (decrease).
K2tog – knit two stitches together (decrease).
P2tog – purl two stitches together (decrease).
Inc – knit into the front and back of the same stitch (increase).

Instructions:

Toe Shaping
Using provisional cast on method and MC, cast on 12 stitches
Round 1: P across
Round 2: K across
Round 3: P across
Round 4: K across

Remove live stitches from scrap yarn and place them on a double pointed needle. You should have 24 sts on two needles (12 sts per needle). Begin knitting in the round.


Round 5: *K2, Inc, K1 (add a needle) K1, Inc, K2.* Repeat from * to *

Round 6: Needle 1 – K2, Inc, K across needle
          Needle 2 – K across needle to last 3 sts, Inc, K2
          Needle 3 – K2, Inc, K across needle
          Needle 4 – K across needle to last 3 sts, Inc, K2

Repeat Round 6 until you have 40 sts total (10 sts per needle)


Round 7: K across

Round 8: Needle 1 – K2, Inc, K across needle
        Needle 2 – K across needle to last 3 sts, Inc, K2
Needle 3 – K2, Inc, K across needle
Needle 4 – K across needle to last 3 sts, Inc, K2

Repeat Round 7 and Round 8 until you have 64 sts total (16 sts per needle)

Foot:

For all foot rounds, work the Stardust Pattern below. The MC appears in white on the chart and the CC appears in black. Work until the sock is the length from the toe to the bend of your ankle at the top of your foot.

Heel Flap:

Turn so WS is facing and work across Needles 3 & 4 only (leave Needles 1 & 2 unworked and to the side) in CC only, meaning you do not work in the Stardust Pattern for the heel flap. 
Row 1: Sl 1, P across


Row 2: Sl 1, K across


Repeat Rows 1 and 2 nine more times (10 repeats total, or 20 rows).
 
Row 3: P16, P2tog, P1, turn (leave rem sts unworked)
Row 4: Sl 1, K3, K2tog, K1, turn (leave rem sts unworked)
Row 5: Sl 1, P4, P2tog, P1, turn
Row 6: Sl1, K5, K2tog, K1, turn. 
Row 7: Sl1, P6, P2tog, P1, turn. 
Row 8: Sl1, K7, K2tog, K1, turn. 
Row 9: Sl1, P8, P2tog, P1, turn. 
Row 10: Sl1, K9, K2tog, K1, turn. 
Row 11: Sl1, P10, P2tog, P1, turn. 
Row 12: Sl1, K11, K2tog, K1, turn. 
Row 13: Sl1, P12, P2tog, P1, turn. 
Row 14: Sl1, K13, K2tog, K1, turn. 
Row 15: Sl1, P14, P2tog, P1, turn. 
Row 16: Sl 1, K15, K2tog, turn
Row 17: Sl 1, P15, P2tog, turn
 
Split the remaining heel flap sts so there’s 8 sts on Needle 4 and 9 sts on Needle 3. Begin working in the round again.

Round 9: K across Needle 3; K across Needle 4 and pick up and K 10 sts along heel flap edge on same Needle 4; K across Needles 1 & 2 in Stardust Pattern; pick up and K 10 sts along the other heel flap edge with Needle 3 and K remaining sts on Needle 3. (69 sts total). The spot between Needle 3 and Needle 4 will be the new starting point and Needle 4 now becomes Needle 1 and so on for the rest of the pattern.

Gusset Shaping: (decrease)
For the Gusset Shaping and the rest of the pattern until the end ribbing, work in the Stardust Pattern.

Round 10: Needle 1 – K across until last 3 sts, K2tog, K1.
       Needle 2 – K across.
       Needle 3 – K across.
       Needle 4 – K1, SSK, K across.
 
Round 11: K across.

Repeat Round 10 and Round 11 until there are 64 sts total (16 sts per needle). Note: Needle 4 has one more stitch on it than Needle 1, so on the last decrease row, decrease only on Needle 4.


Continue working in Stardust Pattern until you reach 1/4 inch less than your desired length.

Ribbing:

Using MC only, Work K1, P1 for five rows.
Cast off.

Stardust Pattern:
Here is what the pattern looks like in its entirety from far away:

It’s not only great for socks, but would be wonderful with a scarf or even a sweater. I realize it’s difficult to actually read the chart above, so I have separated it out into five different sections for ease of viewing and printing:


Posted on

Pattern: Nautica Stripes Infinity Scarf

Sizing:
68 inches in diameter

Materials:
Size E crochet hook
1 skein Loops & Threads Woolike in Golden Yellow
1 skein Loops & Threads Woolike in Beige
1 skein Loops & Threads Woolike in Ice Blue
1 skein Loops & Threads Woolike in Navy
1 skein Loops & Threads Woolike in Denim Blue
1 skein Loops & Threads Woolike in Chocolate
1 skein Loops & Threads Woolike in Charcoal

Sewing needle

Color Pattern:
Work the following color pattern for the entire scarf

(4 rows Charcoal, 4 rows Beige) three times
(2 rows Navy, 4 rows Chocolate) three times, 2 rows Navy
(6 rows Golden Yellow, 6 rows Charcoal) three times
(4 rows Navy, 4 rows Denim Blue) four times, 4 rows Navy
(4 rows Charcoal, 4 rows Navy) four times
(4 rows Golden Yellow, 6 rows Beige) three times, 4 rows Golden Yellow
(6 rows Chocolate, 4 rows Ice Blue) three times
(4 rows Beige, 4 rows Navy) four times
(6 rows Denim Blue, 6 rows Ice Blue) three times
(6 rows Golden Yellow, 4 rows Navy) three times, 6 rows Golden Yellow

Instructions:
Ch 52
Starting row: 1 dc in third ch from hook, 1 hdc in each ch until end, turn.
All remaining rows: Ch 2, 1 dc in each st until end, turn.

Finishing:
Using sewing needle, sew the first charcoal ch row to the last yellow dc row. Weave in ends.

Posted on

Pattern: Animal Parade Baby Blanket

Finished Measurements
29 inches x 28 inches

Gauge:
4 inches = 22 sts and 30 rows

Materials
Size 6 circular needle
3 skeins Bernat Softee Baby Yarn in White
1 skein Bernat Softee Baby Yarn in Pink
1 skein Bernat Softee Baby Yarn in Grey
1 skein Bernat Softee Baby Yarn in Pale Blue
1 skein Bernat Softee Baby Yarn in Soft Lilac
1 skein Bernat Softee Baby Yarn in Little Mouse
1 skein Bernat Softee Baby Yarn in Lemon

Yarn Substitute: Brava Sport

This post contains affiliate links. If you do decide to purchase though the links in this post, a small portion of the sale may go to support this site, at no additional cost to you.

Instructions:
This blanket is made up of 5 square sections with 7 rows of squares. Each square is made up of 24 stitches and 24 rows. Surrounding each square is 6 rows in seed stitch and 6 stitches in seed stitch. The squares with the animals are worked in stockinette stitch. Below is a chart that gives a big picture of the blanket. Charts should be read from the bottom right corner, going from right to left, with the RS facing.

In White, CO 156
Rows 1, 3, 5: *K1, P1* to end
Rows 2, 4, 6: *P1, K1* to end

Odd Rows 7-29: *K1, P1* three times, K across next 24 sts in Elephant pattern, *K1, P1* three times, K across next 24 sts in White, *K1, P1* three times, K across next 24 sts in Bear pattern, *K1, P1* three times, K across next 24 sts in White, *K1, P1* three times, K across next 24 sts in Rooster pattern, *K1, P1* three times.

Even Rows 8-30: *P1, K1* three times, P across next 24 sts in Rooster pattern, *P1, K1* three times, P across next 24 sts in White, *P1, K1* three times, P across next 24 sts in Bear pattern, *P1, K1* three times, P across next 24 sts in White, *P1, K1* three times, P across next 24 sts in Elephant pattern, *P1, K1* three times.

Rows 31, 33, 35: *K1, P1* to end
Rows 32, 34, 36: *P1, K1* to end

Odd Rows 37-59: *K1, P1* three times, K across next 24 sts in White, *K1, P1* three times, K across next 24 sts in Dog pattern, *K1, P1* three times, K across next 24 sts in White, *K1, P1* three times, K across next 24 sts in Giraffe pattern, *K1, P1* three times, K across next 24 sts in White, *K1, P1* three times.

Even Rows 38-60: *P1, K1* three times, P across next 24 sts in White, *P1, k1* three times, P across next 24 sts in Giraffe pattern, *P1, K1* three times, P across next 24 sts in White, *P1, K1* three times, P across next 24 sts in Dog pattern, *P1, K1* three times, P across next 24 sts in White, *P1, K1* three times.

Rows 61, 63, 65: *K1, P1* to end
Rows 62, 64, 66: *P1, K1* to end

Continue in this manner until you have worked all animal patterns based on the large chart above. Be sure to end with 6 rows in seed stitch. Bind off.

Back:
To hide the ends, knit 24 sts in stockinette stitch for 24 rows and sew onto the back of each square with an animal.


Find me on Instagram and tag me in your photos! I’d love to see your work. @knitabitcrochetaway

Individual Animal Charts:

Posted on

Pattern: Nautica Striped Cardigan

This busy and colorful striped cardigan will keep you warm during those cold days.

Sizing:
Pattern is written in US women’s S (M, L) with standard fitting. The pictures shown are in the Small size.

Gauge:
32 stitches and 42 rows = 4 inches

Materials:
Size 2 circular needles (any cord length)
Size 2 double pointed needles
1 skein Loops & Threads Woolike in Golden Yellow
1 skein Loops & Threads Woolike in Beige
1 skein Loops & Threads Woolike in Ice Blue
1 skein Loops & Threads Woolike in Navy
1 skein Loops & Threads Woolike in Denim Blue
1 skein Loops & Threads Woolike in Chocolate
1 skein Loops & Threads Woolike in Charcoal
Button to match your taste. 6 buttons shown in pictures sized 30mm
Stitch markers
Scrap yarn

Color Pattern:
Left Panel
(6 rows Golden Yellow, 6 rows Beige) repeat 4 times total. 6 rows Golden Yellow.
(10 rows Chocolate, 4 rows Ice Blue) repeat 3 times total. 10 rows Chocolate.
(8 rows Beige, 4 rows Navy) repeat 4 times total. 8 rows Beige.
(6 rows Denim Blue, 6 rows Ice Blue) repeat 3 times total.
(8 rows Golden Yellow, 4 rows Navy) repeat 3 times total. 8 rows Golden Yellow. 2 rows Navy.

Right Panel
(8 rows Navy, 6 rows Charcoal) repeat 2 times total. 10 rows Navy. 6 rows Charcoal. 12 Rows Navy. 6 rows Denim Blue, 10 rows Navy, (6 rows Denim Blue, 8 rows Navy) repeat 2 times total.
(6 rows Golden Yellow, 6 rows Charcoal) repeat 4 times total. 6 rows Golden Yellow.
(8 rows Chocolate, 6 rows Navy) repeat 3 times total.
(8 rows Charcoal, 8 rows Beige) repeat 3 times total.

Note: Avoid holes when changing colors by following this tutorial.

Instructions:
Yoke
In Charcoal, CO 176 (192, 208) sts.
Rows 1-9: K1, P1 across.

Row 10: K1, P1 for 88 (96, 104) sts, pm, K1, P1 for remaining sts. Note: you might want to make this marker a different color than all other markers you use because this marker will be used to differentiate between the left panel of colors and the right panel of colors. This marker will not be used as an increase marker and will be treated as invisible in the pattern from here on out, so just slip the marker when you come to it and know to change colors.

For all rows following until the end edging, work in the Color Pattern of the Left Panel and the Right Panel. The Right Panel should be worked first on the RS until the marker, then the Left Panel should be worked after the marker. Note that the color striping on the Left Panel and the Right Panel do not necessarily line up (that adds to the fun!)

Row 11: P across
Row 12: K across and increase 48 (52, 58) sts evenly along the next row, making sure to have 24 (24, 24) sts on each side of the marker. 224 (244, 266).

Shoulders
(Set Up Row) Row 13: P 33 (36, 40), pm, P 46 (50, 53), pm, P 66 (72, 80), pm, P 46 (50, 53), pm, P 33 (36, 40).

Row 14: *K to two sts before marker, KFB, K1, sm, K1, KFB.* Repeat from * to * three more times, K to end (8 incr total).
Row 15: P across.

Repeat Rows 14 and 15, 26 (32, 38) times total to have 432 (500, 570) sts total.

Row 16: K to first marker, sm, place 98 (114, 129) shoulder sts onto scrap yarn, CO 6 (6, 8) sts, sm, K to next marker, place 98 (114, 129) shoulder sts onto scrap yarn, CO 6 (6, 8) sts, sm, K to end.

Body
With the scrap yarn holding the two sleeves, you should be working only 248 (284, 328) sts.

Continue working in st st until you have completed all of the color changes in the Left Panel and the Right Panel Color Pattern.

Rows 17-26: In Charcoal, K1, P1. Bind Off.

Sleeves
For the sleeves, continue working in the same Color Pattern for the left sleeve in the Left Panel and for the right sleeve in the Right Panel.

Using double pointed needles, pick up and K 3 (3, 4) sts along armpit, pm, pick up and K 3 (3, 4) sts along armpit, pick up and K all other sts sleeve sts on scrap yarn.

Rounds 1-9: work in st st
Round 10: K1, SSK, K until 3 sts before marker, K2tog, K1.

Repeat Rounds 1-10, 18 more times (19 times total).

Rounds 11-37: In Charcoal, K1, P1.

Bind off and repeat for the other sleeve.

Button Edging
Working down the right panel edge, pick up 258 sts evenly.
Rows 27- 31: In Charcoal, K1, P1.

Row 32: K1, P1 for 11 sts, bind off 6 sts, *K1, P1 for 40 sts, bind off 6 sts.* Repeat from * to * 4 more times, K1, P1 until end.
Row 33: K1, P1 for 11 sts, CO 6 sts, *K1, P1 for 40 sts, CO 6 sts.* Repeat from * to * 4 more times, K1, P1 until end.
Rows 34-38: K1, P1.
Bind off.

Working down the left panel edge, pick up 258 sts evenly.
Rows 39-50: K1, P1.
Bind off.

Attach buttons to line up with the button holes.

Wear with pride!

Posted on

Pattern: Bordered Chevron Blanket

Finished Measurements:
46″ x 68″

Materials:
Size 9 (US) circular needle
(BC) 2 skeins Loops & Threads Impeccable in Aran
(CC) 3 skeins Lang Yarns Mille Colori Big in Color No. 0044 (pink and green blend)
(MC) 4 skeins Land Yarns Mille Colori Big in Color No. 0039 (brown and orange blend)

Abbreviations:
K – knit
P – purl
Yo – yarn over
Sl – slip next stitch
Psso – pass the slipped stitch over the stitch just worked
St(s) – stitch(es)

Chevron Pattern:
Row 1: *K1, yo, K12, K2tog, sl 1, K1, psso, K12, yo.* Repeat from * to * until last st, K1.
Row 2: P across.

Instructions:

This blanket will test your intarsia skills. If you’ve never worked with color changes before, I posted some instructions here but I found these instructions were helpful as well.

You’ll have seven different color sections, each bordered by white. Each section has its own ball of yarn. Conveniently, you’ll have four sections of MC to match the 4 skeins you’ll use and three sections of CC to match the 3 skeins you’ll use. There are 8 border sections of BC so you’ll want to make 8 relatively small balls of BC yarn. You’ll be working from a lot of different skeins and it’ll get tangled a lot, but don’t get frustrated! The finished product is worth it.

In BC, CO 204 stitches
Row 1-6: Work Chevron Pattern.

Now you change colors, which are ordered across a row as follows:
BC, MC, BC, CC, BC, MC, BC, CC, BC, MC, BC, CC, BC, MC, BC

Row 7: (In BC, K1, yo, K1), *(In MC, K11, K2tog, sl 1, K1, psso, K11), (In BC, K1, yo, K1, yo, K1), (In CC, K11, K2tog, sl 1, K1, psso, K11), (In BC, K1, yo, K1, yo, K1).* Repeat from * to * until last 28 sts, in MC, K11, K2tog, sl 1, K1, psso, K11, in BC, K1, yo, K1.

Row 8: P across

Repeat Rows 7 and 8, 9 more times for a total of 10 repeats (making 20 Rows total).

Rows 9-12: In BC, work Chevron Pattern.

TIP: When changing from working the BC only across to working the different colors across, be sure you are pulling from the same skein in that section below to keep the color changing consistent.

Repeat Rows 7-12, 9 more times (10 times total)

Work Rows 7-8 one more time.

Rows 13-18: In BC, work Chevron Pattern. Bind off.