Posted on

Pattern: Mesh Baby Blanket


Find a printer-friendly, PDF version of the Mesh Baby Blanket below!

A soft and squishy baby blanket

ABOUT

Skill Level:

Beginner

Pattern Notes:

This blanket is knit flat and in one piece. The yarn is held double through the entire blanket to achieve maximum squishiness

Stitches that appear between * and * should be worked until the end, unless otherwise indicated.

COMPONENTS

Materials:

2 skeins Loops and Threads Cozy Baby in Oahu

Size 11 (US) circular needles, 16 inch

Tapestry needle

Finished Measurements:

28 inches x 44 inches

STITCH ABBREVIATIONS

K – knit

P – purl

Sl – slip

YO – yarn over

CO – cast on

St(s) – stitch(es)

INSTRUCTIONS

Using long tail cast on method and with yarn held double, CO 113 sts

Rows 1-5: K across

Row 6: K5, Sl1, K1, *pass the third st on the left needle over the first and second sts on the left needle, K1, YO, K1* until the last 7 sts, K7.

Row 7: K5, P across until the last 5 sts, K5.

Row 8: K5, Sl1, K2, *pass the third st on the left needle over the first and second sts on the left needle, K1, YO, K1* until the last 6 sts, K6.

Row 9: Repeat Row 7.

Repeat Rows 6-9 until you reach approximately 1.5 inches before your desired length.

Rows 10-14: K across

Bind off loosely. Cut yarn and weave in ends with tapestry needle.

THANK YOU!

I hope you enjoyed making the Mesh Baby Blanket as much as I did! Tag me on Instagram @knitabitcrochetaway and use #knitabitcrochetaway and #MeshBabyBlanket – I’d love to see your progress and finished product!

Posted on

Pattern: Adelaide Bonnet

A vintage-inspired baby bonnet


Find a printer-friendly, PDF version of Adelaide Bonnet below!
 

ABOUT

Skill Level:

Intermediate

Pattern Notes:

This bonnet is made in one piece with the back edge sewn together at the end.

An I-cord drawstring is attached at the end to help the bonnet frame the face.

Stitches that appear between * and * should be worked until the end, unless otherwise indicated.

COMPONENTS

Materials:

60-65 yards of Yarn Bee Rustic Romantic in Blueberry Bushel

Size 8 double pointed needles

Tapestry needle

Your favorite faux fur pompom

Size:

0-3 months

Finished Measurements:

7 inches tall x 10 inches around (measuring from left cheek to right cheek)

 Gauge:

16 sts x 26 rows = 4 inches

STITCH ABBREVIATIONS

CO – cast on

K – knit

P – purl

Sl – slip

St(s) – stitch(es)

BO – bind off

Ssk – slip stitch from left needle to right needle knitwise. Slip a second stitch from the left needle to the right needle knitwise. Slip those two unworked stitches separately back to the left needle purlwise. Knit those two stitches together in the back of the stitches

INSTRUCTIONS

Bonnet:

Loosely CO 51 sts

Rows 1-30: Sl 1 purlwise, *P1, K1*

Using the Icelandic Bind Offmethod, BO using K across. This forms the bonnet edge that frames the face.

Fold the piece in half and sew the CO edge to the other CO edge together using a tapestry needle.

I-Cord:

CO 3

Work the I-cord for approximately 30 rows, or until it measures 7 inches.

Here is a link to a helpful video that demonstrates how to attach the I-cord edging. Work 2 sts of I-cord until only one stitch remains. Slip the last stitch knitwise. With your right needle and the right side of the bonnet facing you, pick up the right side edge of the first slipped stitch of the bonnet. Pick up the stitch by inserting your needle from top to bottom. Knit the last two sts together as if working a ssk.

Continue attaching the I-cord in this manner along the entire bottom edge of the bonnet. When you have finished attaching the I-cord along the entire bottom edge, work the I-cord for approximately 30 rows, or until it measures 7 inches.

Pompom:

Find the point of the bonnet at the back of the head and attach your favorite faux fur pompom.

THANK YOU!

I hope you enjoyed making the Adelaide Bonnet as much as I did! Tag me on Instagram @knitabitcrochetaway and use #knitabitcrochetaway and #AdelaideBonnet– I’d love to see your progress and finished product!

Posted on

Pattern: Animal Parade Baby Blanket

Finished Measurements
29 inches x 28 inches

Gauge:
4 inches = 22 sts and 30 rows

Materials
Size 6 circular needle
3 skeins Bernat Softee Baby Yarn in White
1 skein Bernat Softee Baby Yarn in Pink
1 skein Bernat Softee Baby Yarn in Grey
1 skein Bernat Softee Baby Yarn in Pale Blue
1 skein Bernat Softee Baby Yarn in Soft Lilac
1 skein Bernat Softee Baby Yarn in Little Mouse
1 skein Bernat Softee Baby Yarn in Lemon

Yarn Substitute: Brava Sport

This post contains affiliate links. If you do decide to purchase though the links in this post, a small portion of the sale may go to support this site, at no additional cost to you.

Instructions:
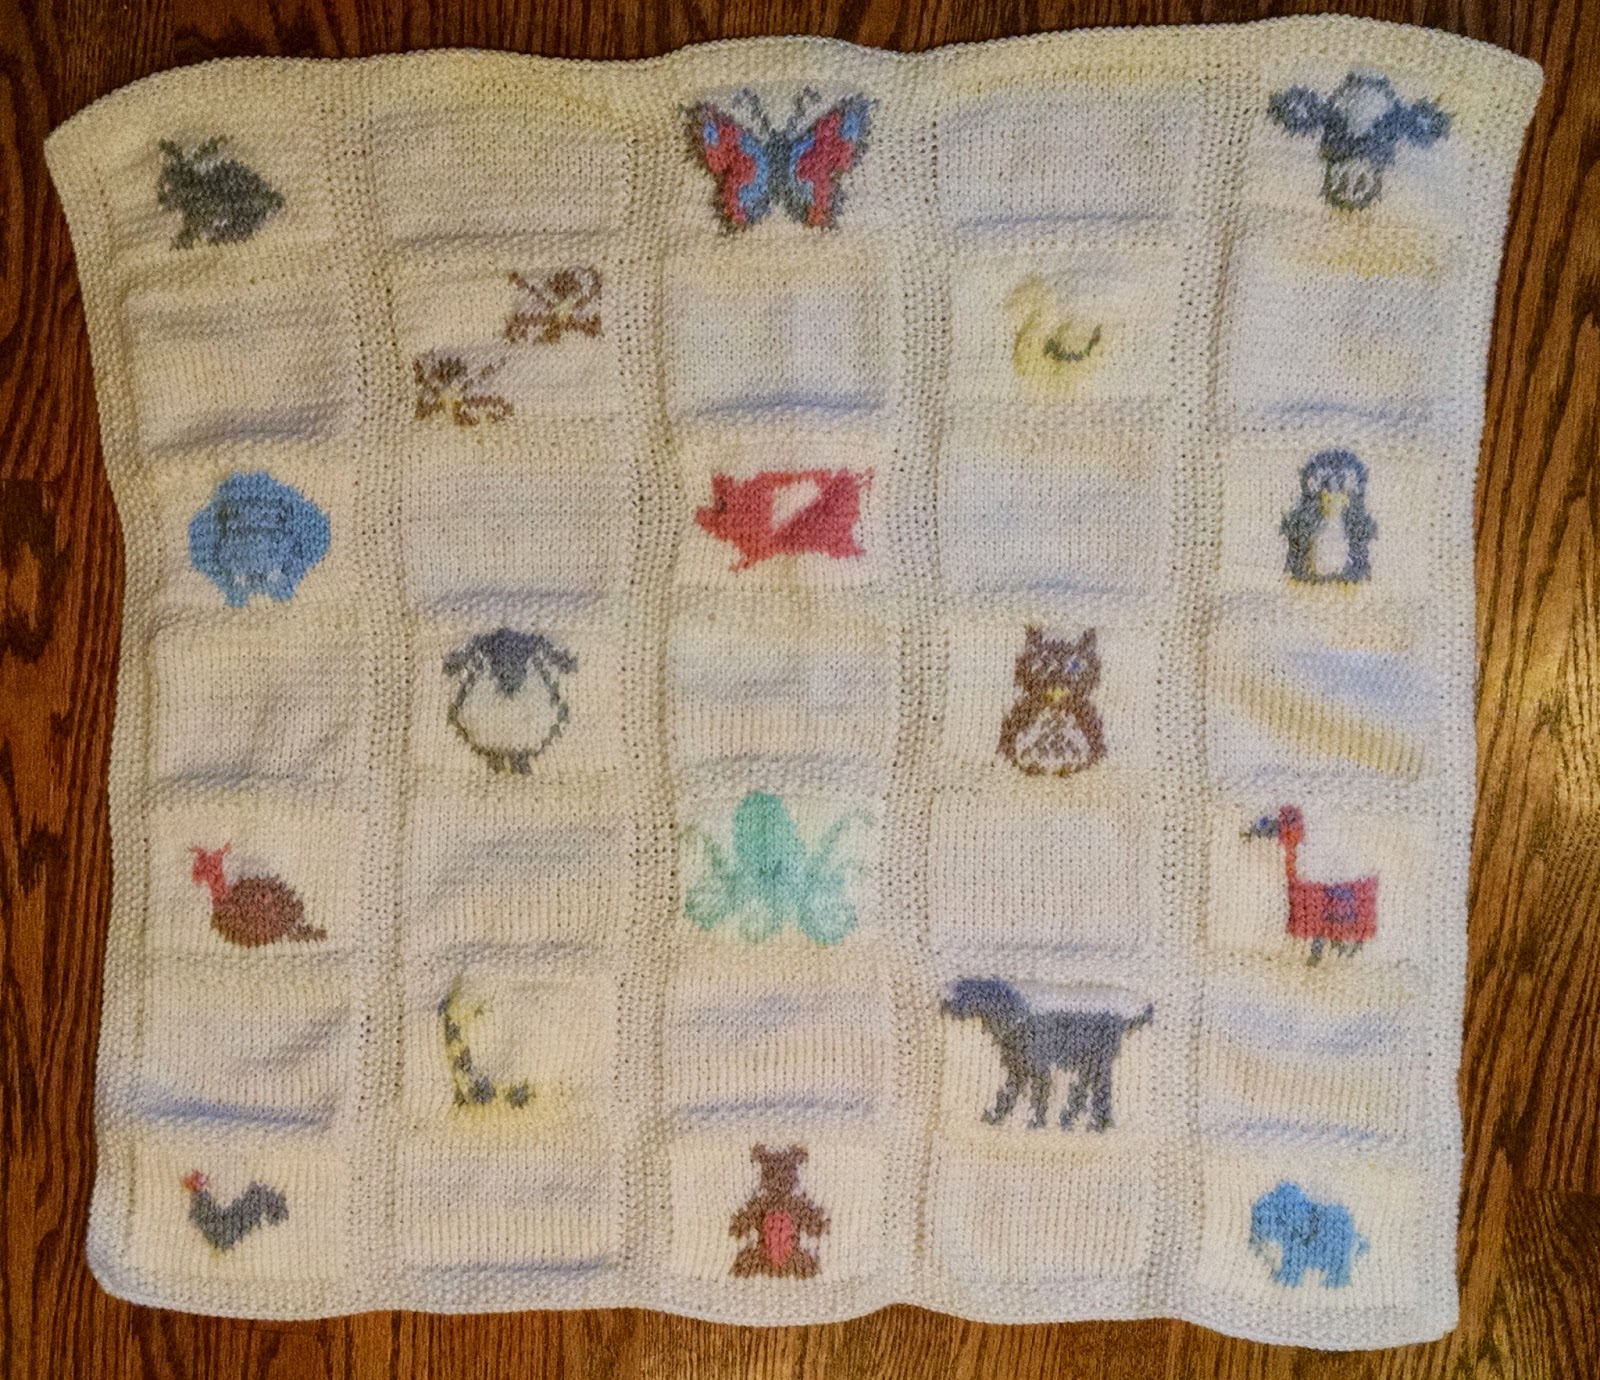
This blanket is made up of 5 square sections with 7 rows of squares. Each square is made up of 24 stitches and 24 rows. Surrounding each square is 6 rows in seed stitch and 6 stitches in seed stitch. The squares with the animals are worked in stockinette stitch. Below is a chart that gives a big picture of the blanket. Charts should be read from the bottom right corner, going from right to left, with the RS facing.

In White, CO 156
Rows 1, 3, 5: *K1, P1* to end
Rows 2, 4, 6: *P1, K1* to end

Odd Rows 7-29: *K1, P1* three times, K across next 24 sts in Elephant pattern, *K1, P1* three times, K across next 24 sts in White, *K1, P1* three times, K across next 24 sts in Bear pattern, *K1, P1* three times, K across next 24 sts in White, *K1, P1* three times, K across next 24 sts in Rooster pattern, *K1, P1* three times.

Even Rows 8-30: *P1, K1* three times, P across next 24 sts in Rooster pattern, *P1, K1* three times, P across next 24 sts in White, *P1, K1* three times, P across next 24 sts in Bear pattern, *P1, K1* three times, P across next 24 sts in White, *P1, K1* three times, P across next 24 sts in Elephant pattern, *P1, K1* three times.

Rows 31, 33, 35: *K1, P1* to end
Rows 32, 34, 36: *P1, K1* to end

Odd Rows 37-59: *K1, P1* three times, K across next 24 sts in White, *K1, P1* three times, K across next 24 sts in Dog pattern, *K1, P1* three times, K across next 24 sts in White, *K1, P1* three times, K across next 24 sts in Giraffe pattern, *K1, P1* three times, K across next 24 sts in White, *K1, P1* three times.

Even Rows 38-60: *P1, K1* three times, P across next 24 sts in White, *P1, k1* three times, P across next 24 sts in Giraffe pattern, *P1, K1* three times, P across next 24 sts in White, *P1, K1* three times, P across next 24 sts in Dog pattern, *P1, K1* three times, P across next 24 sts in White, *P1, K1* three times.

Rows 61, 63, 65: *K1, P1* to end
Rows 62, 64, 66: *P1, K1* to end

Continue in this manner until you have worked all animal patterns based on the large chart above. Be sure to end with 6 rows in seed stitch. Bind off.

Back:
To hide the ends, knit 24 sts in stockinette stitch for 24 rows and sew onto the back of each square with an animal.


Find me on Instagram and tag me in your photos! I’d love to see your work. @knitabitcrochetaway

Individual Animal Charts: