
Fits average women’s (men’s) foot
Materials:
1 skein Lion Brand Sock Ease in Taffy (MC)
1 skein Paton Kroy Sock Yarn in Flax (CC)
Size 1 double pointed needles
Scrap yarn
Yarn Substitute: Stroll
This post contains affiliate links. If you do decide to purchase though the links in this post, a small portion of the sale may go to support this site, at no additional cost to you.
Gauge:
32 sts x 32 rows = 4 inches
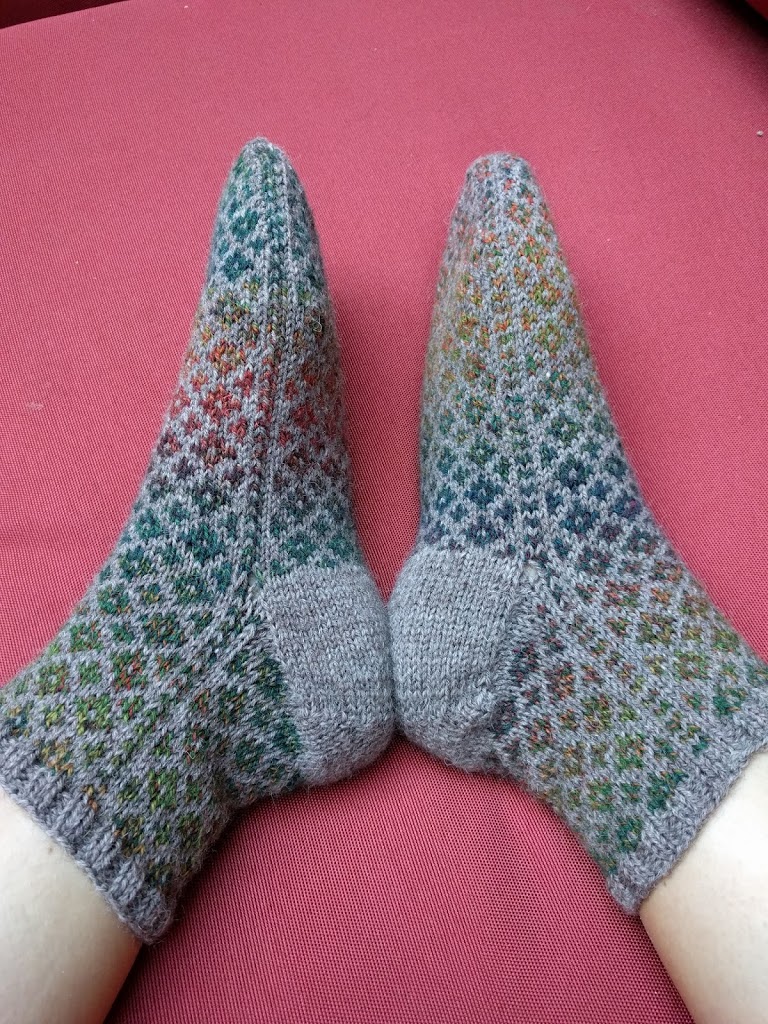
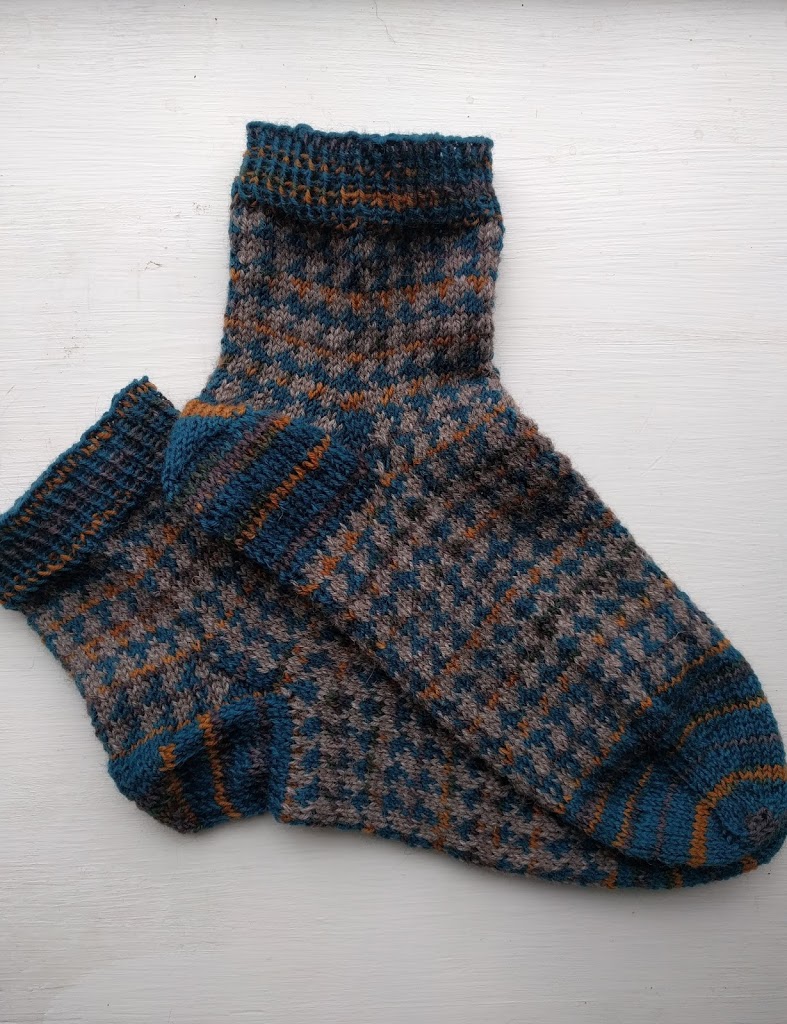
Flecked Pattern Chart:
White box = MC
Black box = CC

Toe Shaping
Using provisional cast on method and MC only, cast on 8 (8) stitches
Row 2: Purl across
Row 3: Knit across
Row 4: Purl across
Remove live stitches from scrap yarn and place them on a double pointed needle. You should have 16 sts on two needles. Begin knitting in the round.
Round 5: *K2, Inc, K2 (add a needle) K2, Inc, K2.* Repeat from * to *
Round 6: Needle 1 – K2, Inc, K across needle
Needle 2 – K across needle to last 3 sts, Inc, K2
Needle 3 – K2, Inc, K across needle
Needle 4 – K across needle to last 3 sts, Inc, K2
Repeat Round 6 until you have 32 (32) sts total, or 8 (8) sts per needle
Round 7: K across
Round 8: Needle 1 – K2, Inc, K across needle
Needle 2 – K across needle to last 3 sts, Inc, K2
Needle 3 – K2, Inc, K across needle
Needle 4 – K across needle to last 3 sts, Inc, K2
Repeat Rounds 7 and Round 8 until you have 64 (72) sts total, 16 (18) sts per needle
Foot
Using both MC and CC, work Flecked Pattern along the foot. Continue working until the foot measures the length of your foot until you reach the bend in your ankle at the top.
Heel Flap
Work Needles 1 and 2 using MC ONLY, leaving Needles 3 and 4 unworked. Needles 1 and 2 are worked flat.
Row 9: *Sl1, K1.* Repeat from * to * until end, turn
Row 10: Sl 1, P across, turn
Repeat Rows 9 and Row 10 for a total of 20 (24) rows total.
Heel Shaping
Row 11: Sl1, K16 (18), K2tog, K1, turn (leave remaining sts unworked)
Row 12: Sl1, P3 (3), P2tog, P1, turn (leave remaining sts unworked)
Row 13: Sl1, K until one st before the gap, K2tog, K1, turn
Row 14: Sl1, P until one st before the gap, P2tog, P1, turn
Repeat Rows 13 and Round 14 until you have 18 (20) sts left on Needles 1 and 2
Begin working in the round. You will change your needle numbering as you go as indicated below.
Round 15: Using MC, K9 (10) (Needle 3). Add a needle, K9 (10), pick up and K11 (13) sts along length of heel flap using the same needle (Needle 4). Work Flecked Pattern across the next two needles at the top of the foot (Needles 1 and 2). Using Needle 3 and MC only, pick up and K11 (13) sts along length of heel flap, K9 (10) remaining sts on Needle 3. Using MC only, K across Needle 4. Mark new beginning of the round.
Gusset Shaping (decrease)
(Large Only)
Round 16: Work in Flecked Pattern across Needles 1 and 2. Using MC only (K1, SSK, K2). Work remaining 18 sts in Flecked Pattern. Work first 18 sts on Needle 4 in Flecked Pattern, using MC only (K2, K2tog, K1).
Round 17: Work in Flecked Pattern across Needles 1 and 2. Using MC only (K4). Work remaining 18 sts in Flecked Pattern. Work first 18 sts on Needle 4 in Flecked Pattern, using MC only (K4).
Round 18: Work in Flecked Pattern across Needles 1 and 2. Using MC only (K1, SSK, K1). Work remaining 18 sts in Flecked Pattern Work first 18 sts on Needle 4 in Flecked Pattern, using MC only (K1, K2tog, K1).
Round 19: Work in Flecked Pattern across Needles 1 and 2. Using MC only (K3). Work remaining 18 sts in Flecked Pattern. Work first 18 sts on Needle 4 in Flecked Pattern, using MC only (K3).
Round 20: Work in Flecked Pattern across Needles 1 and 2. Using MC only (K1, SSK). Work remaining 18 sts in Flecked Pattern. Work first 18 sts on Needle 4 in Flecked Pattern, using MC only (K2tog, K1).
Round 21: Work in Flecked Pattern across Needles 1 and 2. Using MC only (K2). Work remaining 18 sts in Flecked Pattern. Work first 18 sts on Needle 4 in Flecked Pattern, using MC only (K2).
Round 22: Work in Flecked Pattern across Needles 1 and 2. Using MC only (K1). Work remaining 18 sts in Flecked Pattern beginning with a SSK. Work first 18 sts on Needle 4 in Flecked Pattern ending with a K2tog using MC only (K1).
Round 23: Work in Flecked Pattern across Needles 1 and 2. Using MC only (K1). Work remaining 18 sts in Flecked Pattern. Work first 18 sts on Needle 4 in Flecked Pattern, using MC only (K1).
Round 24: Work in Flecked Pattern across Needles 1 and 2. Work 18 sts in Flecked Pattern beginning with K1, SSK. Work 18 sts on Needle 4 in Flecked Pattern, ending with K2tog, K1.
(Small Only)
Round 16: Work in Flecked Pattern across Needles 1 and 2. Using MC only (K1, SSK, K1). Work remaining 16 sts in Flecked Pattern Work first 16 sts on Needle 4 in Flecked Pattern, using MC only (K1, K2tog, K1).
Round 17: Work in Flecked Pattern across Needles 1 and 2. Using MC only (K3). Work remaining 16 sts in Flecked Pattern. Work first 16 sts on Needle 4 in Flecked Pattern, using MC only (K3).
Round 18: Work in Flecked Pattern across Needles 1 and 2. Using MC only (K1, SSK). Work remaining 16 sts in Flecked Pattern. Work first 16 sts on Needle 4 in Flecked Pattern, using MC only (K2tog, K1).
Round 19: Work in Flecked Pattern across Needles 1 and 2. Using MC only (K2). Work remaining 16 sts in Flecked Pattern. Work first 16 sts on Needle 4 in Flecked Pattern, using MC only (K2).
Round 20: Work in Flecked Pattern across Needles 1 and 2. Using MC only (K1). Work remaining 16 sts in Flecked Pattern beginning with a SSK. Work first 16 sts on Needle 4 in Flecked Pattern ending with a K2tog using MC only (K1).
Round 21: Work in Flecked Pattern across Needles 1 and 2. Using MC only (K1). Work remaining 16 sts in Flecked Pattern. Work first 16 sts on Needle 4 in Flecked Pattern, using MC only (K1).
Round 22: Work in Flecked Pattern across Needles 1 and 2. Work 16 sts in Flecked Pattern beginning with K1, SSK. Work 16 sts on Needle 4 in Flecked Pattern, ending with K2tog, K1.
Ankle
Continue working in Flecked Pattern until you reach 1 inch less than the desired length up ankle, or approximately 3 inches.
Ribbing
Using MC only, work (K1, P1) ribbing for 10 rows. Bind off using the Icelandic Bind-Off for a stretchy finish. Video tutorial available here.